Mazda CX-5 Service & Repair Manual: Instrument Cluster Disassembly/Assembly
CAUTION:
-
If the instrument cluster is hit forcefully during disassembly such as by being dropped, it could get damaged and the system may not operate normally. When disassembling the instrument cluster, perform the procedure on a workbench on clean clothes being careful not to drop it.
1. Move a tape-wrapped flathead screwdriver in the direction of the arrow shown in the figure, lift up the cover while pressing the cover tab, and disengage the cover tab from the instrument cluster.
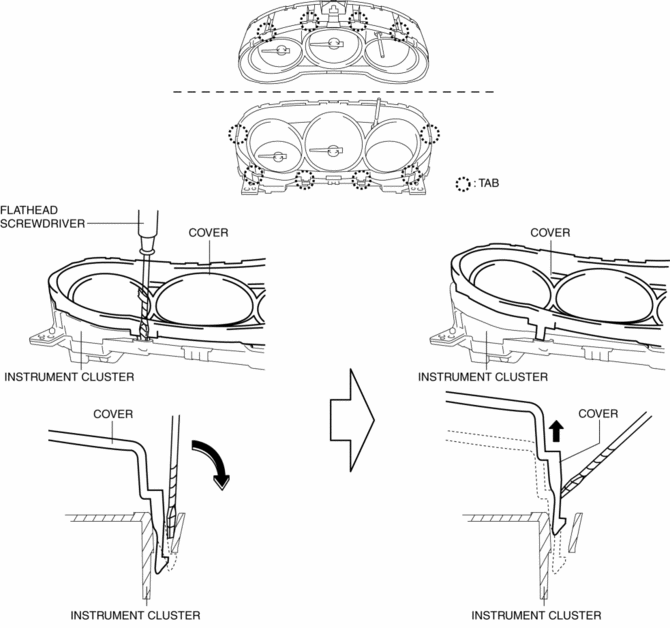
2. Disengage all the cover tabs from the instrument cluster and remove the cover.
3. Assemble in the reverse order of disassembly.
 Instrument Cluster Configuration (Using Read/Write Function)
NOTE:
When performing configuration, it is necessary to read the vehicle specification
information from the instrument cluster before replacing it. Connect the M-MDS
to the vehicle and p ...
 Instrument Cluster Inspection
Speedometer inspection
Using a speedometer tester
1. Adjust the tire pressure to the specification.
2. Using a speedometer tester, verify that the tester reading is as indicated
in the following ...
Other materials:
Cruise Control Switch Inspection
1. Disconnect the negative battery cable and wait for 1 min or more..
2. Remove the driver?side air bag module..
3. Disconnect the clock spring connector (part wiring harness-side).
4. Measure the resistance between clock spring terminals E and A (part wiring
harness-side) using a tester.
...
Scheduled Maintenance (Mexico)
Follow Schedule 1 if the vehicle is operated mainly where none of the following
conditions apply.
• Repeated short-distance driving
• Driving in dusty conditions
• Driving with extended use of brakes
• Driving in areas where salt or other corrosive
materials are used
• Driving on ...
Washer Nozzle
Purpose
The washer nozzle sprays the washer fluid sent from the washer motor to the
optimum positions on the windshield.
Construction
A ball-shaped spray orifice is set inside the washer nozzle which can be
adjusted up or down.
The washer nozzle is moved u ...
