Mazda CX-5 Service & Repair Manual: Hydraulic Variable Valve Timing Actuator Inspection
WARNING:
-
A hot engine can cause severe burns. Turn off the engine and wait until it is cool before servicing.
CAUTION:
-
Do not disassemble the hydraulic variable valve timing actuator because it is a precision unit.
1. Disconnect the negative battery cable..
2. Remove the plug hole plate..
3. Remove the ignition coil/ion sensors..
4. Remove the cylinder head cover..
5. Verify that the notch of the rotor and projection of the cover on the hydraulic variable valve timing actuator are aligned and fitted.
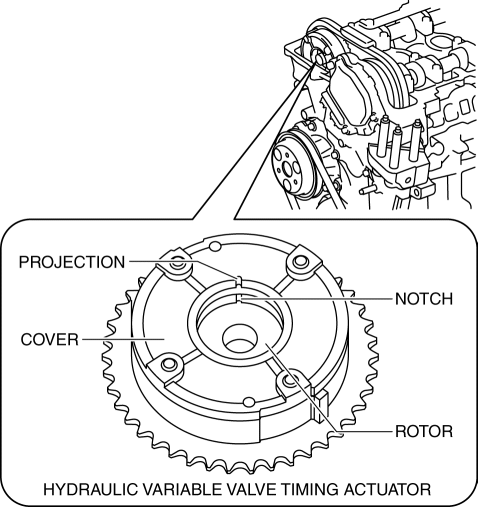
-
If the notch of the rotor and projection of the cover are not aligned, rotate the crankshaft in the direction the engine rotates two turns and verify that they are aligned.
-
If the notch of the rotor and projection of the cover are still not aligned, replace the hydraulic variable valve timing actuator..
-
If, when turning the crankshaft, there is a slapping noise from the hydraulic variable valve timing actuator each time before the cam reaches its maximum lift, it means that the actuator is not secured. Replace the hydraulic variable valve timing actuator..
6. Install in the reverse order of removal.
 Fresh Air Duct
Purpose, Function
Conducts fresh air from outside the engine compartment.
Increases air density by taking fresh air, which is cooler than the engine
compartment, to enhance the charg ...
 Hydraulic Variable Valve Timing Actuator
Purpose, Function
The hydraulic variable valve timing actuator operates according to the hydraulic
pressure and changes the phases of the exhaust camshaft. As a result, the open/close
per ...
Other materials:
Rear Drive Shaft Removal/Installation
CAUTION:
Performing the following procedures without first removing the ABS wheel?speed
sensor may possibly cause an open circuit in the harness if it is pulled by
mistake. Before performing the following procedures, remove the ABS wheel?speed
sensor (wheel side) and fix it to an ...
Taillight Bulb Removal/Installation
1. Disconnect the negative battery cable..
2. Insert a tape-wrapped flathead screwdriver into the service hole in the position
shown in the figure.
3. Move the flathead screwdriver in the direction of the arrow (1) shown in the
figure, pull out the service hole cover from the liftgate, a ...
Headliner
Purpose/Function
The headliner is equipped with a shock absorbing pad for driver's head protection
during a collision.
Construction
The front and rear side of the headliner is equipped with a shock absorbing
pad with a plastic rib-pad structure.
...
