
Mazda CX-5 Service & Repair Manual: How To Use This Manual
Range of Topics
-
This manual contains procedures for performing all required service operations. The procedures are divided into the following five basic operations:
-
Removal/Installation
-
Disassembly/Assembly
-
Replacement
-
Inspection
-
Adjustment
-
Simple operations which can be performed easily just by looking at the vehicle (i.e., removal/installation of parts, jacking, vehicle lifting, cleaning of parts, and visual inspection) have been omitted.
Advisory Messages
-
You will find several Warnings,
Cautions,
Notes,
Specifications
and Upper and Lower Limits
in this manual.
-
A Warning indicates a situation in which serious injury or death could result if the warning is ignored.
-
A Caution indicates a situation in which damage to the vehicle or parts could result if the caution is ignored.
-
A Note provides added information that will help you to complete a particular procedure.
-
The values indicate the allowable range when performing inspections or adjustments.
-
The values indicate the upper and lower limits that must not be exceeded when performing inspections or adjustments.
-
Warning
-
Caution
-
Note
-
Specification
-
Upper and lower limits
Symbols
-
There are nine symbols indicating oil, grease, fluids, sealant, and the use of SST
or equivalent. These symbols show application points or use of these materials during service.
|
Symbol |
Meaning |
Kind |
|
|
Apply oil |
New appropriate engine oil or gear oil |
|
|
Apply brake fluid |
New appropriate brake fluid |
|
|
Apply automatic transmission/transaxle fluid |
New appropriate automatic transmission/transaxle fluid |
|
|
Apply continuously variable transaxle fluid |
New appropriate continuously variable transaxle fluid |
|
|
Apply grease |
Appropriate grease |
|
|
Apply sealant |
Appropriate sealant |
|
|
Apply petroleum jelly |
Appropriate petroleum jelly |
|
|
Replace part |
O?ring, gasket, etc. |
|
|
Use SST or equivalent |
Appropriate tools |


Service Procedure
Inspection, adjustment
-
Inspection and adjustment procedures are divided into steps. Important points regarding the location and contents of the procedures are explained in detail and shown in the illustrations.
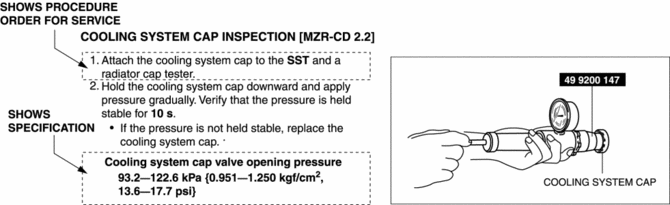
Repair procedure
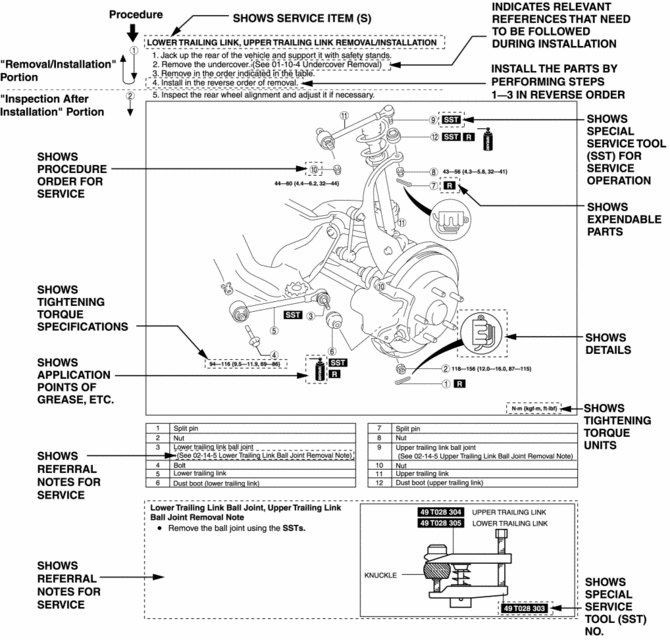
1. Most repair operations begin with an overview illustration. It identifies the components, shows how the parts fit together, and describes visual part inspection. However, only removal/installation procedures that need to be performed methodically have written instructions.
2. Expendable parts, tightening torques, and symbols for oil, grease, and sealant are shown in the overview illustration. In addition, symbols indicating parts requiring the use of special service tools or equivalent are also shown.
3. Procedure steps are numbered and the part that is the main point of that procedure is shown in the illustration with the corresponding number. Occasionally, there are important points or additional information concerning a procedure. Refer to this information when servicing the related part.
Troubleshooting Procedure
Basic flow of troubleshooting
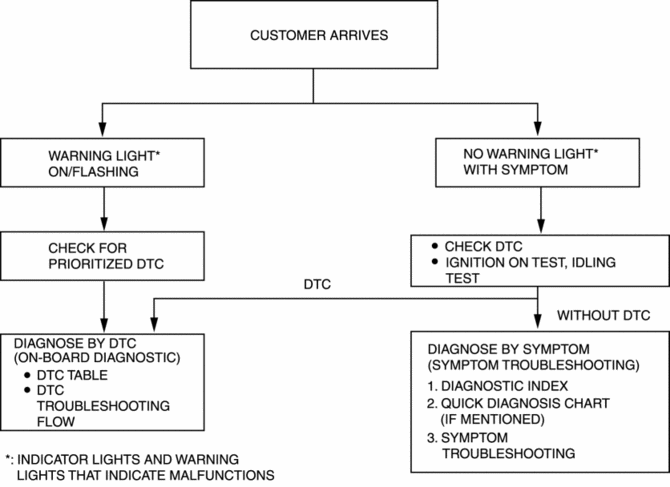
DTC troubleshooting flow (on?board diagnostic)
-
Diagnostic trouble codes (DTCs) are important hints for repairing malfunctions that are difficult to simulate. Perform the specific DTC diagnostic inspection to quickly and accurately diagnose the malfunction.
-
The on?board diagnostic function is used during inspection. When a DTC is shown specifying the cause of a malfunction, continue the diagnostic inspection according to the items indicated by the on?board diagnostic function.
Diagnostic index
-
The diagnostic index lists the symptoms of specific malfunctions. Select the symptoms related or most closely relating to the malfunction.
Quick diagnosis chart (If mentioned)
-
The quick diagnosis chart lists diagnosis and inspection procedures to be performed specifically relating to the cause of the malfunction.
Symptom troubleshooting
-
Symptom troubleshooting quickly determines the location of the malfunction according to symptom type.
Procedures for Use
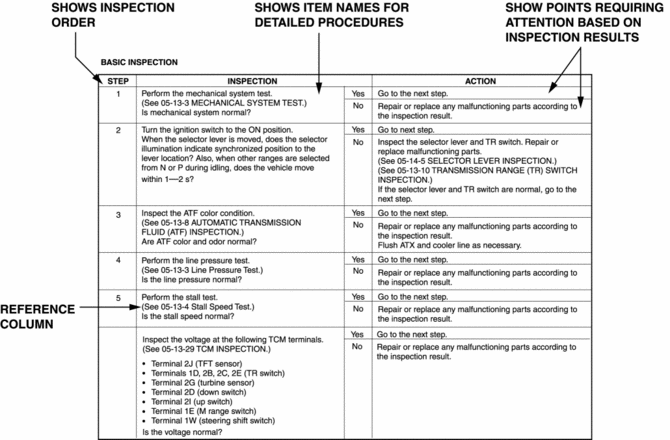
Using the basic inspection (section 05)
-
Perform the basic inspection procedure before symptom troubleshooting.
-
Perform each step in the order shown.
-
The reference column lists the location of the detailed procedure for each basic inspection.
-
Although inspections and adjustments are performed according to the reference column procedures, if the cause of the malfunction is discovered during basic inspection, continue the procedures as indicated in the action column.
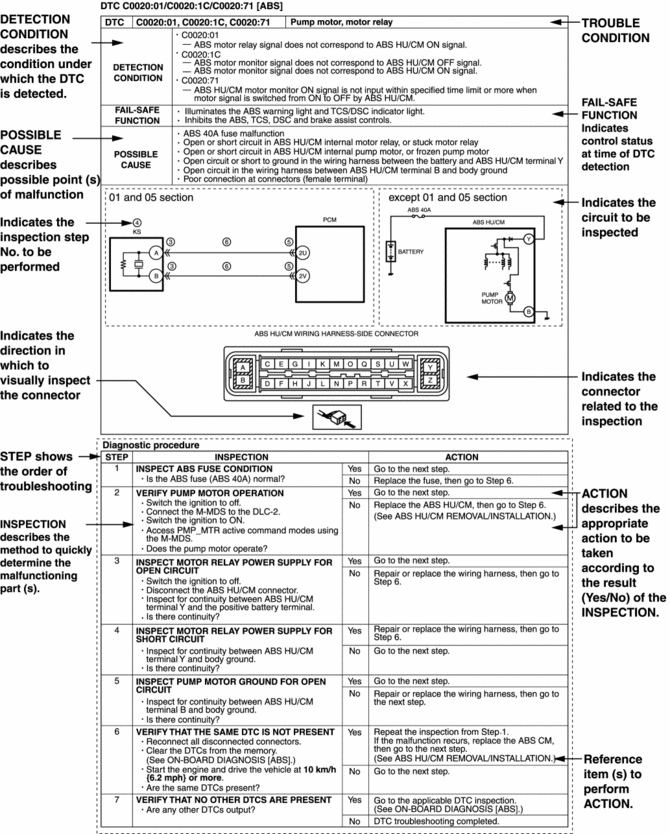
Using the DTC troubleshooting flow
-
DTC troubleshooting flow shows diagnostic procedures, inspection methods, and proper action to take for each DTC.
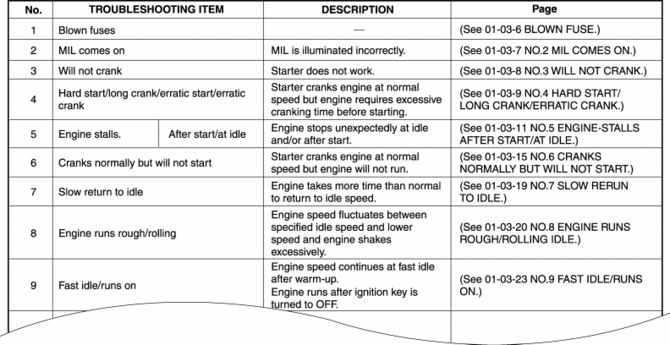
Using the diagnostic index
-
Malfunction symptoms are listed in the diagnostic index under symptom troubleshooting.
-
The exact malfunction symptoms can be selected by following the index.
-
Correctly verify the malfunction symptom according to “DESCRIPTION”.
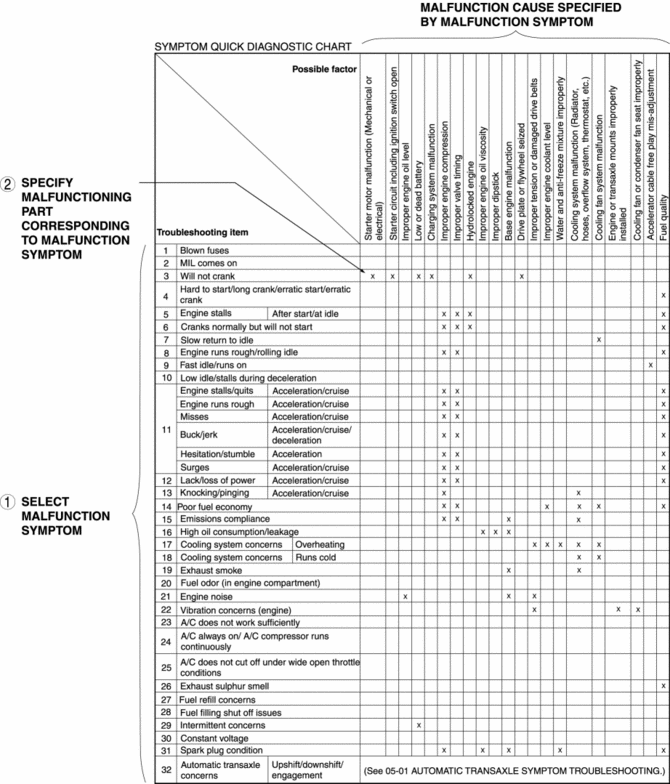
Using the quick diagnosis chart
-
The related malfunction cause can be understood.
-
The relation between the malfunction symptom and cause is indicated.
-
The relation between the malfunction symptom and cause can be detected quickly, and if multiple malfunction symptoms occur, the area which is the common cause among the multiple malfunctions can be specified.
-
The effective inspection procedure for the malfunction cause specified from the malfunction symptoms can be selected using the inspection procedure chart.
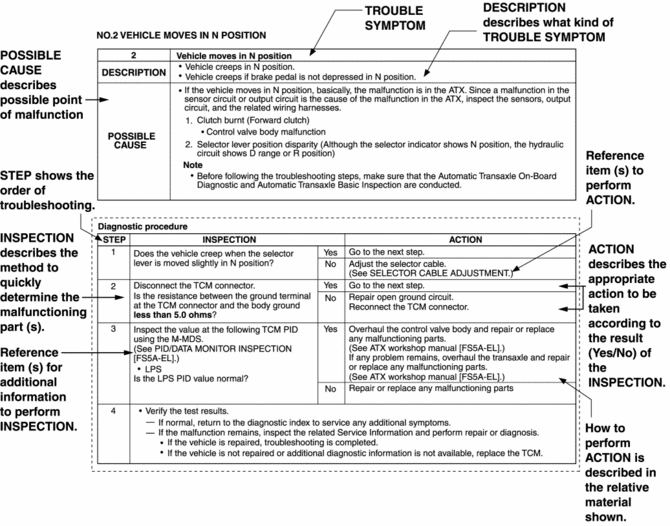
Using the symptom troubleshooting
-
Determine the malfunctioning part quickly and accurately based on each malfunction symptom.
-
After repair, verify that the malfunction symptom is eliminated.
-
There are the troubleshooting procedures and actions for each malfunctioning part.
-
Structured as procedures for verifying malfunction symptom quickly and accurately.
 Vehicle General
...
 Abbreviations
AAS
Active Adaptive Shift
ABS
Antilock Brake System
ABDC
After Bottom Dead Center
ACC
Access ...
Other materials:
Battery Inspection [Skyactiv G 2.0]
WARNING:
Since battery acid is toxic, be careful when handling the battery.
Since battery acid is highly corrosive, be careful not to allow it to contact
clothing or the vehicle.
In case battery acid contacts skin, eyes, or clothing, flush it immediately
with running wa ...
Keyless Antenna [Keyless Entry System]
Purpose
Outputs a request signal and specifies the remote transmitter location.
Function
The keyless antennas output request signals based on the signals from the
start stop unit.
Construction, Operation
Request signals are output by the keyless antenna installed ...
Front Door Key Cylinder Switch Inspection
1. Perform the front door glass preparation..
2. Disconnect the negative battery cable..
3. Remove the following parts:
a. Inner garnish.
b. Front door trim.
c. Front door key cylinder.
d. Front door glass.
e. Front door module panel.
f. Front door latch and lock actuator.
Front Do ...
