Mazda CX-5 Service & Repair Manual: Hood Removal/Installation
WARNING:
-
Removing the hood without supporting it could cause the hood to fall and cause serious injury. Always perform the procedure with at least another person to prevent the hood from falling.
1. Disconnect the negative battery cable..
2. Remove the following parts:
a. Front over fender.
b. Front bumper.
c. Front combination light.
d. Front fender panel.
3. Loosen bolts A.
4. Remove bolts B.
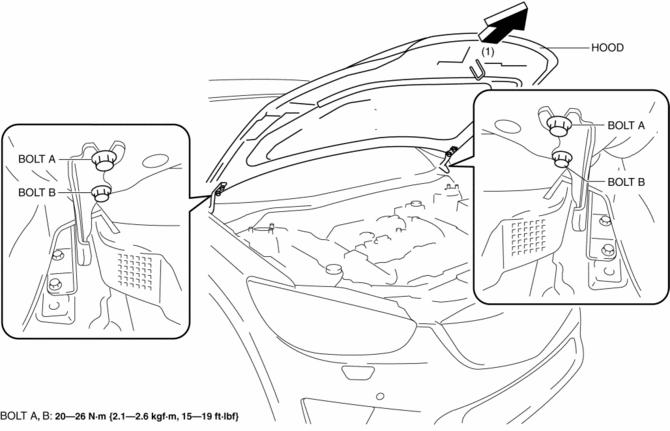
5. Remove the hood in the direction of the arrow(1) shown in the figure.
6. Remove bolts C.
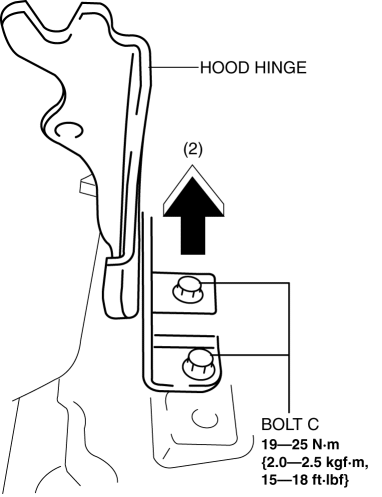
7. Remove the hood hinge in the direction of the arrow (2) shown in the figure.
8. Install in the reverse order of removal.
9. Perform the hood adjustment..
 Hood Release Cable Removal/Installation
1. Disconnect the negative battery cable..
2. Remove the following parts:
a. Front bumper.
b. Front combination light (LH).
c. Front mudguard (LH).
d. Hood release lever.
3. Disconnect the ...
 Liftgate Adjustment
1. Measure the gap and height difference between the liftgate and the body.
2. Loosen the liftgate hinge installation bolts and adjust the liftgate.
Standard clearance
a: 5.2?7.2 mm { ...
Other materials:
Seat Warmer System
Purpose
The seat warmer system warms the front seat cushion and front seat back using
the seat warmer unit.
Function
The seat warmer unit warms the seat cushion and seat back by supplying power
to the built-in filaments.
The seat warmer unit can adjust the tempe ...
Sirius Satellite Radio Unit Removal/Installation
CAUTION:
The audio unit communicates with the SIRIUS satellite radio unit and records
the presence/non-presence of the SIRIUS satellite radio unit when the ignition
is switched to ACC or ON (engine off or on) after connecting the negative battery
cable.
If the commander ...
Cylinder Head Gasket
Purpose, Function
The cylinder head gasket is installed between the cylinder head and cylinder
block to prevent leakage of air-fuel mixture, combustion gas, engine oil, and
engine coolant.
Construction
A four-layer type metal gasket has been adopted for the cylinder head ga ...
