Mazda CX-5 Service & Repair Manual: Hood Release Cable Removal/Installation
1. Disconnect the negative battery cable..
2. Remove the following parts:
a. Front bumper.
b. Front combination light (LH).
c. Front mudguard (LH).
d. Hood release lever.
3. Disconnect the hood release cable from the hood latch.
4. While pressing the tabs of the clip in the direction of arrow (1) shown in the figure, pull the clip in the direction of arrow (2) to detach it from the body.
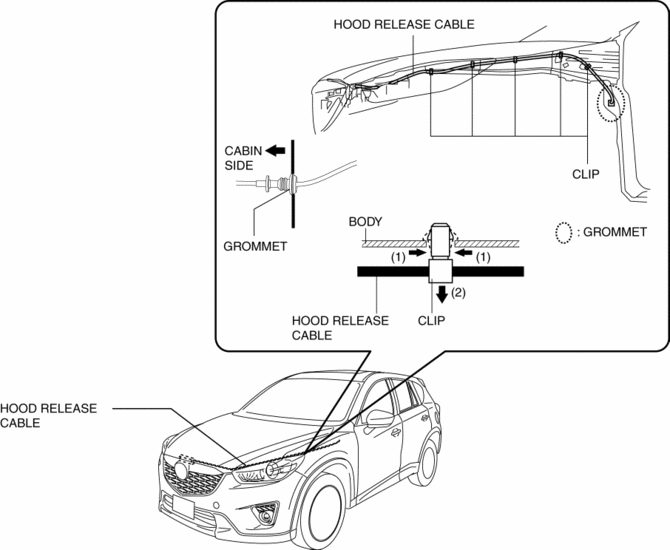
5. Remove the clip from the body.
6. Press the grommet into the cabin side.
7. Remove the hood release cable from the cabin side.
8. Install in the reverse order of removal.
 Hood Latch Switch Inspection
1. Disconnect the negative battery cable..
2. Remove the front bumper..
3. Disconnect the hood latch switch connector..
4. Verify that the continuity is as indicated in the table.
NOTE:
...
 Hood Removal/Installation
WARNING:
Removing the hood without supporting it could cause the hood to fall and
cause serious injury. Always perform the procedure with at least another person
to prevent the hood from ...
Other materials:
Refrigerant Pressure Sensor [Full Auto Air Conditioner]
Purpose
The refrigerant pressure sensor detects the refrigerant pressure in the refrigerant
cycle.
Function
The refrigerant pressure sensor converts the detected refrigerant pressure
to an electric signal and sends it to the PCM.
Construction
The refriger ...
Sas Control Module Configuration (Using Read/Write Function) [Standard Deployment
Control System]
NOTE:
When performing configuration, it is necessary to read the vehicle specification
information from the SAS control module before replacing it. Connect the M-MDS
to the vehicle and perform vehicle identification before removing the SAS control
module. The vehicle specification i ...
Front Outer Handle Removal/Installation
1. Perform the front door glass preparation..
2. Disconnect the negative battery cable..
3. Remove the following parts:
a. Inner garnish.
b. Front door trim.
c. Front door glass.
d. Front door module panel.
e. Front door key cylinder.
4. Disconnect the keyless antenna connector (With ...
