Mazda CX-5 Service & Repair Manual: Headliner Removal/Installation
1. Disconnect the negative battery cable..
2. Remove the following parts:
a. Sunroof seaming welt (with sunroof system).
b. A-pillar trim.
c. Front map light.
d. Sunvisor.
e. Front scuff plate.
f. Rear scuff plate.
g. B-pillar lower trim.
h. Adjust anchor cover.
i. Upper anchor installation bolt on the seat belt.
j. B-pillar upper trim.
k. Assist handle.
l. Trunk board.
m. Trunk end trim.
n. Trunk side trim.
o. D-pillar trim.
p. C-pillar trim.
3. Disconnect the roof wiring harness connector and remove the roof wiring harness connector clip from the body.
4. Disconnect the rear washer hose C. (with rear washer system).
5. Temporarily install the seaming welt shown in the figure to the headliner.
CAUTION:
-
If fasteners are removed without temporarily installing the seaming welt, the headliner may fall off and the part may be damaged. Before removing fasteners, temporarily install the seaming welt to prevent the headliner from falling off.
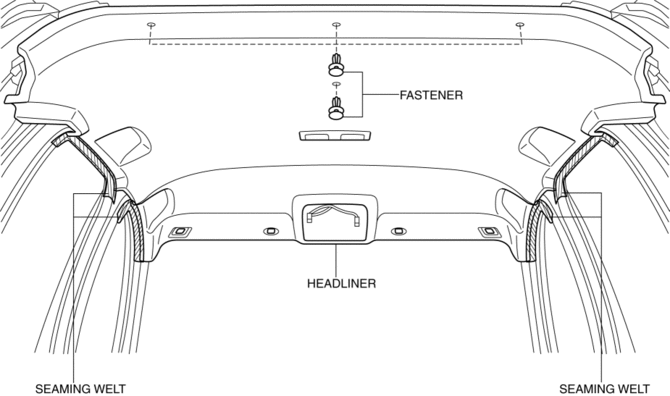
6. Remove fasteners.
7. Partially peel back the seaming welt. Take the headliner out from the opened liftgate.
8. Install in the reverse order of removal.
 Headliner
Purpose/Function
The headliner is equipped with a shock absorbing pad for driver's head protection
during a collision.
Construction
The front and rear side of the headliner ...
 Inner Garnish Removal/Installation
1. Take the shaded area shown in the figure, and pull the inner garnish in the
direction of the arrow (1) while detaching clips A.
2. Take the shaded area shown in the figure, and remove the i ...
Other materials:
Engine Coolant Replacement
WARNING:
Never remove the cooling system cap or loosen the radiator drain plug while
the engine is running, or when the engine and radiator are hot. Scalding engine
coolant and steam may shoot out and cause serious injury. It may also damage
the engine and cooling system.
Tu ...
Shift Solenoid No.1 [Fw6 A EL, Fw6 Ax EL]
Purpose/Function
Shift solenoid No.1 adjusts the hydraulic pressure in the low clutch circuit
based on the current demand from the TCM according to the vehicle conditions.
Construction
Shift solenoid No.1 is installed to the solenoid control valve body.
Shift solenoid ...
Tire Pressure Warning Alarm
Purpose
The tire pressure warning alarm warns the user that a tire pressure has decreased
or notifies the user that the tire pressure warning alarm has been reset.
Function
If the instrument cluster receives a tire pressure warning alarm request
signal sent from the D ...
