Mazda CX-5 Service & Repair Manual: Glove Compartment Removal/Installation
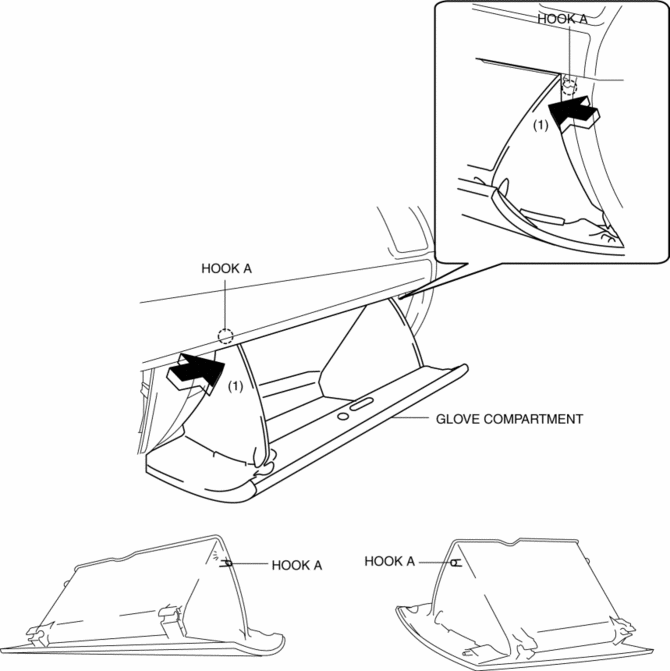
1. Push the glove compartment in the direction of the arrow (1) and remove hooks A.
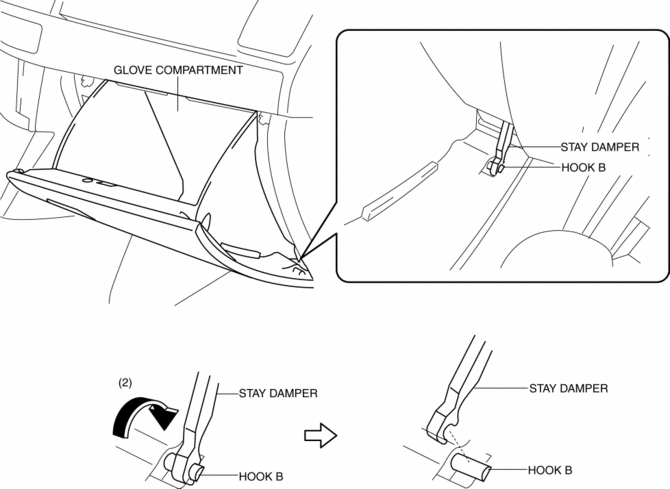
2. Pull the stay damper in the direction of the arrow (2) shown in the figure and remove the hook B.
CAUTION:
-
If the glove compartment is closed without being joined to the stay damper, the stay damper may be damaged. Verify that the stay damper is joined to the glove compartment before closing the glove compartment.
3. Pull down the glove compartment in the direction of the arrow (3).
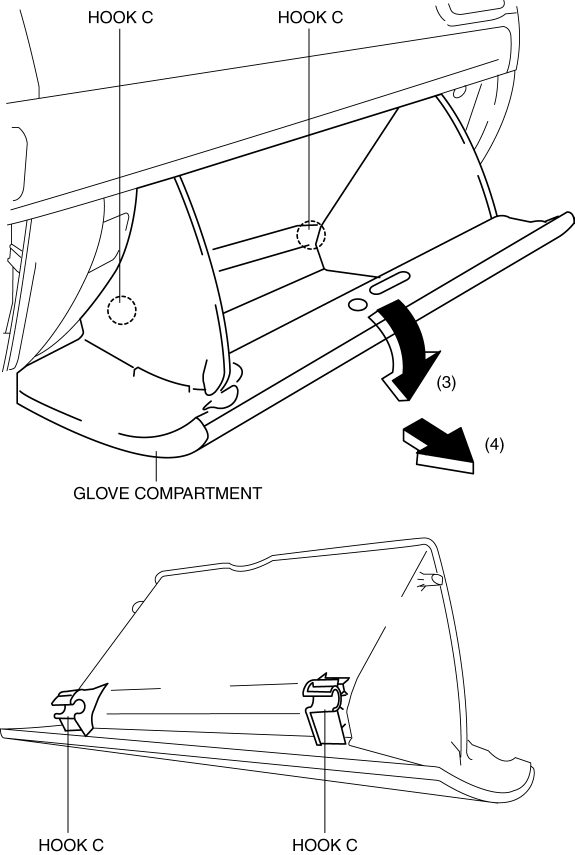
4. Pull the glove compartment in the direction of the arrow (4) and remove it while detaching hooks C.
5. Install in the reverse order of removal.
 Front Console Removal/Installation
CAUTION:
Affix protective tape to the position shown in the figure.
1. Disconnect the negative battery cable..
2. Remove the following parts:
a. Decoration panel.
b. Shift l ...
 Knee Bolster Removal/Installation
1. Disconnect the negative battery cable..
2. Remove the following parts:
a. Driver-side front scuff plate.
b. Driver-side front side trim.
c. Switch panel.
d. Decoration panel.
e. Shift l ...
Other materials:
Passenger Side Air Bag Module Removal/Installation [Standard Deployment Control
System]
WARNING:
Handling the air bag module improperly can accidentally deploy the air bag
module, which may seriously injure you. Read the air bag system service warnings
and cautions before handling the air bag module..
NOTE:
When replacing the passenger-side air bag module af ...
Rear Seat Center Armrest Removal/Installation
1. Operate the push knob (RH) and lower the rear seat back (RH).
2. Remove screw A.
3. Remove the rear seat center armrest hinge cover (RH) in the direction of the
arrow (1) shown in the figure while setting hook A aside.
4. Remove bolt B.
5. Remove the rear seat center armrest in ...
Blind Spot Monitoring (Bsm) Warning Alarm
Purpose
The Blind Spot Monitoring (BSM) warning alarm warns the driver of a possible
accident.
Function
If the instrument cluster receives a warning sound request signal from the
BSM control module (RH), it sounds the BSM warning alarm using the buzzer in
the instrument ...
