Mazda CX-5 Service & Repair Manual: General Procedures (Suspension)
Wheel and Tire Installation
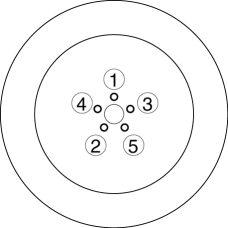
1. When installing the wheels and tires, tighten the wheel nuts in a criss-cross pattern to the following tightening torque.

-
Tightening torque
-
108—147 N·m {12—14 kgf·m, 80—108 ft·lbf}
Suspension Links Removal/Installation
1. For the joint sections with rubber bushings, raise the vehicle using a lift, and then temporarily tighten the installation bolts and nuts. Lower the vehicle to the ground and tighten them to the specified tightening torque.
Connector Disconnection
1. Disconnect the negative battery cable before performing any work that requires handling of connectors..
Headlight Auto Leveling System Initialization (Vehicle with discharge headlight system)
1. Initialize the auto leveling sensor, when performing the following services..
-
Removing the auto leveling sensor
-
Disconnecting the auto leveling sensor link
-
Removing the suspension parts related the vehicle height
 General
...
 Rear Trailing Link Removal/Installation
1. Remove the floor under cover..
2. Disconnect the rear parking cable..
3. Remove in the order indicated in the table.
4. Install in the reverse order of removal.
5. Inspect the wheel a ...
Other materials:
Power Steering Malfunction Indicator Light
Purpose
The power steering malfunction indicator light warns the driver that there
is a malfunction with the electric power steering (EPS) system.
Function
If there is a malfunction in the EPS system, the power steering malfunction
indicator light illuminates.
If th ...
High Pressure Fuel Pump Inspection
NOTE:
The following vacuum values are indicated by relative pressure from the fuel
pressure sensor.
1. Verify that the fuel pressure sensor is normal..
2. Connect the M-MDS to the DLC-2.
3. Switch the ignition ON (engine off).
4. Select the “FUEL_PRES”, “LOAD” and “R ...
Rear Body Control Module (Rbcm) Inspection
1. Disconnect the negative battery cable..
2. Remove the following parts:
a. Trunk board.
b. Trunk end trim.
c. Rear scuff plate (LH).
d. Trunk side trim (LH).
3. Remove the rear body control module (RBCM) from the body with the connector
connected..
4. Connect the negative battery c ...
