
Mazda CX-5 Service & Repair Manual: Fuel Gauge Sender Unit Inspection [Awd]
Fuel gauge sender unit (main)
NOTE:
-
For the fuel gauge sender unit removal/installation, refer to the fuel pump removal/installation because the fuel gauge sender unit is integrated with the fuel pump..
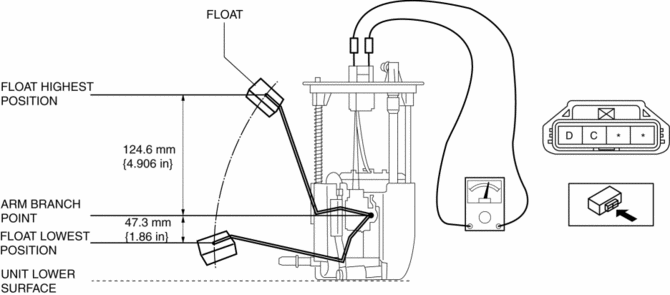
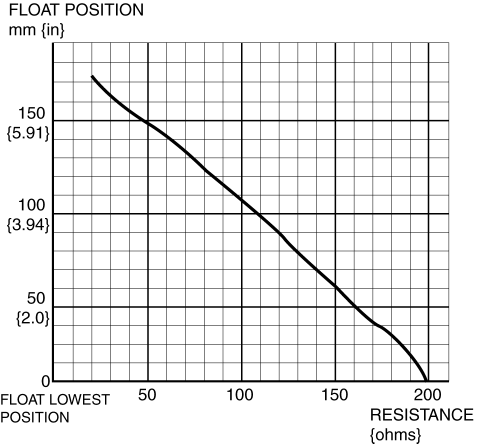
1. Verify that the resistance at fuel gauge sender unit (main) terminals D and C is as indicated in the table according to the height of the float.
-
If not as indicated in the table, replace the fuel gauge sender unit (main).
Fuel gauge sender unit (sub)
1. Remove the fuel gauge sender unit (sub)..
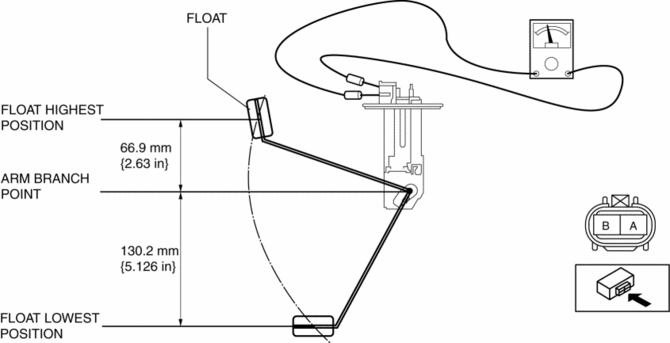
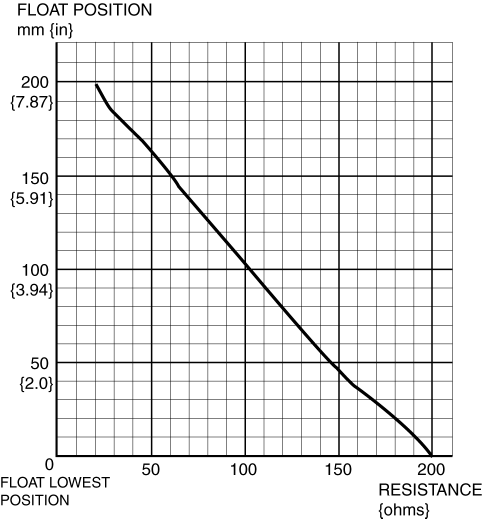
2. Verify that the resistance at fuel gauge sender unit (sub) terminals B and A is as indicated in the table according to the height of the float.
-
If not as indicated in the table, replace the fuel gauge sender unit (sub).
 Electronic Control Coupling
Purpose, Function
An electromagnetic clutch, which operates smoothly due to the lack influence
from the front and rear wheel traction force, has been adopted for the electronic
control co ...
 Fuel Gauge Sender Unit Removal/Installation [Awd]
WARNING:
Always keep sparks and flames away from fuel when servicing the fuel system.
Fuel can be easily ignited which could cause serious injury or death, and damage
to equipment.
...
Other materials:
Pressure Sensor Removal/Installation [Two Step Deployment Control System]
WARNING:
Handling the pressure sensor improperly can accidentally operate (deploy)
the air bag module, which may seriously injure you. Read the air bag system
service warnings and cautions before handling the pressure sensor..
1. Switch the ignition to off.
2. Disconnect the ne ...
Fuel Injection Control System
Outline
Performs optimum fuel injection according to engine operation conditions.
The PCM determines the engine operation conditions based on the signals from
each input device and drives the fuel injectors at the optimal fuel injection
time (fuel injection amount) and the fuel ...
Driver Side Air Bag Module Removal/Installation [Standard Deployment Control
System]
WARNING:
Handling the air bag module improperly can accidentally deploy the air bag
module, which may seriously injure you. Read the air bag system service warnings
and cautions before handling the air bag module..
NOTE:
The driver-side air bag module is installed to the ...
