Mazda CX-5 Service & Repair Manual: Front Wiring Harness Protector Removal/Installation
Front Wiring Harness Protector No.1
1. Disconnect the negative battery cable..
2. Remove the air cleaner case..
3. While pressing the tabs of clip A in the direction of the arrows (1) shown in the figure, pull clip A in the direction of the arrow (2) shown in the figure to detach the tab of clip A from the radiator.
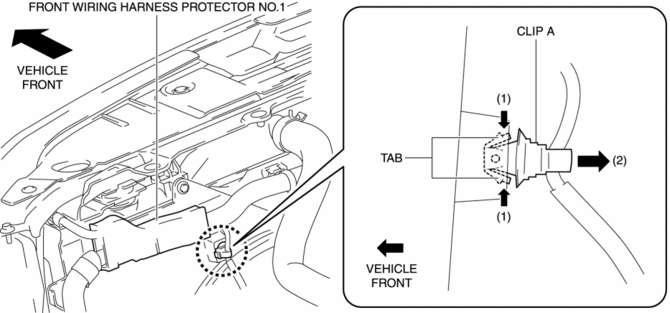
4. Detach clip A.
5. Insert a tape-wrapped flathead screwdriver into the service hole in the position shown in the figure.
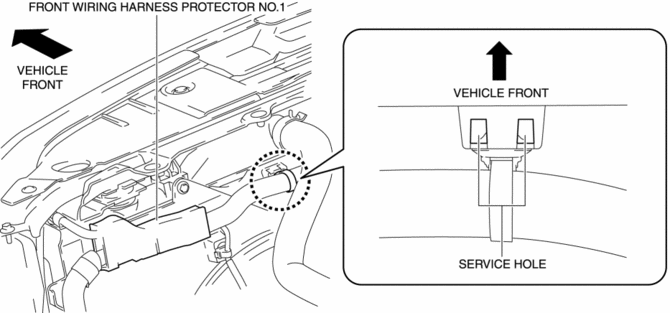
6. While pressing the tabs of clip B in the direction of the arrows (3) shown in the figure, pull clip B in the direction of the arrow (4) shown in the figure to detach the tab of clip B from the radiator.
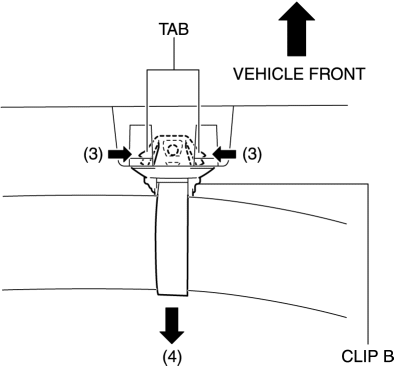
7. Detach clip B.
8. While pressing the tabs of clip C in the direction of the arrows (5) shown in the figure, pull clip C in the direction of the arrow (6) shown in the figure to detach the tab of clip C from the front bumper.
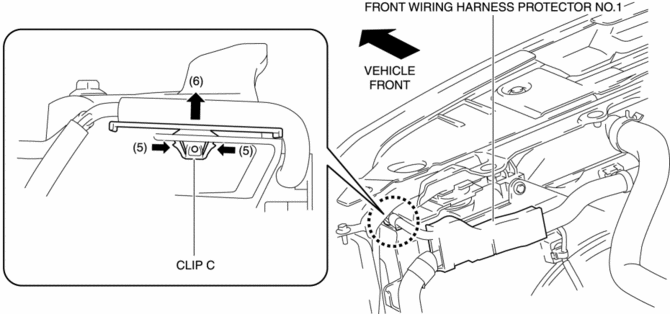
9. Remove clip C.
10. While pressing the clip tabs in the direction of the arrows (7) shown in the figure, pull the clip in the direction of the arrow (8) to detach the clip tabs from the radiator.
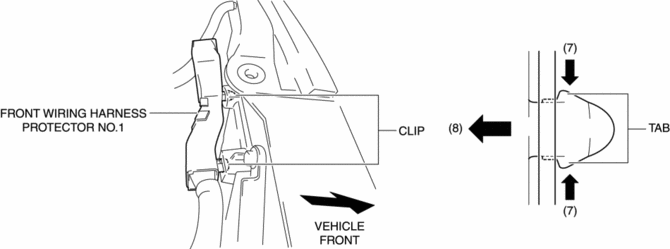
11. Detach all the clip tabs and remove the clips.
12. Insert a flathead screwdriver into the position shown in the figure.
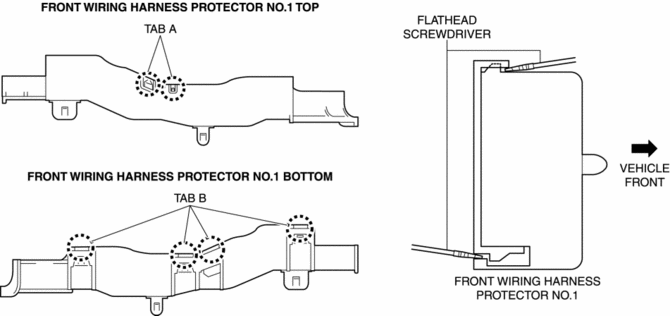
13. While lifting up the hooks in the direction of the arrows (9) shown in the figure using a flathead screwdriver, pull the hooks in the direction of the arrows (10) shown in the figure to detach the tabs from the hooks.
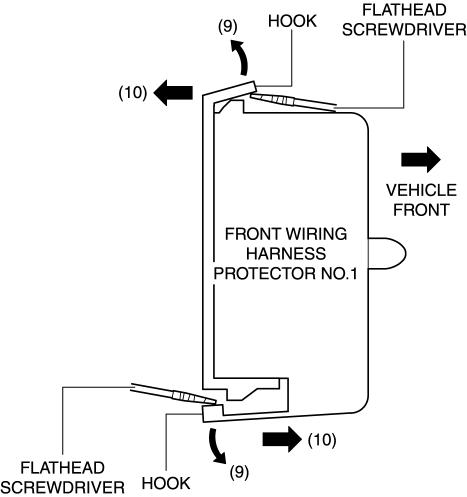
14. Detach all the tabs and hooks and remove front wiring harness protector No.1.
15. Install in the reverse order of removal.
Front Wiring Harness Protector No.2
1. Remove the battery tray..
2. While pressing the clip tabs in the direction of arrows (1) shown in the figure, pull the clip in the direction of arrow (2) to detach it from the engine mount.
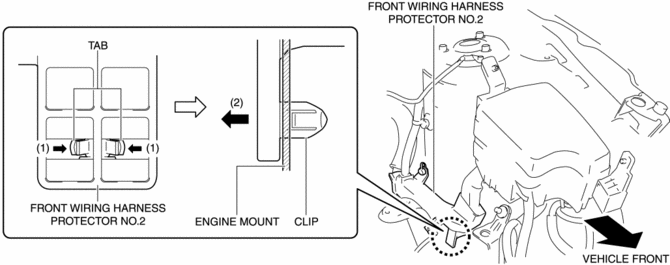
3. Remove the clip.
4. Remove the cap in the direction of the arrow (3) shown in the figure.
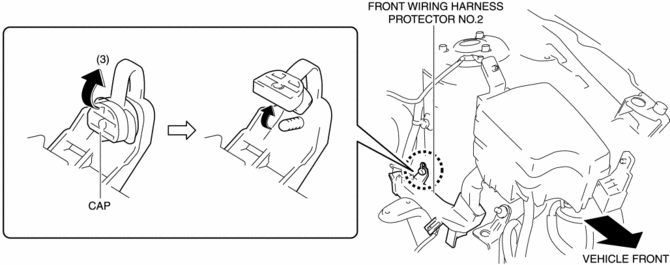
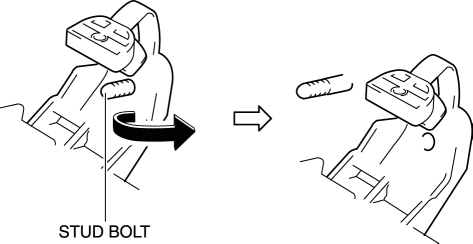
5. Pull out front wiring harness protector No.2 from the stud bolt and set it aside as shown in the figure.
6. While pressing the clip tabs in the direction of the arrows (4) shown in the figure, push out the clip in the direction of the arrow (5) shown in the figure to detach the clip tabs from front wiring harness protector No.2.
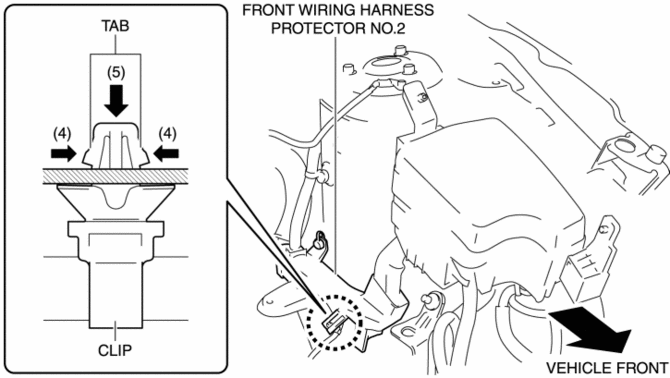
7. Remove the clip.
8. Insert a tape-wrapped flathead screwdriver into the gap between front wiring harness protector No.2 and the tabs shown in the figure.
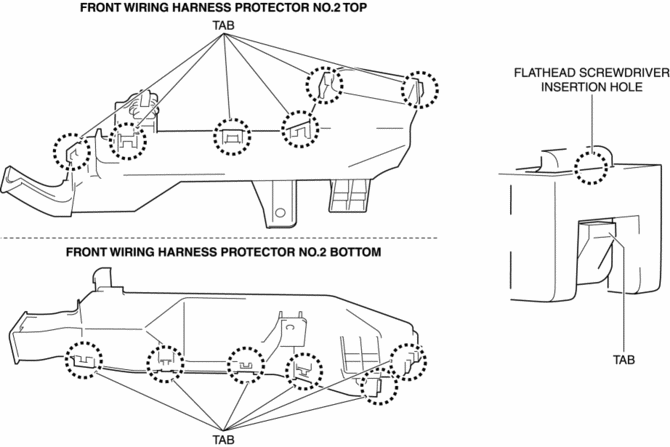
9. Move the flathead screwdriver in the direction of the arrow (6) shown in the figure, lift up the front wiring harness protector No.2 tab to detach the tab from front wiring harness protector No.2.
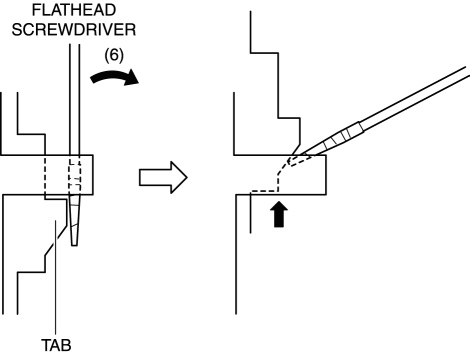
10. Detach all the tabs and front wiring harness protector No.2 and remove front wiring harness protector No.2.
11. Install in the reverse order of removal.
 Body And Accessories SST
49 L067 001
Reflector
49 L067 002
Tripod
49 L067 003
Plum-bob
49 L067 006
Plum-bob
...
 Identification Number Locations
Vehicle Identification Number (VIN)
If the VIN plate is adhered to the dashboard, it is located in the position
shown in the figure.
Engine Type/Number
SKYACTIV-G 2.0
SKYAC ...
Other materials:
Roof Carrier Bracket Removal/Installation
1. Disconnect the negative battery cable..
2. Remove the following parts:
a. Sunroof seaming welt (with sunroof system).
b. A-pillar trim.
c. Front map light.
d. Sunvisor.
e. Front scuff plate.
f. Rear scuff plate.
g. B-pillar lower trim.
h. Adjust anchor cover.
i. Upper anchor i ...
Remote Handle Lever Removal/Installation
1. Disconnect the negative battery cable..
2. Remove the following parts:
a. Trunk board.
b. Trunk end trim.
c. Rear scuff plate.
d. Trunk side trim.
3. Disconnect the remote cable on the remote handle lever side from the remote
cable on the rear seat side.
4. Remove the remote c ...
Front ABS Wheel Speed Sensor Removal/Installation
1. Remove the mudguard..
2. Remove in the order indicated in the table.
3. Install in the reverse order of removal.
4. After installation, verify that there is no twisting in the front ABS wheel-speed
sensor.
1
Connector
2
Bolt
...
