Mazda CX-5 Service & Repair Manual: Front Under Cover No.2 Removal/Installation
1. Lift up the vehicle.
2. Remove the front under cover No.1..
3. Remove bolts A.
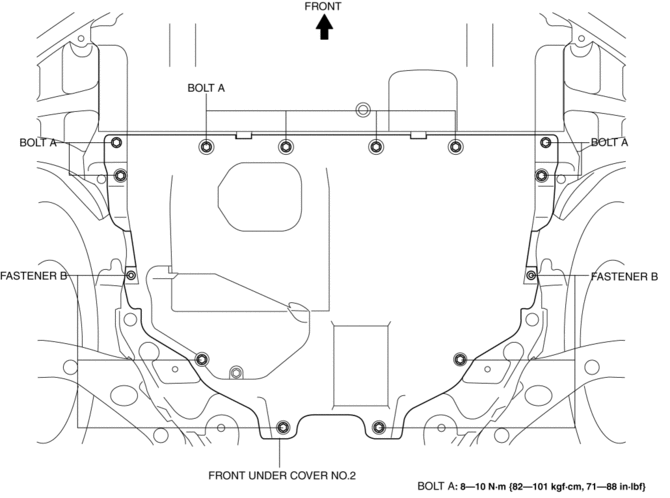
4. Remove fasteners B.
5. Remove the front under cover No.2.
6. Install in the reverse order of removal.
 Front Under Cover No.1 Removal/Installation
1. Remove bolts A.
2. Remove screws B.
3. Remove fasteners C.
4. Remove the front under cover No.1 in the direction of the arrow in the order
of (1), (2) shown in the figure while detachin ...
 Lower Cowl Side Reinforcement Installation [Panel Replacement]
Symbol Mark
Installation Procedure
1. When installing new parts, measure and adjust the body as necessary to conform
with standard dimensions.
2. Drill holes for the plug welding before inst ...
Other materials:
Tcs/DSC Indicator Light
Purpose/Function
The TCS/DSC indicator light, built into the instrument cluster, informs the
driver of the following vehicle conditions.
TCS is operating. (Drive wheel is slipping.)
DSC is operating. (Vehicle side-slip condition.)
Roll over mitigation (RO ...
Front Map Light
Purpose
The front map lights shine light at the front of the vehicle interior.
Function
The front map lights illuminate when the map light switch is turned on.
Illuminates according to the lock condition of the driver's door and open/close
conditions of the doors u ...
Tire Pressure Monitoring System Warning Light
Purpose, Function
The tire pressure monitoring system warning light notifies the driver that
it was determined that a tire pressure has decreased below the specified value
based on the initialization.
The tire pressure monitoring system warning light notifies the driver that
...
