
Mazda CX-5 Service & Repair Manual: Front Side Trim Removal/Installation
1. Remove the front scuff plate..
2. Partially peel back the seaming welt.
3. Remove the cap nut.
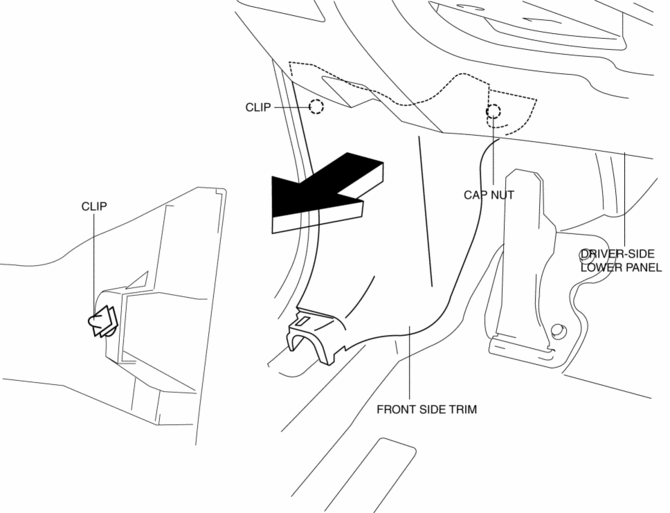
4. Pull the front side trim in the direction of the arrow shown in the figure and remove it while detaching the clip.
5. Install in the reverse order of removal.
 Front Scuff Plate Removal/Installation
1. Take the shaded area shown in the figure, detach tab A while pulling the front
scuff plate in the direction of the arrow (1) shown in the figure, then detach the
hook B, clip C, and pin D while ...
 Headliner
Purpose/Function
The headliner is equipped with a shock absorbing pad for driver's head protection
during a collision.
Construction
The front and rear side of the headliner ...
Other materials:
Drive Belt
Purpose, Function
The drive belt transmits rotation force of the crankshaft pulley to the pulley
for the auxiliary parts.
Construction
The drive belt is installed to the front of the engine.
A V-ribbed belt has been adopted for the drive belt.
The wat ...
Engine Coolant Temperature (ECT) Sensor Inspection
Resistance Inspection
WARNING:
When the engine is hot, it can badly burn. Turn off the engine and wait until
it is cool before removing the ECT sensor.
ECT Sensor No.1
1. Remove the ECT sensor No.1..
2. Place the ECT sensor No.1 in water with a thermometer, and heat the water
...
Front Door Key Cylinder Switch Inspection
1. Perform the front door glass preparation..
2. Disconnect the negative battery cable..
3. Remove the following parts:
a. Inner garnish.
b. Front door trim.
c. Front door key cylinder.
d. Front door glass.
e. Front door module panel.
f. Front door latch and lock actuator.
Front Do ...
