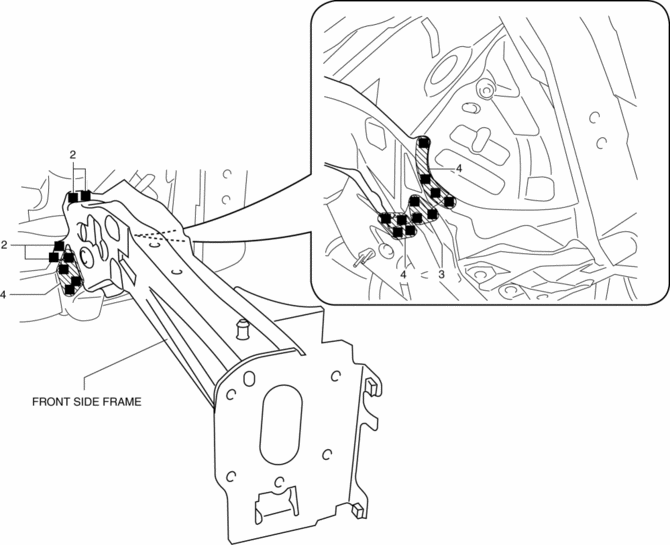
Mazda CX-5 Service & Repair Manual: Front Side Frame Installation [Panel Replacement]
Symbol Mark

Installation Procedure
1. When installing new parts, measure and adjust the body as necessary to conform with standard dimensions.
2. Drill holes for the plug welding before installing the new parts.
3. After temporarily installing new parts, make sure the related parts fit properly.
4. Plug weld the 19 locations shown in the figure, then install the front side frame.
 Front Side Frame (Partial Cutting) Removal [Panel Replacement]
Symbol Mark
Removal Procedure
1. Drill the 4 locations indicated by (A) shown in the figure, then remove suspension
mounting reinforcement and outer frame reinforcement.
2. Rough cut locatio ...
 Front Side Frame Removal [Panel Replacement]
Symbol Mark
Removal Procedure
1. Drill the 15 locations indicated by (A) shown in the figure.
2. Drill the 4 locations indicated by (B) shown in the figure.
NOTE:
When drilling the 4 ...
Other materials:
Rear Door Trim Disassembly/Assembly
1. Disassemble in the order shown in the figure.
1
Switch panel cover
2
Power window subswitch.
3
Fastener
4
Rear door trim
2. Assemble in the reverse order of disassembly.
...
Wheel Apron Component Removal [Panel Replacement]
Symbol Mark
Removal Procedure
1. Drill the 14 locations indicated by (A) from the front wheel housing side
shown in the figure.
2. Drill the 11 locations indicated by (B) shown in the figure.
3. Drill the 4 locations indicated by (C) shown in the figure.
NOTE:
When drilling t ...
Electric Variable Valve Timing Actuator, Hydraulic Variable Valve Timing Actuator
Removal/Installation
WARNING:
A hot engine can cause severe burns. Turn off the engine and wait until it
is cool before servicing.
CAUTION:
Do not disassemble the electric variable valve timing actuator and hydraulic
variable valve timing actuator because they are precision units.
If ...
