Mazda CX-5 Service & Repair Manual: Front Seat Belt Removal/Installation
WARNING:
-
Handling the front seat belt (pre-tensioner seat belt) improperly can accidentally deploy the pre-tensioner seat belt, which may seriously injure you. Read the air bag system service warnings and cautions before handling the front seat belt.
(See AIR BAG SYSTEM SERVICE WARNINGS [STANDARD DEPLOYMENT CONTROL SYSTEM].)
(See AIR BAG SYSTEM SERVICE CAUTIONS [STANDARD DEPLOYMENT CONTROL SYSTEM].)
(See AIR BAG SYSTEM SERVICE WARNINGS [TWO-STEP DEPLOYMENT CONTROL SYSTEM].)
(See AIR BAG SYSTEM SERVICE CAUTIONS [TWO-STEP DEPLOYMENT CONTROL SYSTEM].)
WARNING:
-
The side air bag sensor is attached to the lower part of the B-pillar. When working around the B-pillar, disconnect the negative battery cable avoiding excessive impact to the lower part of the B-pillar (with side air bag sensor No.1).
CAUTION:
-
The ELR (emergency locking retractor) has a spring that will unwind if the retractor cover is removed. The spring cannot be rewound by hand. If this occurs, the ELR will not work properly. Therefore, do not disassemble the retractor.
Front Seat Belt With Lap Pre-tensioner Seat Belt
1. Switch the ignition off.
2. Disconnect the negative battery cable and wait for 1min or more
..
3. Remove the front scuff plate..
4. Remove the rear scuff plate..
5. Remove the B-pillar lower trim..
6. Remove the fastener.

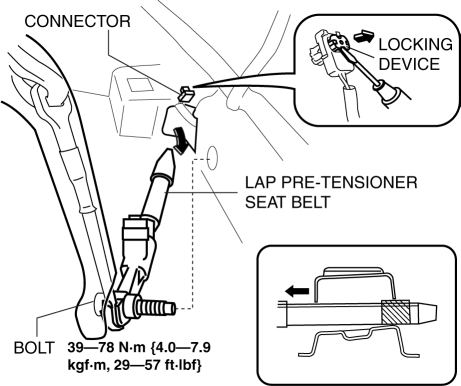
7. Remove the cover.
8. Using a flathead screwdriver, lift the locking device carefully, however do not remove it.

9. Disconnect the lap pre-tensioner seat belt connector.
10. Remove the bolt.
11. Remove the lap pre-tensioner seat belt.
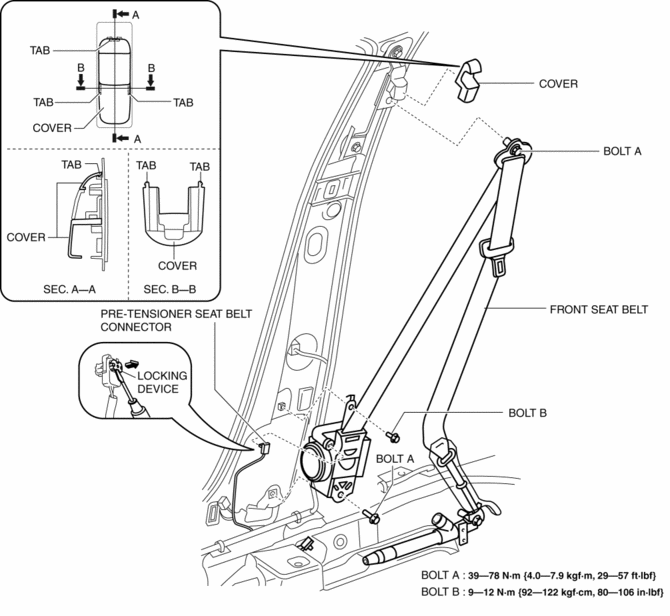
12. Using a flathead screwdriver, lift the locking device carefully, however do not remove it.

13. Disconnect the pre-tensioner seat belt connector.
14. Remove the cover.
15. Remove bolt A.
16. Remove bolt B.
17. Remove the front seat belt.
18. Install in the reverse order of removal.
19. Switch the ignition ON (engine off or on).
20. Verify that the air bag system warning light illuminates for approx. 6 s
and goes out.
-
If the air bag system warning light does not operate, refer to the on-board diagnostic system (air bag system) and perform inspection of the system..
Front Seat Belt Without Lap Pre-tensioner Seat Belt
1. Switch the ignition off.
2. Disconnect the negative battery cable and wait for 1min or more
..
3. Remove the front scuff plate..
4. Remove the rear scuff plate..
5. Remove the B-pillar lower trim..
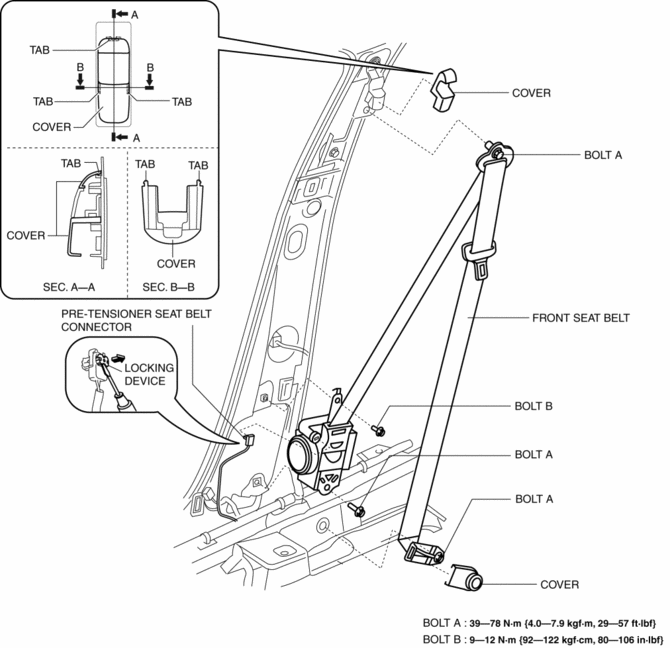
6. Using a flathead screwdriver, lift the locking device carefully, however do not remove it.

7. Disconnect the pre-tensioner seat belt connector.
8. Remove the cover.
9. Remove bolt A.
10. Remove bolt B.
11. Remove the front seat belt.
12. Install in the reverse order of removal.
13. Switch the ignition ON (engine off or on).
14. Verify that the air bag system warning light illuminates for approx. 6 s
and goes out.
-
If the air bag system warning light does not operate, refer to the on-board diagnostic system (air bag system) and perform inspection of the system..
 Front Buckle Removal/Installation
Driver-side
1. Disconnect the negative battery cable and wait for 1 min or more..
2. Remove the front seat..
3. Disconnect the front buckle connector.
4. Remove the bolt.
5. Remove t ...
 Lap Pre Tensioner Seat Belt [Two Step Deployment Control System]
Purpose
The lap pre-tensioner seat belts retract and tighten the seat belt webbing
to protect the front passengers during a collision.
Function
The lap pre-tensioner seat belts ...
Other materials:
Oil Control Valve (OCV) Removal/Installation [Skyactiv G 2.0]
WARNING:
A hot engine can cause severe burns. Turn off the engine and wait until it
is cool before servicing.
1. Disconnect the negative battery cable..
2. Remove the plug hole plate..
3. Remove the ignition coil/ion sensors..
4. Remove the cylinder head cover..
5. Remove in ...
Sunroof Switch Inspection
1. Disconnect the negative battery cable..
2. Remove the front map light..
3. Verify that the continuity between the sunroof switch terminals is as indicated
in the table.
If not as indicated in the table, replace the sunroof switch.
...
Air Intake Actuator [Full Auto Air Conditioner]
Purpose
The air intake actuator moves the air intake door in the blower unit to switch
the air intake port.
Function
The air intake actuator drives the motor based on the signal from the climate
control unit and moves the air intake door to the FRESH or REC position.
...
