Mazda CX-5 Service & Repair Manual: Front Scuff Plate Removal/Installation
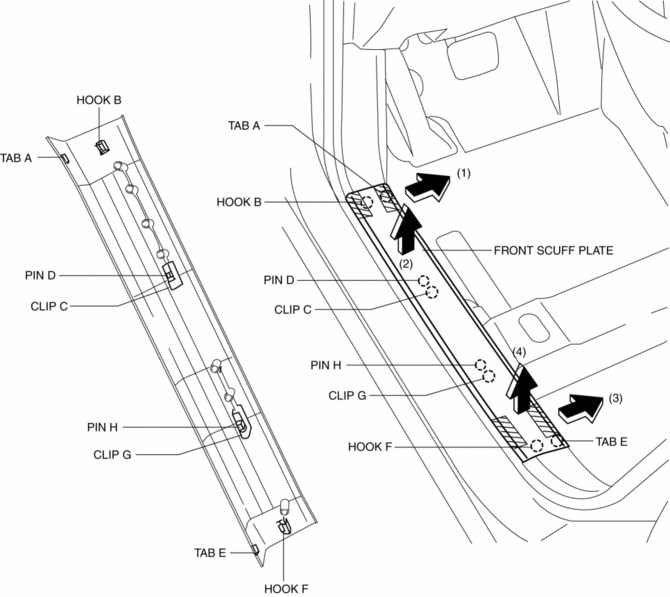
1. Take the shaded area shown in the figure, detach tab A while pulling the front scuff plate in the direction of the arrow (1) shown in the figure, then detach the hook B, clip C, and pin D while pulling in the direction of the arrow (2).
2. Take the shaded area shown in the figure, detach tab E while pulling the front scuff plate in the direction of the arrow (3) shown in the figure, then detach the hook F, clip G and pin H while pulling in the direction of the arrow (4).
3. Install in the reverse order of removal.
 Floor Insulator Removal/Installation
Driver-side
1. Disconnect the negative battery cable..
2. Remove the following parts:
a. Driver-side front scuff plate.
b. Driver-side front side trim.
c. Decoration panel.
d. Shift lever k ...
 Front Side Trim Removal/Installation
1. Remove the front scuff plate..
2. Partially peel back the seaming welt.
3. Remove the cap nut.
4. Pull the front side trim in the direction of the arrow shown in the figure
and remove i ...
Other materials:
Condenser Removal/Installation
1. Disconnect the negative battery cable..
2. Discharge the refrigerant..
3. Remove the front under cover No.1..
4. Drain the engine coolant..
5. Remove the following parts:
a. Plug hole plate.
b. Air cleaner, air hose and fresh air duct component.
c. Coolant reserve tank.
d. Cooling ...
Evaporator Temperature Sensor [Full Auto Air Conditioner]
Purpose
The evaporator temperature sensor detects the airflow temperature passing
through the evaporator.
Function
The evaporator temperature sensor converts the detected temperature to an
electric signal.
Construction
A thermistor-type evaporator temperature s ...
Front Accessory Socket Removal/Installation
1. Disconnect the negative battery cable..
2. Remove the front console..
3. Insert a tape-wrapped flathead screwdriver into the gap between the cap tab
and socket.
4. Move the flathead screwdriver in the direction of the arrow (1) shown in the
figure, press the front accessory socket i ...
