Mazda CX-5 Service & Repair Manual: Front Power Window Regulator Removal/Installation
1. Perform the front door glass preparation..
2. Disconnect the negative battery cable..
3. Remove the following parts:
a. Inner garnish.
b. Front door trim.
c. Front door glass.
d. Front door speaker.
e. Front power window motor.
4. Remove bolt A.
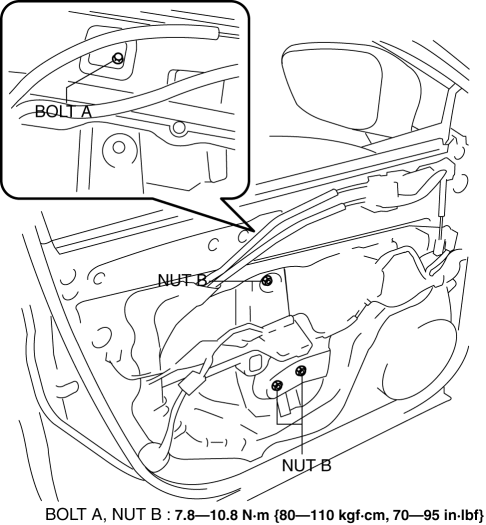
5. Remove nuts B.
6. Insert a hand through the speaker installation hole, rotate the drum housing in the direction shown in the figure to detach tabs from the front door module panel.
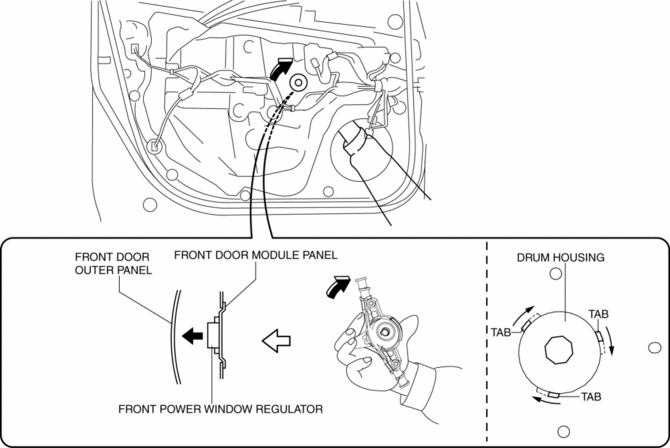
7. Remove the front power window regulator through the speaker installation hole.
CAUTION:
-
When removing the front power window regulator, the front power window regulator may contact the front door speaker installation hole, and the coating film of the front door inner panel and the front power window regulator could be damaged. Remove the front power window regulator while verifying that the front power window regulator and the front door speaker installation hole do not contact each other.

8. Install in the reverse order of removal.
 Front Door Glass Removal/Installation
1. Perform the front door glass preparation..
NOTE:
Before removing the front door glass, the removal procedure for the front
door glass installation bolt can be facilitated by adjusting ...
 Glass Antenna
Purpose, Function
The RDS (Radio Data System) converts radio broadcast waves to electric signals
and sends the signals to the audio unit.
Construction
An antenna with excellent ...
Other materials:
Rain Sensor
Outline
The rain sensor detects the amount of rainfall and calculates the wiper operation
speed, and outputs a windshield wiper control signal to the front body control
module (FBCM) to perform automatic wiper operation (auto wiper system) according
to the amount of rainfall.
...
Ignition Coil [Skyactiv G 2.0]
Purpose, Function
The ignition coil generates high voltage by electromagnetic induction to
discharge the spark plug.
Construction
The ignition coil is installed to the upper part of the spark plug (direct
ignition coil).
With the adoption of the direct ignitio ...
Mass Air Flow (MAF) Sensor
Purpose/Function
Detects the intake airflow amount introduced into the cylinder as basic information
for mainly determining the fuel injection amount.
Detects the intake airflow amount introduced into the cylinder and inputs
it to the PCM as an intake airflow amount signal.
...
