Mazda CX-5 Service & Repair Manual: Front Frame (Rear) Removal [Panel Replacement]
Symbol Mark

Removal Procedure
1. Drill the 33 locations shown in the figure.
NOTE:
-
When drilling, do not drill a hole all the way through or there could be a problem when installing the new part.
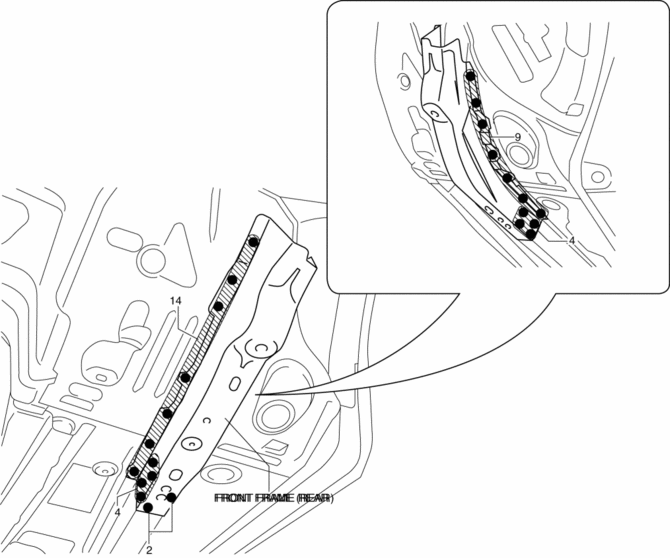
2. Remove the front frame (rear).
 Front Frame (Rear) Installation [Panel Replacement]
Symbol Mark
Installation Procedure
1. When installing new parts, measure and adjust the body as necessary to conform
with standard dimensions.
2. Drill holes for the plug welding before inst ...
 Front Pillar Installation [Panel Replacement]
Symbol Mark
Installation Procedure
1. When installing new parts, measure and adjust the body as necessary to conform
with standard dimensions.
2. Drill holes for the plug welding before inst ...
Other materials:
Owner Maintenance Precautions
The owner or a qualified service technician should make these vehicle inspections
at the indicated intervals to ensure safe and dependable operation.
Bring any problem to the attention of an Authorized Mazda Dealer or qualified
service technician as soon as possible.
When Refueling
• Brake ...
Positive Crankcase Ventilation (PCV) Valve Inspection
Airflow Inspection
1. Disconnect the section (A) of ventilation hose shown in the figure.
2. Start the engine and verify that vacuum is applied to the end of the disconnected
ventilation hose while the engine is idling.
If vacuum is not applied to the ventilation hose, perform the p ...
Driveline/Axle Abbreviations
AAS
Active Adaptive Shift
ABS
Antilock Brake System
ABDC
After Bottom Dead Center
ACC
Accessories
AFS
Adaptive Front Lighting System
ALC
...
