
Mazda CX-5 Service & Repair Manual: Front Fog Lights Indicator Light
Purpose
-
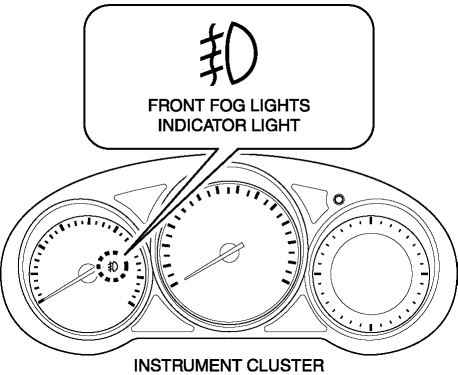
Notifies the user that the front fog lights are illuminated.
Function
-
Illuminates when the front fog light illumination conditions are met.
Construction
-
Displayed in the instrument cluster.
Operation
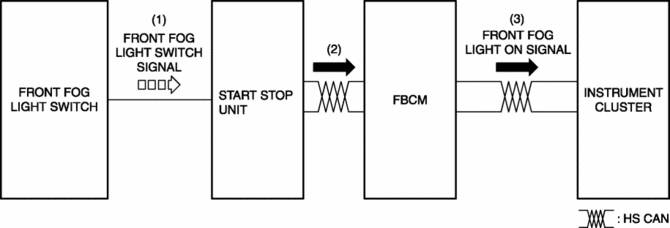
1. With the light switch in the TNS, HEAD, or HI position, a front fog light switch signal is input to the start stop unit when the front fog light switch is operated to the on position.
2. The start stop unit sends the front fog light switch signal to the front body control module (FBCM).
3. The front body control module (FBCM) sends the front fog light switch signal to the instrument cluster as a front fog light illumination signal.
4. The instrument cluster illuminates the front fog light indicator light when it receives the front fog light illumination signal.
Fail-safe
-
Function not equipped.
 Engine Oil Pressure Warning Light
Purpose
The engine oil pressure warning light warns the driver that the engine oil
level is insufficient.
Function
When the instrument cluster receives the engine oil pressure w ...
 Gear Position Indicator [Fw6 A EL, Fw6 Ax EL]
Purpose/Function
The gear position indicator illuminates while under manual shift control
and displays the gear number while driving.
Construction
The gear position indicator is ...
Other materials:
Keys
WARNING
Do not leave the key in your vehicle with children and keep them in a place where
your children will not find or play with them:
•eaving children in a vehicle with the key is
dangerous. This could result in someone being badly injured or even killed. Children
may find these keys to ...
Hill Launch Assist (Hla)
Purpose/Function
The hill launch assist (HLA) is a function which assists the driver in accelerating
the vehicle on a slope by activating the traction control solenoid valve in
the DSC HU/CM when the vehicle begins accelerating on a slope, and maintaining/reducing
brake fluid pressur ...
Rear Drive Shaft
Purpose, Function
Engine noise and vibration have been reduced due to adoption of a bell joint
on the wheel side of the constant velocity joint.
A low noise and vibration double offset joint with low slide resistance has
been adopted for the differential side of the constant v ...
