Mazda CX-5 Service & Repair Manual: Front Fog Light
Purpose
-
By shining light in a wider area in front of the vehicle than the light from the headlights, visibility during poor weather conditions, such as rain and fog, has been improved. In addition, the visibility of the vehicle from on-coming vehicles, pedestrians, and other people has been improved.
Function
-
Illuminates according to the light switch and front fog light switch operation.
Construction
-
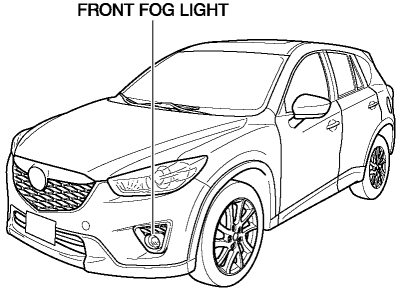
Round-type fog lights are installed to the front bumper.
-
Clear lenses have been adopted to the front fog lights.

Operation
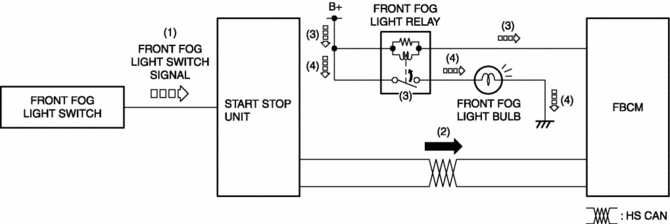
1. With the light switch in the TNS, HEAD, or HI position, a front fog light switch signal is sent to the start stop unit when the front fog light switch is operated to the on position.
2. The start stop unit sends the front fog light switch signal to the front body control module (FBCM).
3. When the front body control module (FBCM) receives the fog light switch signal, it turns the front fog light relay on.
4. When the front fog light relay turns on, the front fog light bulb illuminates.

Fail-safe
-
Function not equipped.
 Front Combination Light Removal/Installation
WARNING:
Incorrect servicing of the discharge headlights could result in electrical
shock. Before servicing the discharge headlights, always refer to the service
warnings..
NOTE:
...
 Front Fog Light Aiming
NOTE:
Perform front fog light aiming if any of the following work is performed.
Front fog light replacement
Work that can affect vehicle height such as suspension repla ...
Other materials:
Climate Control Unit Removal/Installation [Manual Air Conditioner]
Removal
1. Disconnect the negative battery cable..
2. Remove the following parts:
a. Shift lever knob (MTX).
b. Glove compartment.
c. Front console box.
d. Shift panel.
e. Upper panel.
f. Rear console.
g. Side wall.
h. Decoration panel.
i. Front console.
3. Press the tab down, ...
Front Body Control Module (Fbcm) Configuration (Using Read/Write Function)
NOTE:
When performing configuration, it is necessary to read the vehicle specification
information from the front body control module (FBCM) before replacing it. Connect
the M-MDS to the vehicle and perform vehicle identification before removing
the front body control module (FBCM). ...
Shift And Select Mechanism [C66 M R]
Purpose, Function
The shift and select mechanism moves the shift fork to change gears according
to the operation of the shift lever in the cabin.
Construction
Shift control module
The moving parts of the shift control module are vertically positioned..
In th ...
