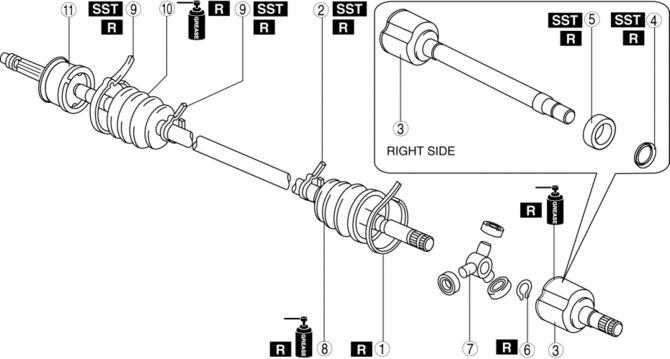
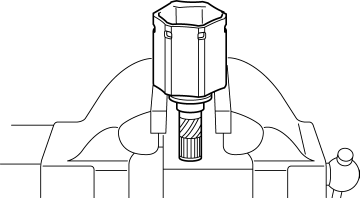
Mazda CX-5 Service & Repair Manual: Front Drive Shaft (Tripod Joint) Disassembly/Assembly
1. Disassemble in the order indicated in the table.
2. Assemble in the reverse order of disassembly.
|
1 |
Boot band (transaxle side (large diameter)) (See Boot Band (Transaxle Side (Large Diameter)) Disassembly Note.) (See Boot Band (Transaxle Side (Large Diameter)) Assembly Note.) |
|
2 |
Boot band (transaxle side (small diameter)) (See Boot Band (Transaxle Side (Small Diameter), Wheel Side)) Disassembly Note.) (See Boot Band (Transaxle Side (Small Diameter), Wheel Side)) Assembly Note.) |
|
3 |
Outer ring (See Outer Ring Disassembly Note.) (See Outer Ring Assembly Note.) |
|
4 |
Dust cover (See Dust Cover Disassembly Note.) (See Dust Cover Disassembly Note.) |
|
5 |
Bearing (See Bearing Disassembly Note.) (See Bearing Assembly Note.) |
|
6 |
Snap ring (See Snap Ring, Tripod Joint Disassembly Note.) (See Tripod Joint, Snap Ring Assembly Note.) |
|
7 |
Tripod joint (See Snap Ring, Tripod Joint Disassembly Note.) (See Tripod Joint, Snap Ring Assembly Note.) |
|
8 |
Boot (See Boot Disassembly Note.) (See Boot Assembly Note.) |
|
9 |
Boot band (wheel side) (See Boot Band (Transaxle Side (Small Diameter), Wheel Side)) Disassembly Note.) (See Boot Band (Transaxle Side (Small Diameter), Wheel Side)) Assembly Note.) |
|
10 |
Boot (See Boot Disassembly Note.) (See Boot Assembly Note.) |
|
11 |
Shaft and ball joint component |
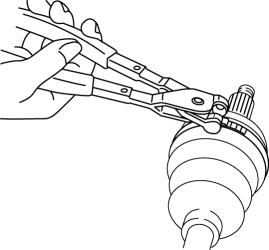
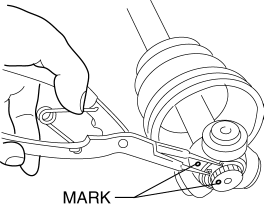
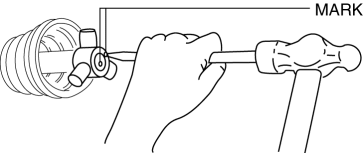
Boot Band (Transaxle Side (Large Diameter)) Disassembly Note
1. Pry up the boot band at the points indicated in the figure using pliers and remove the band.
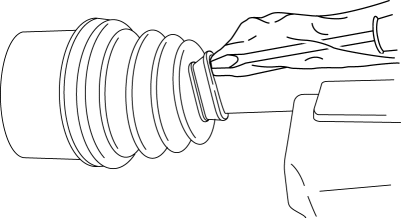
Boot Band (Transaxle Side (Small Diameter), Wheel Side)) Disassembly Note
NOTE:
-
Remove the boot band only if there is a malfunction.
1. Remove the boot band using end clamp pliers.
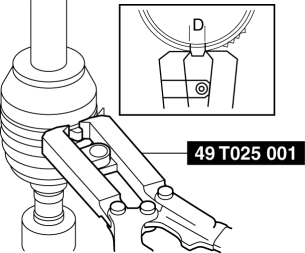
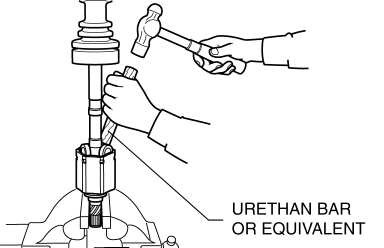
Outer Ring Disassembly Note
1. Mark the outer ring and the shaft for proper assembly.
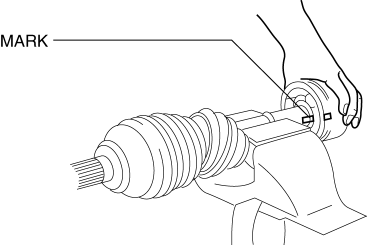
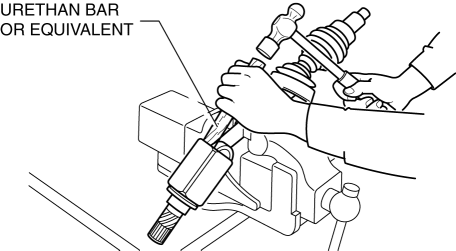
2. Secure the drive shaft using a vise.
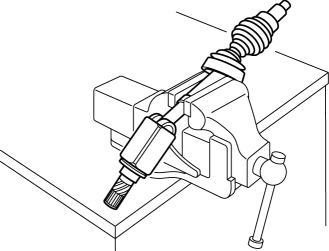
3. Tap the outer ring slightly by using a hummer and urethan bar or equivalent, and remove the outer ring from the drive shaft.
CAUTION:
-
Lightly tap the outer ring carefully, otherwise the tripod joint rollers could be damaged.
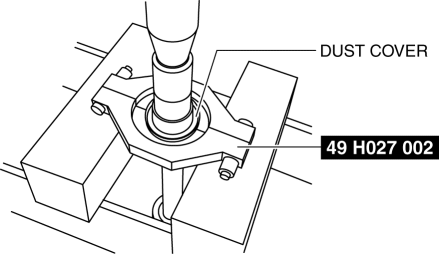
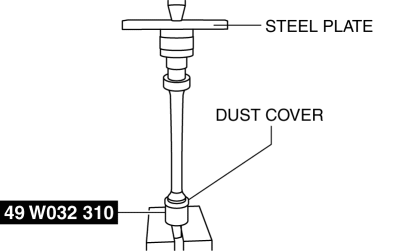
Dust Cover Disassembly Note
1. Disassemble the dust cover using the press and the SST
.
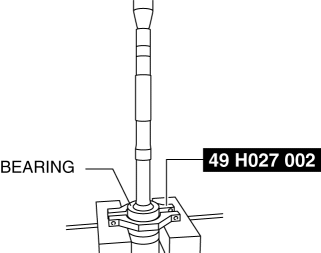
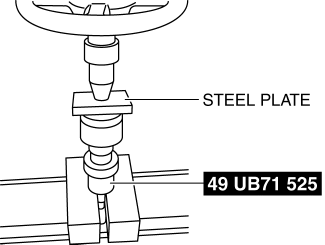
Bearing Disassembly Note
1. Disassemble the bearing using the press and the SST
.
Snap Ring, Tripod Joint Disassembly Note
1. Place an alignment mark on the shaft and tripod joint.
2. Remove the snap ring using snap ring pliers.
3. Remove the tripod joint from the shaft.
CAUTION:
-
Do not try to remove the tripod joint by hitting it with a hammer. The tripod joint could be damaged.
Boot Disassembly Note
NOTE:
-
Remove the wheel side boot only if there is any malfunction.
1. Wrap the shaft splines with tape.

2. Remove the boot.
Boot Assembly Note
NOTE:
-
The boot shapes on the wheel side and the differential side are different. Do not install the wrong boot by mistake.
1. Fill the inside of the new dust boot (wheel side) with grease.
NOTE:
-
Do not touch the grease with your hand. Apply it from the tube to prevent foreign matter from entering the boot.
-
Grease amount
-
96—106 g {3.4—3.7 oz}
2. Install the boot with the drive shaft spline still wrapped with vinyl tape.
3. Remove the vinyl tape.
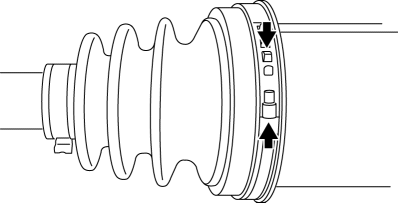
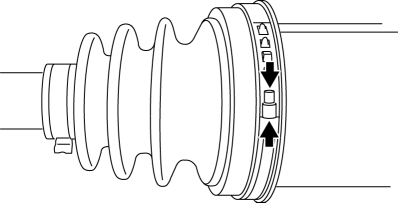
Boot Band (Transaxle Side (Small Diameter), Wheel Side)) Assembly Note
Boot band (small diameter side)
1. Adjust clearance A by turning the adjusting bolt of the SST
.
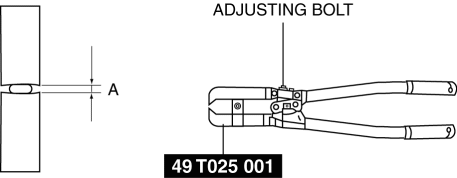
-
Clearance A
-
2.9 mm {0.11 in}
2. Crimp the wheel side small boot band using the SST
. Verify that clearance B is within the specification.
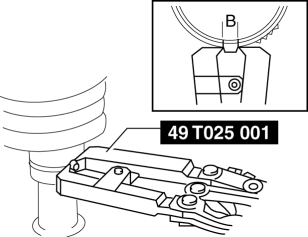
-
If clearance B is more than the specification, reduce clearance A of the SST
and crimp the boot again.
-
If clearance B is less than the specification, replace the boot band, increase clearance A of the SST
, and crimp the new boot.
-
Clearance B
-
2.4—2.8 mm {0.10—0.11 in}
3. Verify that the boot band does not protrude from the boot band installation area.
-
If it does, replace the boot band and repeat Steps 2 and 3.
Boot band (Large diameter side)
1. Adjust clearance C by turning the adjusting bolt of the SST
.
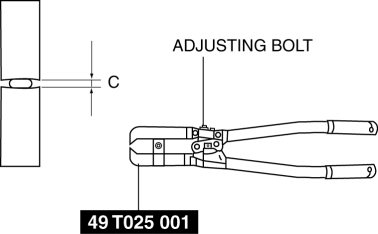
-
Clearance C
-
3.2 mm {0.13 in}
2. Crimp the wheel side small boot band using the SST
. Verify that clearance D is within the specification.
-
If clearance B is more than the specification, reduce clearance C of the SST
and crimp the boot again.
-
If clearance B is less than the specification, replace the boot band, increase clearance C of the SST
, and crimp the new boot.
-
Clearance D
-
2.4—2.8 mm {0.10—0.11 in}
3. Verify that the boot band does not protrude from the boot band installation area.
-
If it does, replace the boot band and repeat Steps 2 and 3.
Tripod Joint, Snap Ring Assembly Note
1. While aligning the marks on the shaft and the tripod joint, insert the tripod joint using a bar and a hammer.
2. Insert a new snap ring using snap ring pliers.
3. Verify that the snap ring is engaged correctly in the groove of the shaft.
Bearing Assembly Note
1. Install a new bearing using the SST
.
Dust Cover Assembly Note
1. Using the SST
, install a new dust cover.
Outer Ring Assembly Note
1. Fill the outer ring and boot (transaxle side) with the specified grease.
NOTE:
-
Do not touch the grease with your hand. Apply it from the tube to prevent foreign matter from entering the boot.
-
Grease amount
-
89—99 g {3.2—3.4 oz}
2. Secure the outer ring using a vise.
CAUTION:
-
Carefully perform the work when securing the outer ring to the vise, otherwise other wise the oil seal could be deformed.
3. Align the roller with the outer ring, tap the roller slightly using a hummer and urethan bar or equivalent, and install the drive shaft to the outer ring with keeping the drive shaft verticality.
CAUTION:
-
Be careful that no foreign matter such as dust or dirt gets into the outer ring, otherwise the drive shaft could be damaged.
4. Set the drive shaft to the standard length.
-
Front drive shaft standard length
-
LH: 675.5—685.5 mm {26.60—26.98 in}
-
RH: 1038.95—1048.95 mm {40.9036—41.2972 in}
5. Release any trapped air from the boots by carefully lifting up the small end of each boot with a cloth wrapped screwdriver.
NOTE:
-
Verify that there is no grease leak while being careful not to damage the boot.
-
If the boot is damaged, it may not be possible to perform the full-length adjustment of the drive shaft.
6. Verify that the drive shaft length is within the specification under atmospheric pressure inside the boot.
-
If not within the specification, repeat from Step 3.
Boot Band (Transaxle Side (Large Diameter)) Assembly Note
1. Pry up the boot band at the points indicated in the figure using pliers and tighten the boot band.
2. Verify that the boot band is installed to the boot slot securely.
 Front Drive Shaft (Double Offset Joint) Disassembly/Assembly
1. Disassemble in the order indicated in the table.
2. Assemble in the reverse order of disassembly.
1
Boot band (transaxle side)
(See FRONT DRIVE SHAFT (TRIPOD JOIN ...
 Front Drive Shaft Inspection
1. Inspect the connections for any looseness.
If there is any malfunction, tighten or replace the applicable part.
2. Inspect the dust boot for damage and cracks.
If there is ...
Other materials:
All Wheel Drive System
Outline
The electronic all-wheel drive (AWD) control system automatically and optimally
controls drive torque distribution for the front and rear wheels. Due to this
off-road mobility and driving stability are improved.
Based on the input signals from each sensor, the AWD contro ...
Camshaft Position (CMP) Sensor Inspection
Intake CMP Sensor
Visual inspection
CAUTION:
When replacing the CMP sensor, make sure there is no foreign material on
it such as metal shavings. If it is installed with foreign material, the sensor
output signal will malfunction resulting from fluctuation in magnetic flux and
caus ...
Aerodynamic
Purpose/Function
For improved aerodynamics, under covers are installed to the under-surface
of the vehicle.
Construction
The vehicle is equipped with the following (3) under covers.
Front under cover No.1
Front under cover No.2
Floor under co ...
