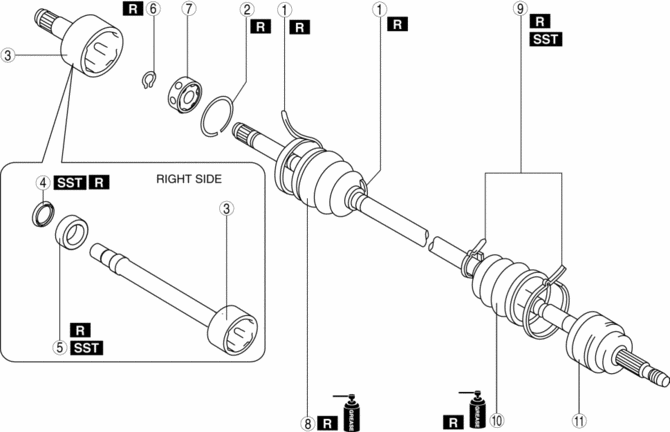
Mazda CX-5 Service & Repair Manual: Front Drive Shaft (Double Offset Joint) Disassembly/Assembly
1. Disassemble in the order indicated in the table.
2. Assemble in the reverse order of disassembly.
|
1 |
Boot band (transaxle side) (See FRONT DRIVE SHAFT (TRIPOD JOINT) DISASSEMBLY/ASSEMBLY.) |
|
2 |
Clip (See Clip Disassembly Note.) |
|
3 |
Outer ring (See Outer Ring Assembly Note.) |
|
4 |
Dust cover (if equipped) (See FRONT DRIVE SHAFT (TRIPOD JOINT) DISASSEMBLY/ASSEMBLY.) |
|
5 |
Bearing (See FRONT DRIVE SHAFT (TRIPOD JOINT) DISASSEMBLY/ASSEMBLY.) |
|
6 |
Snap ring (See Snap Ring Disassembly Note.) (See Cage, Inner Ring, Balls, Snap Ring Assembly Note.) |
|
7 |
Balls, inner ring, cage (See Cage, Inner Ring, Balls, Snap Ring Assembly Note.) |
|
8 |
Boot (See Boot Assembly Note.) |
|
9 |
Boot band (wheel side) (See FRONT DRIVE SHAFT (TRIPOD JOINT) DISASSEMBLY/ASSEMBLY.) |
|
10 |
Boot (See Boot Assembly Note.) |
|
11 |
Shaft and ball joint component |
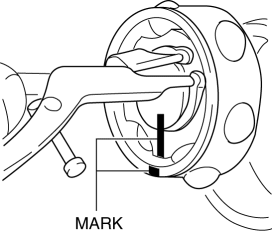
Clip Disassembly Note
CAUTION:
-
Mark with paint; do not use a punch.
1. Mark the drive shaft and outer ring for proper assembly.
Snap Ring Disassembly Note
CAUTION:
-
Mark with paint; do not use a punch.
1. Mark the drive shaft end and inner ring for proper assembly.
Boot Assembly Note
NOTE:
-
The wheel-side and transaxle-side boots are different.
1. Fill the boot (wheel side) with the specified grease.
NOTE:
-
Do not touch grease with your hand. Apply it from the tube to prevent foreign matter from entering the boot.
-
Grease amount
-
95—115 g {3.4—4.0 oz}
2. Install the boot with the splines of the shaft still wrapped in tape from disassembly.
3. Remove the tape.
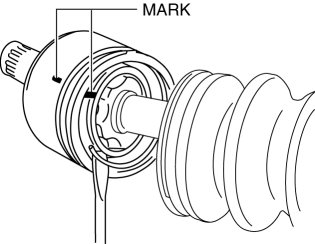
Cage, Inner Ring, Balls, Snap Ring Assembly Note
1. Align the marks and install the balls and cage to the inner ring in the direction shown in the figure.
CAUTION:
-
Install the cage so that the major diameter is at the same side as the snap ring groove. If incorrectly installed, the drive shaft may become disengaged.
2. Align the marks and install the inner ring to the shaft.
3. Install a new snap ring.
Outer Ring Assembly Note
1. Fill the outer ring and boot (transaxle side) with the specified grease.
NOTE:
-
Do not touch grease with your hand. Apply it from the tube to prevent foreign matter from entering the boot.
-
Grease amount
-
85—95 g {3.0—3.7 oz}
2. Install the outer ring on to the shaft.
3. Install the boot.
4. Set the drive shaft to the standard length.
-
LH: 673.8—679.0 mm {26.6—26.7 in}
-
RH: 1036.6—1042.8 mm {40.812—41.055 in}
5. Release any trapped air from the boots by carefully lifting up the small end of each boot with a cloth wrapped screwdriver.
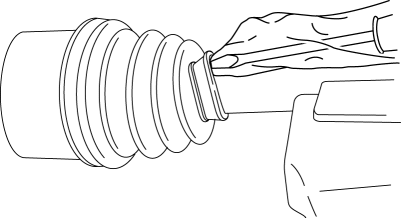
CAUTION:
-
Be careful not to allow the grease to leak.
-
Do not damage the boot.
6. Verify that the drive shaft length is within the specification.
 Front Drive Shaft
Purpose, Function
A bell joint has been adopted for the wheel-side constant velocity joint,
reducing vibration and noise.
A tripod joint have been adopted for the differential side c ...
 Front Drive Shaft (Tripod Joint) Disassembly/Assembly
1. Disassemble in the order indicated in the table.
2. Assemble in the reverse order of disassembly.
1
Boot band (transaxle side (large diameter))
(See Boot Band (Tr ...
Other materials:
Seat Warmer Control Unit Removal/Installation
WARNING:
Handling a side air bag improperly can accidentally operate (deploy) the
air bag, which may seriously injure you. Read the service warnings/cautions
in the Workshop Manual before handling the front seat (side air bag integrated)..
1. Switch the ignition off (LOCK).
2. ...
Generator Disassembly/Assembly [Skyactiv G 2.0]
CAUTION:
Melt the solder quickly, otherwise the diodes (rectifier) and regulator will
be damaged by excessive heat.
1. Disassemble in the order indicated in the table.
2. Assemble in the reverse order of disassembly.
1
Rotor component
...
Plastic Parts Heat Resisting Temperature [Plastic Body Parts]
Part Name
Code
Material Name
Heat resisting
Temperature°C{°F}
Windshield molding
PVC
POLYVINYLCHLORIDE
95 {203}
Cowl grille
PP
POLYPROPYLENE
...
