Mazda CX-5 Service & Repair Manual: Front Door Glass Removal/Installation
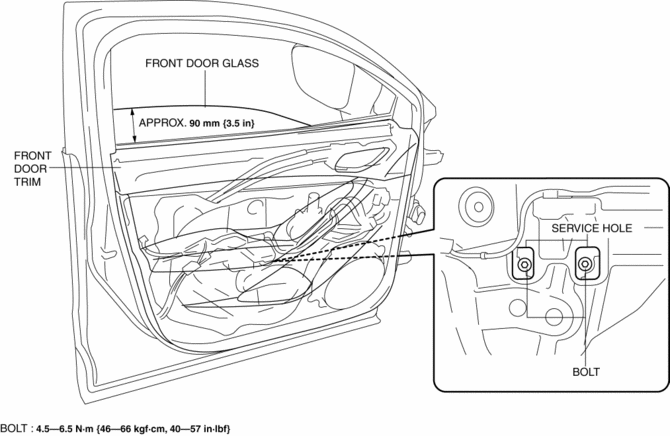
1. Perform the front door glass preparation..
NOTE:
-
Before removing the front door glass, the removal procedure for the front door glass installation bolt can be facilitated by adjusting the top of the front door glass to the position approx. 90 mm {3.5 in}
away from the upper part of the front beltline molding.
2. Disconnect the negative battery cable..
3. Remove the following parts:
a. Inner garnish.
b. Front door trim.
c. Front door speaker.
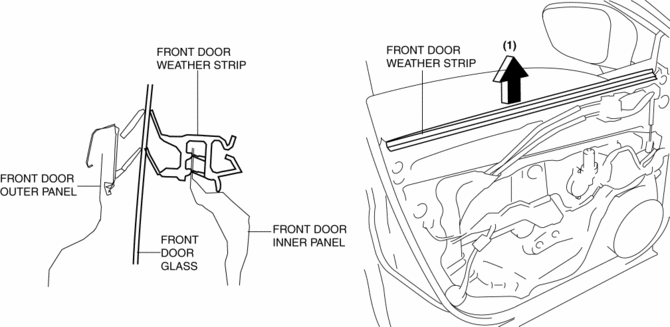
4. Remove the weather strip arrow (1) shown in the figure.
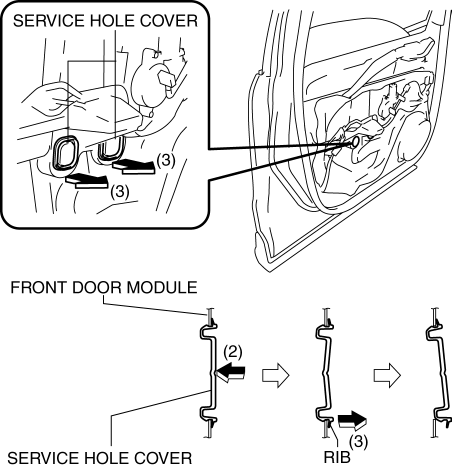
5. Press the center of the service hole cover in the direction of arrow (2) shown in the figure.
6. Remove the service hole cover by holding its rib and partially peeling it back in the direction of arrow (3) shown in the figure.
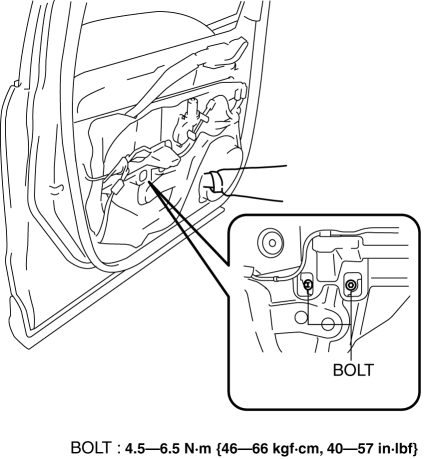
7. Insert your hand through the front door speaker installation hole while supporting the front door glass and adjust the position of the front door glass so that the front door glass installation bolt is in a position in which it can be removed from the service hole cover opening.
8. Remove bolts.
CAUTION:
-
If the bolts are removed without supporting the front door glass, the front door glass may fall off and be damaged. Remove the bolts while inserting your hand into the front door speaker installation hole to support the front door glass.
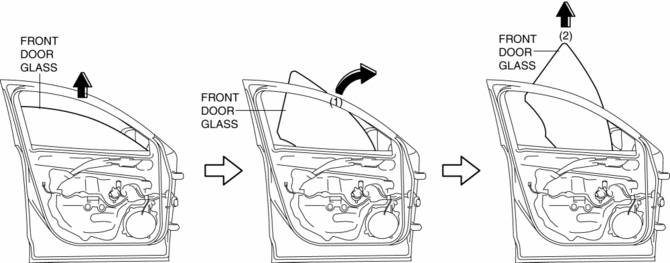
9. Lift up the front door glass, tilt it in the direction of arrow (1) shown in the figure, then remove it in the direction of arrow (2).
10. Install in the reverse order of removal.
Front Door Glass Preparation
-
Perform the adjusting the top of the front door glass to the position approx. 90 mm {3.5 in}
away from the upper part of the front door trim.
 Filament Repair
1. Clean the filament using isopropyl alcohol.
2. Attach tape to both sides of the filament.
3. Using a small brush or marking pen, apply silver paint.
4. After 2—3 min, carefully remove t ...
 Front Power Window Regulator Removal/Installation
1. Perform the front door glass preparation..
2. Disconnect the negative battery cable..
3. Remove the following parts:
a. Inner garnish.
b. Front door trim.
c. Front door glass.
d. Front ...
Other materials:
Front Door Key Cylinder Switch Inspection
1. Perform the front door glass preparation..
2. Disconnect the negative battery cable..
3. Remove the following parts:
a. Inner garnish.
b. Front door trim.
c. Front door key cylinder.
d. Front door glass.
e. Front door module panel.
f. Front door latch and lock actuator.
Front Do ...
Steering SST
49 T028 3A0
Ball joint puller set
49 T025 001
Boot clamp crimpers
49 B032 317
Bearing & oil seal remover
49 B018 003
Body B
49 E032 308
Wrench
...
Pressure Control Valve Inspection [Skyactiv G 2.0]
1. Remove the pressure control valve assembly..
CAUTION:
Do not apply a pressure 36 kPa {0.37 kgf/cm2, 5.2 psi} or more. Doing so
will damage the pressure control valve and evaporative hose.
2. Apply a pressure of 36 kPa {0.37 kgf/cm2, 5.2 psi} to port A.
3. Verify that ther ...
