Mazda CX-5 Service & Repair Manual: Front Body Straight Line Dimensions (2) [Dimensions]
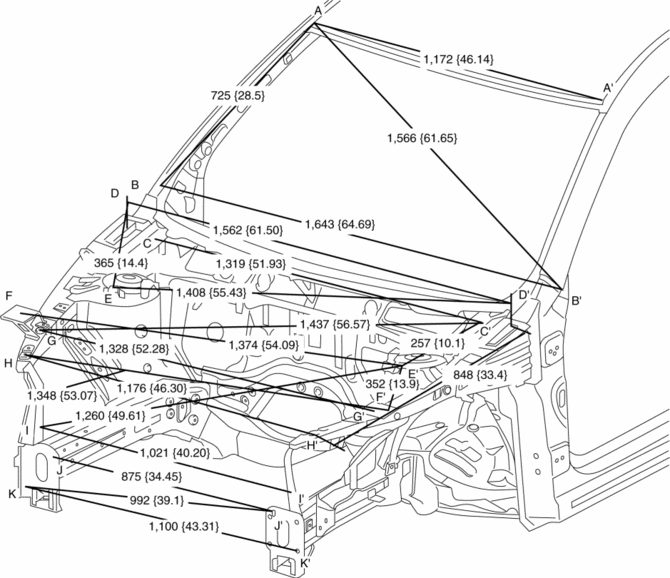
|
Point symbol |
Designation |
Hole diameter or bolt or nut size mm {in} |
|
A |
Roof seamless location |
- |
|
B |
Cabin side outer frame (front pillar outer) projection location |
- |
|
C |
Wiper bracket datum hole |
?7 {0.3} |
|
D |
Hood hinge installation hole |
?10 {0.39} |
|
E |
Front suspension upper mounting installation hole |
?10.2 {0.402} |
|
F |
Front fender panel installation hole |
?7 {0.3} |
|
G |
Apron reinforcement lower datum hole |
?10 {0.39} |
|
H |
Front fender panel installation hole |
?7 {0.3} |
|
I |
Side stay datum hole |
?10 {0.39} |
|
J |
Front bumper reinforcement installation hole |
?12 {0.47} |
|
K |
Front bumper reinforcement installation hole |
?12 {0.47} |
 Front Body Straight Line Dimensions (1) [Dimensions]
Point symbol
Designation
Hole diameter or bolt or nut size mm {in}
A
Cowl panel installation hole
?5 {0.2}
...
 Front Crossmember Removal/Installation
CAUTION:
Performing the following procedures without first removing the front ABS
wheel-speed sensor may possibly cause an open circuit in the wiring harness
if it is pulled by mistake. ...
Other materials:
Air Intake Actuator Inspection [Manual Air Conditioner]
1. Connect battery positive voltage to air intake actuator terminal B (or C),
connect terminal C (or B) to ground, and then verify that the air intake actuator
operates as shown in the table.
If the operation condition is not normal, replace the air intake actuator.
...
Glove Compartment Removal/Installation
1. Push the glove compartment in the direction of the arrow (1) and remove hooks
A.
2. Pull the stay damper in the direction of the arrow (2) shown in the figure
and remove the hook B.
CAUTION:
If the glove compartment is closed without being joined to the stay damper,
the sta ...
Oil Control Valve (OCV) [Skyactiv G 2.0]
Purpose, Function
The OCV switches the oil passage to the hydraulic variable valve timing actuator
to control the opening/closing period of the exhaust valve.
Construction
The OCV is installed to the exhaust camshaft cap (No.1).
The OCV consists of a spool valve wh ...
