Mazda CX-5 Service & Repair Manual: Front Beltline Molding Removal/Installation
CAUTION:
-
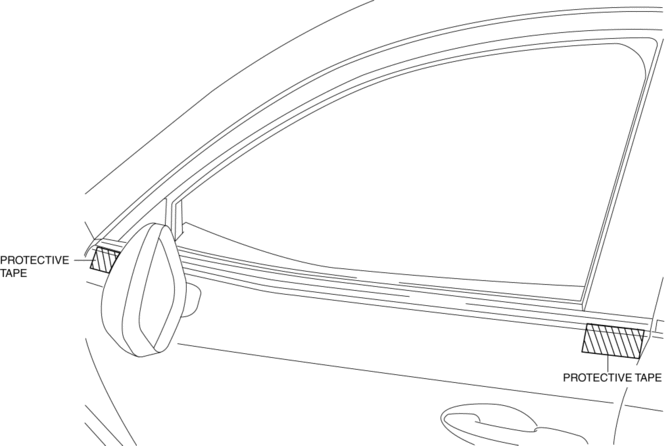
Affix protective tape to the position shown in the figure.
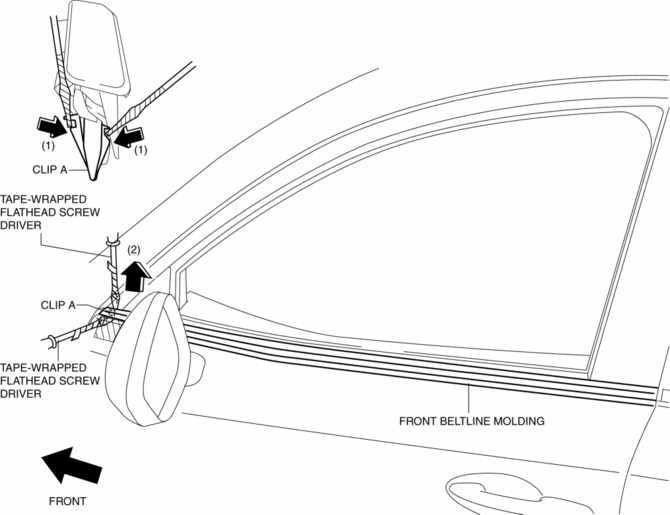
1. Fully open the front door glass.
2. Insert a tape-wrapped flathead screwdriver and then detach clips A in the direction of arrow (1) shown in the figure.
3. Pull up the front side of front beltline molding in the direction of arrow (2) shown in the figure.
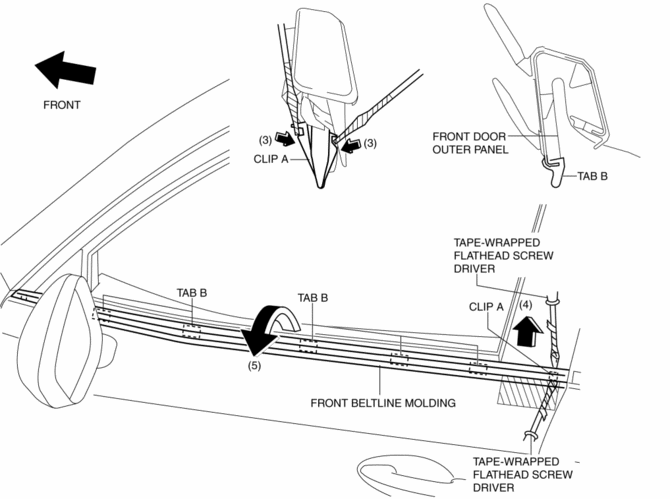
4. Insert a tape-wrapped flathead screwdriver and then detach clips A in the direction of arrow (3) shown in the figure.
5. Pull up the rear side of front beltline molding in the direction of arrow (4) shown in the figure.
6. Rotate the front beltline molding in the direction of the arrow (5) shown in the figure and remove it while detaching tabs B.
7. Install in the reverse order of removal.
 Floor Under Cover Removal/Installation
1. Lift up the vehicle.
2. Remove bolts A.
3. Remove fasteners B.
4. Remove the floor under cover No.1.
5. Remove nuts C.
6. Remove fasteners D.
7. Remove bolts E.
8. Remove the ...
 Front Bumper Disassembly/Assembly
1. Disassemble in the order indicated in the table.
1
Rivet
2
Grille bracket
3
Front bumper retainer
...
Other materials:
Rear Stabilizer Removal/Installation [2 Wd]
WARNING:
Verify that the rear crossmember is securely supported by a jack. If the
rear crossmember falls off, it can cause serious injury or death, and damage
to the vehicle.
CAUTION:
Performing the following procedures without first removing the rear ABS wheel-spee ...
Power Brake Unit Inspection
NOTE:
The following inspection methods are simple inspection methods to judge the
function of the power brake unit.
If there is any malfunction in the power brake unit, replace the power brake
unit as a single unit.
Without Using SST
Operation inspection
1. With the eng ...
Anticorrosion, Sound Insulation, And Vibration Insulation
Body Sealing
Apply body sealer where necessary.
For locations where application of body sealer is difficult after installation,
apply it before installation.
Application of Undercoating
Apply an undercoat to the required location of the body.
Application ...
