
Mazda CX-5 Service & Repair Manual: Floor Side Panel Removal [Panel Replacement]
Symbol Mark

Removal Procedure
1. Drill the 35 locations indicated by (A) shown in the figure, then remove the floor side panel No.1.
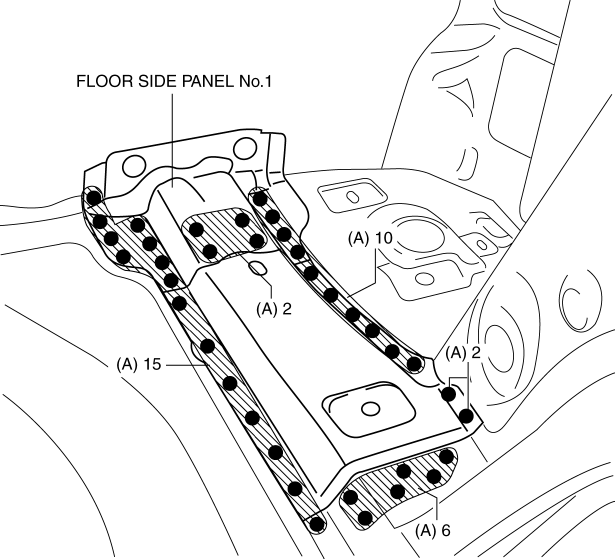
2. Drill the 5 locations indicated by (B) shown in the figure.
3. Drill the 4 locations indicated by (C) from rear wheel housing shown in the figure.
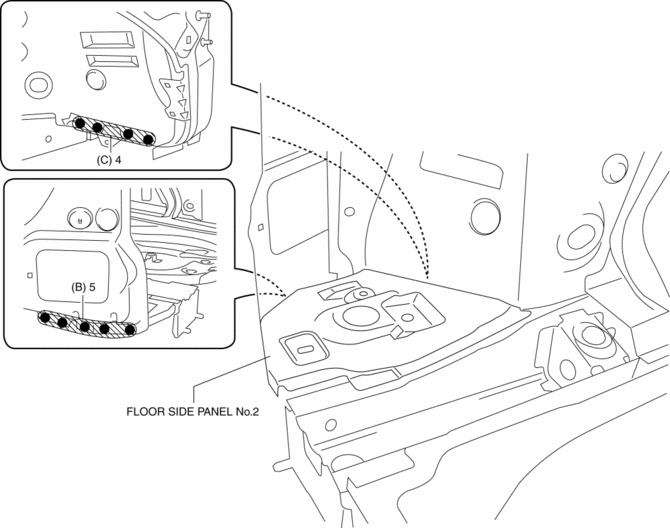
4. Remove the floor side panel No.2.
 Floor Side Panel Installation [Panel Replacement]
Symbol Mark
Installation Procedure
1. When installing new parts, measure and adjust the body as necessary to conform
with standard dimensions.
2. Drill holes for the plug welding before inst ...
 Floor Under Cover Removal/Installation
1. Lift up the vehicle.
2. Remove bolts A.
3. Remove fasteners B.
4. Remove the floor under cover No.1.
5. Remove nuts C.
6. Remove fasteners D.
7. Remove bolts E.
8. Remove the ...
Other materials:
Steering Wheel And Column Removal/Installation
WARNING:
Handling the air bag module improperly can accidentally operate (deploy)
the air bag module, which may seriously injure you. Read the service warnings
and cautions before handling the air bag module..
The steering column (EPS motor) temperature increases directly after ...
Rear Side Marker Light Bulb Removal/Installation
1. Disconnect the negative battery cable..
2. Insert a tape-wrapped flathead screwdriver into the service hole in the position
shown in the figure.
3. Move the flathead screwdriver in the direction of the arrow (1) shown in the
figure, pull out the service hole cover, and detach the serv ...
Solar Radiation Sensor [Full Auto Air Conditioner]
Purpose
The solar radiation sensor detects the sunlight intensity emitted to the
cabin.
Function
The solar radiation sensor converts the detected solar radiation amount to
an electric signal.
Construction
A photodiode (light receiving diode) has been adopted fo ...
