Mazda CX-5 Service & Repair Manual: Filament Repair
1. Clean the filament using isopropyl alcohol.
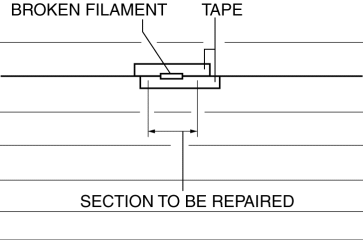
2. Attach tape to both sides of the filament.
3. Using a small brush or marking pen, apply silver paint.
4. After 2—3 min,
carefully remove the tape without damaging the applied area.
CAUTION:
-
Do not operate the rear window defroster until the paint is completely dry. It may cause other malfunctions if it is used before the paint is dry.
5. Dry the repaired part according to the following procedure.
-
When the room temperature is 25 °C {77 °F},
leave it as it is for 24 h.
-
When a hot air blower is used, dry with the 150 °C {302 °F}
air for 30 min.
 Filament Inspection
1. Switch the ignition ON (engine off).
2. Turn the rear window defroster switch on.
CAUTION:
Directly touching the rear window defroster filament with the lead of the
tester could ...
 Front Door Glass Removal/Installation
1. Perform the front door glass preparation..
NOTE:
Before removing the front door glass, the removal procedure for the front
door glass installation bolt can be facilitated by adjusting ...
Other materials:
Engine Removal/Installation
WARNING:
A hot engine can cause severe burns. Turn off the engine and wait until it
is cool before servicing.
Fuel vapor is hazardous. It can very easily ignite, causing serious injury
and damage. Always keep sparks and flames away from fuel.
Fuel line spills and leakag ...
Lighting System Personalization
A personalization function has been adopted with which settings for each
function can be changed.
The following settings for the auto light system and interior light control
system can be changed as desired.
There are two types of customization procedures; one using the M ...
Rear Drive Shaft Removal/Installation
CAUTION:
Performing the following procedures without first removing the ABS wheel?speed
sensor may possibly cause an open circuit in the harness if it is pulled by
mistake. Before performing the following procedures, remove the ABS wheel?speed
sensor (wheel side) and fix it to an ...
