Mazda CX-5 Service & Repair Manual: Extractor Chamber Removal/Installation
1. Disconnect the negative battery cable..
2. Remove the following parts:
a. Rear splash shield.
b. Rear combination light.
c. Rear bumper.
3. Insert a tape-wrapped flathead screwdriver shown in the figure and remove clips in the direction of arrow (1).
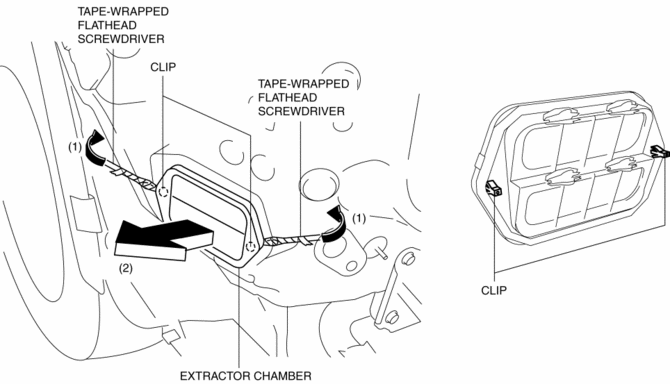
4. Remove the extractor chamber in the direction of arrow (2).
5. Install in the reverse order of removal.
 Exterior Trim
Outline
Exterior is equipped with the under cover on the vehicles under-surface.
Structure View
...
 Floor Side Panel Installation [Panel Replacement]
Symbol Mark
Installation Procedure
1. When installing new parts, measure and adjust the body as necessary to conform
with standard dimensions.
2. Drill holes for the plug welding before inst ...
Other materials:
Purge Control
Outline
An appropriate amount of evaporative gas is fed into the intake manifold
by the purge solenoid valve operation according to the engine operation conditions.
This ensures driveability and prevents release of evaporative gas into the atmosphere.
The PCM drives the purge so ...
Crash Zone Sensor [Standard Deployment Control System]
Purpose
The crash zone sensor detects an impact during a frontal or frontal offset
collision to the vehicle.
Function
The crash zone sensor converts the detected impact to an electrical signal.
Construction
The crash zone sensor is built into the clutch sensor.
...
Hydraulic Variable Valve Timing Actuator
Purpose, Function
The hydraulic variable valve timing actuator operates according to the hydraulic
pressure and changes the phases of the exhaust camshaft. As a result, the open/close
period of the exhaust valve is changed, optimized valve timing in accordance
with driving conditions ...
