Mazda CX-5 Service & Repair Manual: Expansion Valve Removal/Installation
1. Disconnect the negative battery cable..
2. Discharge the refrigerant from the system..
CAUTION:
-
If moisture or foreign material enters the refrigeration cycle, cooling ability will be lowered and abnormal noise will occur. Always immediately plug all open fittings after removing any refrigeration cycle parts to keep moisture or foreign material out of the cycle.
3. Remove the nut.
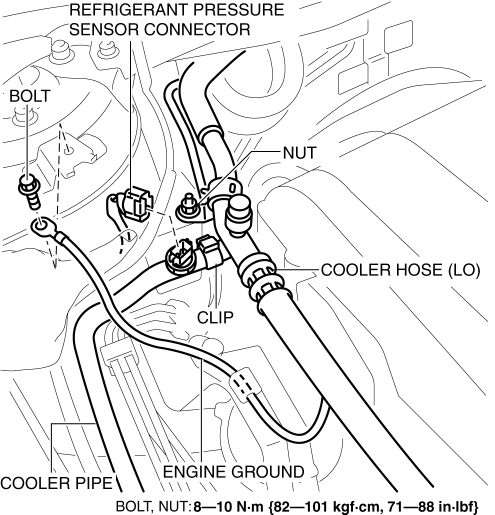
4. Remove the clip.
5. Disconnect the refrigerant pressure sensor connector.
6. Disconnect the engine ground.
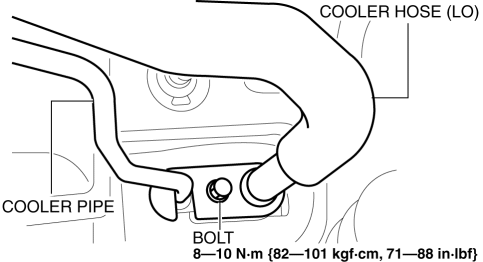
7. Remove the bolt and disconnect the cooler hose (LO) and cooler pipe. Do not allow compressor oil to spill.
8. Set the cooler hose (LO) and cooler pipe aside as shown in the figure while being careful not to let remaining oil in the pipes to spill.
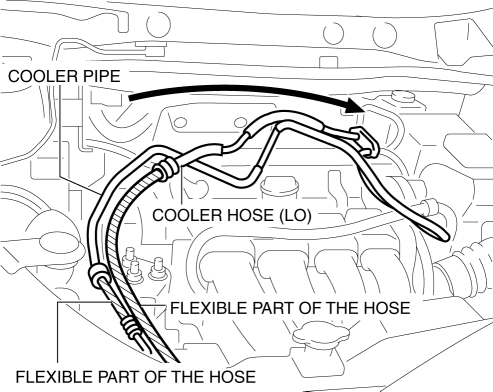
CAUTION:
-
When setting the cooler hose (LO) and cooler pipe aside, only bend the flexible part of the hose. If force is applied to areas other than the flexible hose, the pipe will bend and could be damaged.
9. Remove the bolt.
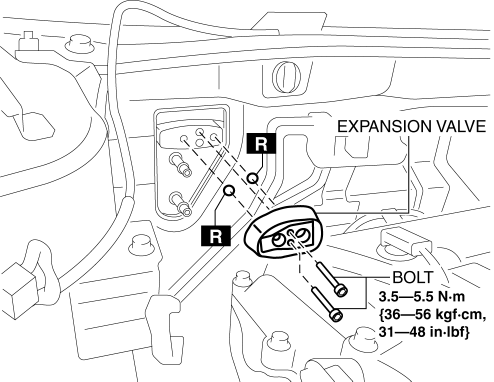
10. Remove the expansion valve. Do not allow compressor oil to spill.
11. Install in the reverse order of removal.
12. Perform the refrigerant system performance test..
 Expansion Valve
Purpose
The expansion valve atomizes liquid refrigerant to facilitate cooling of
the evaporator.
Function
The expansion valve reduces the pressure of liquid refrigerant rapidly ...
 Fan Switch Inspection [Manual Air Conditioner]
1. Disconnect the negative battery cable..
2. Remove the following parts:
a. Shift lever knob (MTX).
b. Glove compartment.
c. Front console box.
d. Shift panel.
e. Upper panel.
f. Rear c ...
Other materials:
Rear Brake (Disc) Removal/Installation
1. Loosen the adjusting nut..
2. Remove in the order indicated in the table.
3. Install in the reverse order of removal.
4. After installation, add brake fluid, bleed the air, and inspect for fluid
leakage..
5. Pump the brake pedal a few times and inspect the following:
The disc pa ...
Rear Side Panel Installation [Panel Replacement]
Symbol Mark
Installation Procedure
1. When installing new parts, measure and adjust the body as necessary to conform
with standard dimensions.
2. Drill holes for the plug welding before installing the new parts.
3. After temporarily installing new parts, make sure the related parts fit p ...
Cylinder Block
Purpose, Function
The cylinder block forms the cylinder and crankcase.
Construction
The cylinder block consists of the upper cylinder block and lower cylinder
block.
The cylinder block is an open deck type with excellent cooling performance.
The lightweight cyl ...
