Mazda CX-5 Service & Repair Manual: Exhaust Manifold
Purpose, Function
-
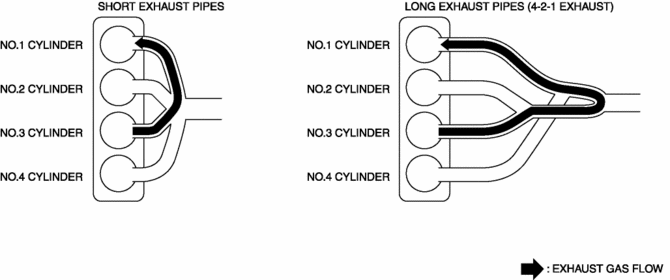
By lengthening the exhaust passage, the transmission of exhaust pressure waves to other cylinders can be delayed, and the amount of gas exhausted from a cylinder and forced back inside the combustion chamber is reduced By reducing the residual gas, the temperature inside the combustion chamber is reduced and the occurrence of knocking even at a high compression ratio is inhibited.
Construction
-
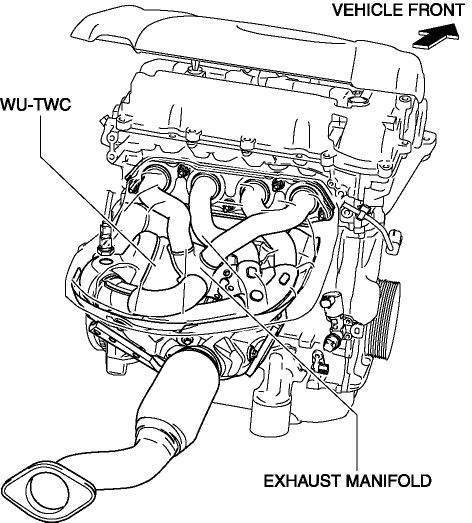
The exhaust manifold is installed to the rear of the engine. In addition, the catalytic converter (WU-TWC) is integrated (WU-TWC).
-
When the No.1 cylinder is at the intake stroke, the No.3 cylinder is at the exhaust stroke. By inducing the high temperature gas exhausted from the No.3 cylinder into the No.1 cylinder, the high temperature gas in the No.1 cylinder remains. If the amount of residual gas is high, the temperature in the combustion chamber rises and knocking can easily occur. With the 4-2-1 exhaust system, the transmission of exhaust pressure waves between each cylinder is delayed by the long exhaust pipes.

 Exhaust System Removal/Installation
WARNING:
A hot engine and exhaust system can cause severe burns. Turn off the engine
and wait until they are cool before removing the exhaust system.
2WD
1. Disconnect the negative b ...
Other materials:
Water Pump
Purpose, Function
The water pump operates by obtaining drive force from the engine via the
drive belt to pump engine coolant.
Construction
The water pump is installed to the engine front.
The water pump consists of the following parts:
A hard plasti ...
Active Command Modes Inspection [Blind Spot Monitoring (Bsm)]
1. Connect the M-MDS to the DLC-2.
2. After the vehicle is identified, select the following items from the initialization
screen of the M-MDS.
a. Select “DataLogger”.
b. Select “Modules”.
c. Select “BSML” or “BSMR”.
3. Select the simulation items from the PID table.
4. ...
Receiver/Drier Removal/Installation
1. Disconnect the negative battery cable..
2. Discharge the refrigerant..
3. Remove the front under cover No.1..
4. Drain the engine coolant..
5. Remove the following parts:
a. Plug hole plate.
b. Air cleaner, air hose and fresh air duct component.
c. Coolant reserve tank.
d. Cooling ...
