Mazda CX-5 Service & Repair Manual: Eps Control Module Inspection
1. Remove the driver-side front scuff plate..
2. Remove the driver-side front side trim..
3. Remove the car-navigation unit (with car-navigation system)..
4. Remove the switch panel..
5. Remove the decoration panel..
6. Remove the shift lever knob (MTX vehicles)..
7. Remove the selector lever knob (ATX vehicles)..
8. Remove the front console box..
9. Remove the shift panel..
10. Remove the upper panel..
11. Remove the rear console..
12. Remove the side wall..
13. Remove the front console..
14. Disconnect the hood release lever from the lower panel..
15. Remove the lower panel..
16. Remove the driver-side front heat duct..
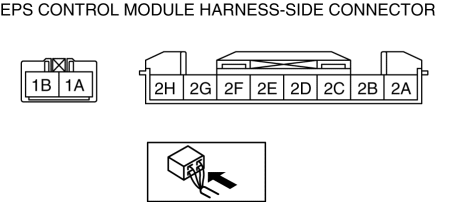
17. Attach the tester lead to the underside of the EPS CM connector and inspect the voltage according to the terminal voltage table (reference).
Terminal Voltage Table (Reference)
|
Terminal |
Signal name |
Connected to |
Measured item |
Measured terminal (measurement condition) |
Voltage (V) |
Inspection item(s) |
|
1A |
Ground |
Ground point |
Voltage |
Under any condition |
1 or less |
|
|
1B |
Battery power supply |
Battery |
Voltage |
Under any condition |
B+ |
|
|
2A |
CAN_H |
— |
Perform DTC inspection |
— |
||
|
2B |
— |
— |
— |
— |
— |
— |
|
2C |
— |
— |
— |
— |
— |
— |
|
2D |
CAN_L |
— |
Perform DTC inspection |
— |
||
|
2E |
— |
— |
— |
— |
— |
— |
|
2F |
— |
— |
— |
— |
— |
— |
|
2G |
— |
— |
— |
— |
— |
— |
|
2H |
Ignition power supply |
IG1 relay |
Voltage |
Ignition ON (engine off or on) |
B+ |
|
|
Ignition OFF (LOCK) |
1 or less |
|||||
 Electric Power Steering System
Outline
A column assist type EPS has been adopted for all models.
EPS provides smooth handling from low to high speeds as a result of the excellent
steering feel provided by the elec ...
 Oil Control Valve (OCV) Inspection [Skyactiv G 2.0]
Coil Resistance Inspection
1. Disconnect the negative battery cable..
2. Remove the plug hole plate..
3. Disconnect the OCV connector.
4. Measure the resistance between terminals A and B using ...
Other materials:
Coupling Component Calibration Data Writing
1. Connect the M-MDS to the DLC-2.
2. After the vehicle is identified, select the following items from the toolbox
of the M-MDS.
Select “Chassis”.
3. Then, select items from the screen menu in the following order.
Select “4WD/AWD”.
Select “Coupling Calibra ...
Car Navigation System Does Not Operation [Car Navigation System]
Possible DTC
Even if the map screen is touched, the car-navigation system cannot be
operated
POSSIBLE CAUSE
Audio unit malfunction (bad LCD panel)
Car-navigation unit malfunction
Diagnosti ...
Engine Oil Level Inspection
1. Position the vehicle on level ground.
2. Warm up the engine.
3. Stop the engine and allow at least 5 min before continuing.
4. Remove the dipstick, wipe it cleanly, and reinstall it fully.
5. Remove the dipstick and verify that the oil level is between the F and L marks
on the dipstick. ...
