Mazda CX-5 Service & Repair Manual: Engine Coolant Temperature (ECT) Sensor Inspection
Resistance Inspection
WARNING:
-
When the engine is hot, it can badly burn. Turn off the engine and wait until it is cool before removing the ECT sensor.
ECT Sensor No.1
1. Remove the ECT sensor No.1..
2. Place the ECT sensor No.1 in water with a thermometer, and heat the water gradually.
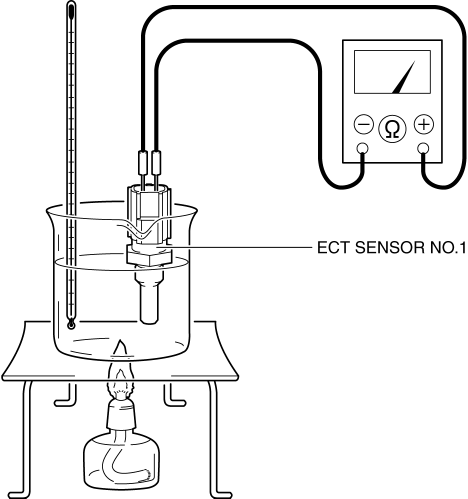
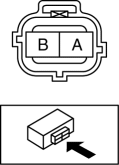
3. Measure the resistance between ECT sensor No.1 terminals A and B.
-
If not as specified, replace the ECT sensor No.1..
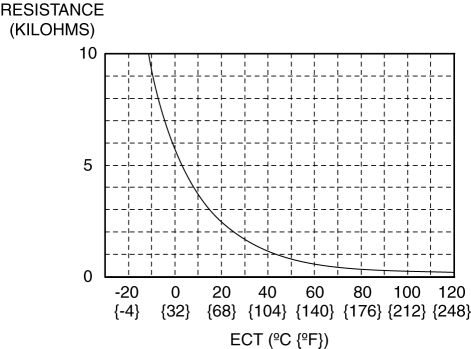
|
ECT (°C {°F}) |
Resistance (Kilohms) |
|
20 {68} |
Approx. 2.45 |
|
80 {176} |
Approx. 0.318 |
ECT Sensor No.2
1. Remove the ECT sensor No.2..
2. Place the ECT sensor No.2 in water with a thermometer, and heat the water gradually.
3. Measure the resistance between ECT sensor No.2 terminals A and B.
-
If not as specified, replace the ECT sensor No.2..
|
ECT (°C {°F}) |
Resistance (Kilohms) |
|
20 {68} |
Approx. 2.45 |
|
80 {176} |
Approx. 0.318 |
 Engine Coolant Replacement
WARNING:
Never remove the cooling system cap or loosen the radiator drain plug while
the engine is running, or when the engine and radiator are hot. Scalding engine
coolant and steam may ...
 Engine Coolant Temperature (ECT) Sensor Removal/Installation
WARNING:
When the engine is hot, it can badly burn. Turn off the engine and wait until
it is cool before removing the ECT sensor.
ECT Sensor No.1
1. Disconnect the negative battery c ...
Other materials:
Rear Brake (Disc) Removal/Installation
1. Loosen the adjusting nut..
2. Remove in the order indicated in the table.
3. Install in the reverse order of removal.
4. After installation, add brake fluid, bleed the air, and inspect for fluid
leakage..
5. Pump the brake pedal a few times and inspect the following:
The disc pa ...
Pressure Control Valve Inspection [Skyactiv G 2.0]
1. Remove the pressure control valve assembly..
CAUTION:
Do not apply a pressure 36 kPa {0.37 kgf/cm2, 5.2 psi} or more. Doing so
will damage the pressure control valve and evaporative hose.
2. Apply a pressure of 36 kPa {0.37 kgf/cm2, 5.2 psi} to port A.
3. Verify that ther ...
Transaxle Fluid Temperature (Tft) Sensor [Fw6 A EL, Fw6 Ax EL]
Purpose/Function
The transaxle fluid temperature (TFT) sensor detects the ATF temperature
in the oil pan.
The transaxle fluid temperature (TFT) sensor signal is used for automatic
shift control, TCC control, line pressure control, direct electric shift control,
learning contr ...
