Mazda CX-5 Service & Repair Manual: Electric Variable Valve Timing Control
Outline
-
The PCM determines the optimum intake valve timing according to the engine operation conditions, and sends the motor drive signals to the electric variable valve timing driver. With the adoption of the electric drive system, variable intake valve timing can be controlled without any influence from the engine conditions, thus the fuel economy has been improved and pumping loss has been decreased.
-
Based on the coordination with the hydraulic variable valve timing control and by increasing the amount of overlap during high engine loads, nitrogen oxide (NOx) occurring largely at high temperatures is reduced by re-circulating exhaust gas into the combustion chamber which reduces combustion temperature.
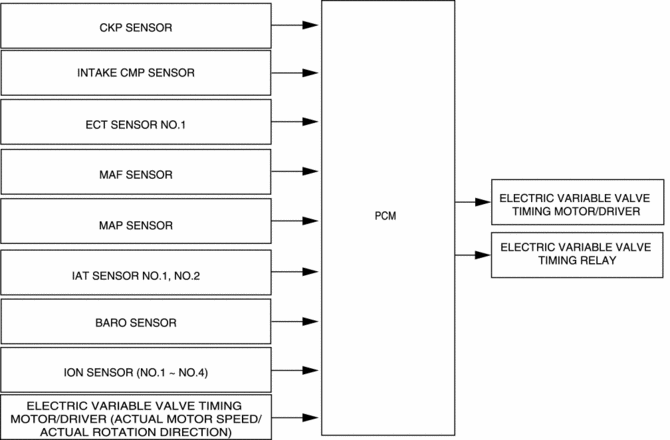
Block Diagram
Operation
Intake valve timing determination
-
The PCM determines the optimum target intake valve timing according to the engine operation conditions, and controls the output duty ratio to the electric variable valve timing driver so that the actual intake valve timing approaches close to the target intake valve timing.
-
Target valve timing
-
The target intake valve timing is determined according to the engine speed, charging efficiency, and engine coolant temperature.
-
Actual valve timing
-
The actual intake valve timing is calculated by adding a correction, which is based on the electric variable valve timing actuator signal value, to the value calculated by subtracting the cam maximum retard learning value from the standard intake valve timing.
-
The standard intake valve timing is calculated based on the signals from the crankshaft position and camshaft position sensors.
-
Cam maximum retard learning value
-
The cam maximum retard learning value is determined by the maximum retard indication output from the PCM and the standard intake valve timing when the standard intake valve timing is stabilized.
Output duty ratio determination
-
The PCM divides the electric variable valve timing motor drive range modes according to the engine operation conditions, and determines the output duty ratio to the electric variable valve timing actuator in each mode.
|
Mode name |
Control description |
Control conditions |
|
Feedback mode |
|
|
|
Energization cut mode |
|
|
|
Phase holding mode |
|
|
 Driver Side Air Bag Module [Standard Deployment Control System]
Purpose
When the driver-side air bag module receives an impact from a frontal or
frontal offset collision, the operation (deployment) of the air bag mediates
the impact to the head and fa ...
 Electronic Control System Outline [Fw6 A EL, Fw6 Ax EL]
Outline
In the electronic control system, the TCM calculates the control content
based on signals from each type of sensor and switch to operate output parts
such as each solenoid. In con ...
Other materials:
AUX/USB/iPod mode
Audio can be heard from the vehicle's speakers by connecting a commercially available
portable audio unit to the auxiliary jack.
A commercially-available, non-impedance (3.5 ) stereo mini plug cable is required.
Contact an Authorized Mazda Dealer for details.
In addition, audio can be playe ...
Evaporator Temperature Sensor [Manual Air Conditioner]
Purpose
The evaporator temperature sensor detects the airflow temperature passing
through the evaporator.
Function
The evaporator temperature sensor converts the detected temperature to an
electric signal.
Construction
A thermistor-type evaporator temperature s ...
Customer Assistance (Mexico)
Your complete and permanent satisfaction is our business. We are here to serve
you. All Authorized Mazda Dealers have the knowledge and the tools to keep your
Mazda vehicle in top condition.
If you have any questions or recommendations for improvement regarding the service
of your Mazda vehic ...
