Mazda CX-5 Service & Repair Manual: Discharge Headlight System Inspection
WARNING:
-
Incorrect servicing of the discharge headlights could result in electrical shock. Before servicing the discharge headlights, always refer to the service warnings..
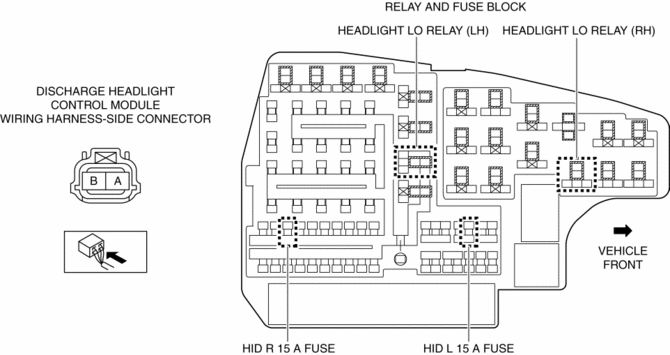
Terminal layout
Inspection procedure
|
Step |
Inspection |
Action |
|
|
1 |
INSPECT
RELAY
|
Yes |
Install the relays, then go to the next step. (See RELAY LOCATION.) |
|
No |
Replace the relay. (See RELAY LOCATION.) |
||
|
2 |
INSPECT
LIGHT SWITCH
|
Yes |
Go to the next step. |
|
No |
Replace the light switch. (See LIGHT SWITCH REMOVAL/INSTALLATION.) |
||
|
3 |
INSPECT
DISCHARGE HEADLIGHT CONTROL MODULE CONNECTOR
|
Yes |
Go to the next step. |
|
No |
Repair or replace the connector. |
||
|
4 |
INSPECT
DISCHARGE HEADLIGHT CONTROL MODULE FOR OPEN CIRCUIT TO GROUND CIRCUIT
|
Yes |
Go to the next step. |
|
No |
Repair or replace the wiring harness for an open circuit. |
||
|
5 |
INSPECT
DISCHARGE HEADLIGHT CONTROL MODULE POWER SUPPLY CIRCUIT
|
Yes |
Turn the light switch to the OFF position, then go to the next step. |
|
No |
Inspect the HID L 15 A fuse and HID R 15 A fuse.
|
||
|
6 |
VERIFY
IF HEADLIGHT HI/LO BULB IS BAD OR DISCHARGE HEADLIGHT CONTROL MODULE IS
MALFUNCTIONING
|
Yes |
Replace the headlight HI/LO bulb. (See HEADLIGHT BULB REMOVAL/INSTALLATION.) |
|
No |
Replace the discharge headlight control module. (See DISCHARGE HEADLIGHT CONTROL MODULE REMOVAL/INSTALLATION.) |
||
 Discharge Headlight System
Outline
The discharge headlight system utilizes a gas discharge type light to emit
a white light resembling sunlight over a wide area. Also, use of the gas discharge
type light realizes h ...
 Exterior Lighting Systems
Outline
Projector type headlights have been adopted to the front combination lights.
Auto-light system has been adopted in which TNS and headlights automatically
and optimally illumi ...
Other materials:
ABS Wheel Speed Sensor And ABS Sensor Rotor
Purpose/Function
The ABS wheel-speed sensor and ABS sensor rotor detect the rotation condition
of each wheel and transmit this information to the DSC HU/CM.
The signal from the ABS wheel-speed sensor is the primary signal that the
DSC HU/CM uses when carrying out control.
...
Afs Off Indicator Light
Purpose
The AFS OFF indicator light notifies the user that the AFS is stopped or
a malfunction occurs in the AFS.
Function
The AFS OFF indicator light illuminates when the AFS is stopped and flashes
when a malfunction occurs in the AFS.
Construction
When the mi ...
Passenger Sensing System [Two Step Deployment Control System]
Purpose
The passenger sensing system detects whether or not there is an occupant
on the passenger seat to control the operation (deployment) of the passenger-side
air bag system corresponding to the detected condition.
Function
Measures the total seated weight on the passen ...
