Mazda CX-5 Service & Repair Manual: Discharge Headlight Bulb
Purpose, Function
-
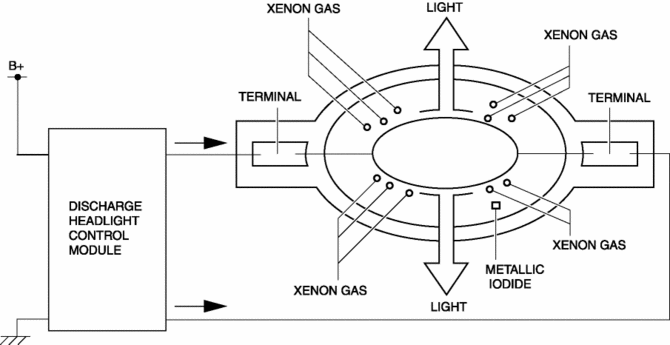
Charges the internal metallic element and emits white light resembling sunlight.
Construction
-
A mercury-free bulb has been adopted for the discharge headlight bulb.
-
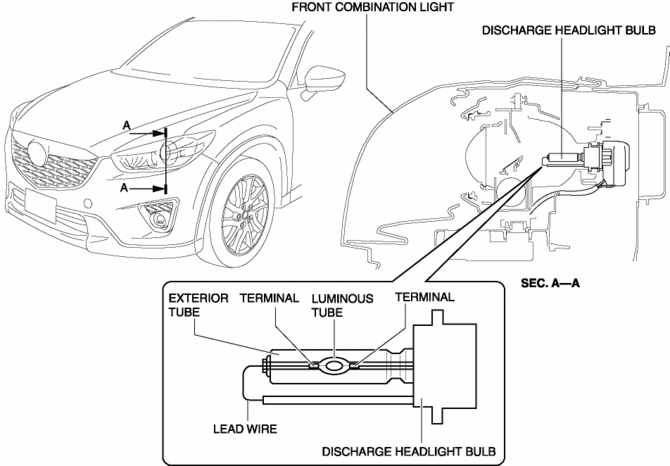
The discharge headlight bulb is assembled to the front combination light.
-
The discharge headlight bulb consists of xenon gas, a luminous tube in which metallic iodide is enclosed, a lead wire and electrodes which pass electricity, and an exterior tube.
Operation
1. When high DC voltage (approx. 25,000 V) from the discharge headlight control module is input to the electrodes, the insulation between the electrodes is broken down and electrical current flows between the electrodes.
2. When electrical current flows between the electrodes of the discharge headlight bulb, the xenon gas is energized and emits light.
3. When the xenon gas emits light, temperature inside the discharge headlight bulb rises, the metallic iodide vaporizes/separates, and the metallic element discharges and emits light.
Fail-safe
-
Function not equipped.
 DRL (Daytime Running Light) System
Outline
The DRL system automatically switches the headlights to HI beams (50% dim)
or illuminates the DRL bulb when the ignition is switched ON (engine on), the
parking brake is released, ...
 Discharge Headlight Control Module
Purpose
Converts DC voltage from the battery to AC voltage and outputs the stabilized
voltage to the discharge headlight.
Function
The discharge headlight control module control ...
Other materials:
Air Fuel Ratio (A/F) Sensor Heater Control
Outline
Based on the control of the A/F sensor heater, a stabilized oxygen concentration
is detected even at low exhaust temperatures, and feedback control of fuel injection
even at cold engine start is made possible for improved cold temperature exhaust
emission performance.
...
Ignition Coil/Ion Sensor Removal/Installation [Skyactiv G 2.0]
1. Disconnect the negative battery cable..
2. Remove the plug hole plate..
3. Remove in the order indicated in the table.
4. Install in the reverse order of removal.
1
Connector
2
Ignition coil
...
Engine Oil
NOTE
Changing the engine oil should be performed by an Authorized Mazda Dealer.
Refer to Introduction for owner's responsibility in protecting your investment.
Recommended Oil
U.S.A. and CANADA
0W-20 full synthetic recommended:
Mazda Genuine Oil is used in your Mazda vehicle and is t ...
