
Mazda CX-5 Service & Repair Manual: Differential Oil Temperature Sensor Inspection
WARNING:
-
Hot differential oil may cause severe burns. Do not perform maintenance while differential oil is hot.
1. Disconnect the negative battery cable.
2. Disconnect the differential oil temperature sensor connector and remove the differential oil temperature sensor.
3. Wrap the differential oil temperature sensor with plastic wrap and immerse it into a beaker filled with water. Gradually raise the water temperature, and measure resistance between differential oil temperature sensor terminals A and B.
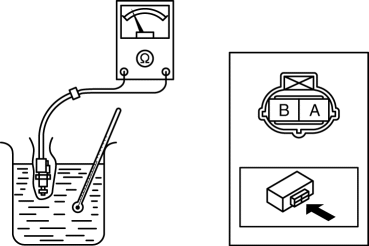
-
If not as specified, inspect the harness for continuity. If there is normal continuity between the terminals, replace the differential oil temperature sensor.
|
Water temperature (°C {°F}) |
Resistance (kilohm) |
|
0 {32} |
91—100 |
|
10 {50} |
56—61 |
|
20 {68} |
35—39 |
|
30 {86} |
23—25 |
|
40 {104} |
15—16 |
|
50 {122} |
10—11 |
|
60 {140} |
7.1—7.9 |
|
70 {158} |
5.0—5.6 |
|
80 {176} |
3.6—4.0 |
4. Install the differential oil temperature sensor and connect the connector.
5. Connect the negative battery cable..
 Differential Oil Temperature Sensor
Purpose, Function
The differential oil temperature sensor detects the rear differential oil
temperature based on the resistance of the thermistor, and inputs it to the
AWD CM.
Const ...
 Differential Oil Temperature Sensor Removal/Installation
WARNING:
Hot differential oil may cause severe burns. Do not perform maintenance while
differential oil is hot.
1. Disconnect the negative battery cable.
2. Disconnect the different ...
Other materials:
Synchronizer Mechanism [C66 M R]
Purpose, Function
For smooth gear changes, the synchronizer mechanism synchronizes the rotation
of the engaging area and engages gears.
Construction
Detent ball-type synchronizer key
A detent ball-type synchronizer key has been adopted for the synchronizer
mechanism ex ...
Front Under Cover No.1 Removal/Installation
1. Remove bolts A.
2. Remove screws B.
3. Remove fasteners C.
4. Remove the front under cover No.1 in the direction of the arrow in the order
of (1), (2) shown in the figure while detaching the guide D.
5. Install in the reverse order of removal. ...
Liftgate Latch Switch Inspection
1. Disconnect the negative battery cable..
2. Remove the following parts:
a. Liftgate upper trim.
b. Liftgate side trim.
c. Liftgate lower trim.
d. Liftgate latch and lock actuator.
3. Verify that the continuity is as indicated in the table.
If not as indicated in the tab ...
