Mazda CX-5 Service & Repair Manual: Dashboard Disassembly/Assembly
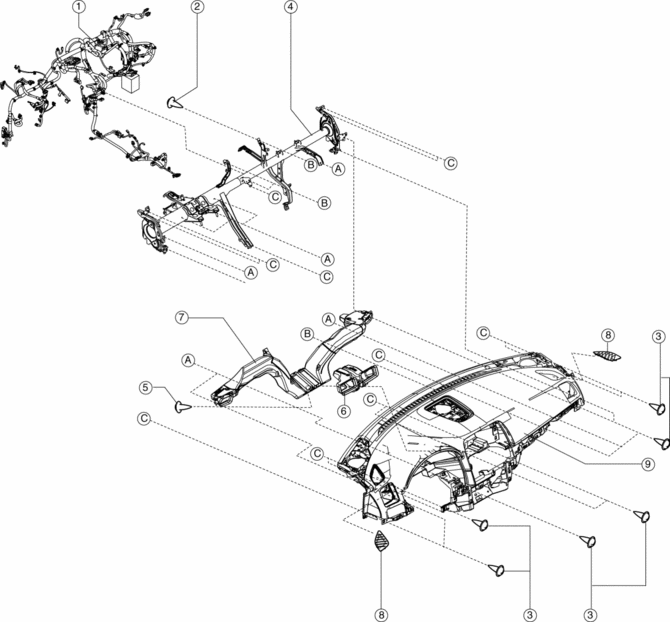
1. Disassemble in the order indicated in the table.
|
1 |
Wiring harness |
|
2 |
Screw A |
|
3 |
Screw B |
|
4 |
Dashboard member |
|
5 |
Screw C |
|
6 |
Duct No.1 |
|
7 |
Duct No.2 |
|
8 |
Demister grille |
|
9 |
Dashboard |
2. Assemble in the reverse order of disassembly.
 D Pillar Trim Removal/Installation
1. Disconnect the negative battery cable..
2. Remove the following parts:
a. Trunk board.
b. Trunk end trim.
c. Rear scuff plate.
d. Trunk side trim.
3. Take the shaded area shown in the f ...
 Dashboard Removal/Installation
1. Disconnect the negative battery cable..
2. Remove the following parts:
a. Windshield wiper arm and blade.
b. Cowl grille.
c. Windshield wiper motor.
d. Front scuff plate.
e. Front side ...
Other materials:
Non Return Valve Inspection
WARNING:
Fuel is very flammable liquid. If fuel spills or leaks from the pressurized
fuel system, it will cause serious injury or death and facility breakage. Fuel
can also irritate skin and eyes. To prevent this, always complete the “Fuel
Line Safety Procedure”, while referring ...
Glass/Windows/Mirrors
Outline
The following glass has been adopted.
Windshield
Front door glass
Rear door glass
Rear door quarter glass
Quarter window glass
Rear window glass
Outer mirror glass
The following mirrors h ...
Clutch Master Cylinder Removal/Installation [C66 M R]
CAUTION:
Secure the steering wheel using tape or a cable to prevent the steering shaft
from rotating after disconnecting the steering shaft. If the steering wheel
rotates after the steering shaft and the steering gear and linkage are disconnected,
the internal parts of the clock spr ...
