Mazda CX-5 Service & Repair Manual: Cruise Control Switch Inspection
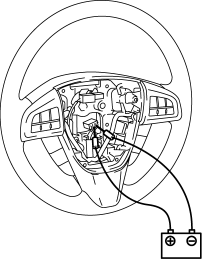
1. Disconnect the negative battery cable and wait for 1 min or more
..
2. Remove the driver?side air bag module..
3. Disconnect the clock spring connector (part wiring harness-side).
4. Measure the resistance between clock spring terminals E and A (part wiring harness-side) using a tester.
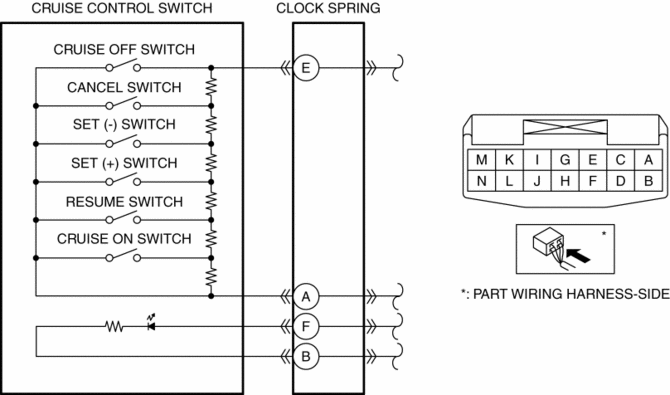
-
If as specified, go to the next step.
-
If not as specified, replace the steering switch..
|
Switch condition |
Resistance (ohm) |
|
Cruise OFF switch held at on |
Continuity |
|
CANCEL switch held at on |
Approx. 84.5 |
|
SET (?) switch held at on |
Approx. 189.5 |
|
SET (+) switch held at on |
Approx. 326.5 |
|
RESUME switch held at on |
Approx. 506.5 |
|
Cruise ON switch held at on |
Approx. 761.5 |
|
Neutral |
Approx. 3,311.5 |
5. Apply battery positive voltage to clock spring terminal F (part wiring harness-side), and terminal B (part wiring harness-side) to ground.
6. Verify that the LED illuminates.
-
If the LED does not illuminate, replace the steering switch..
 Cruise Control
...
 Cruise Control System
Outline
Enables driving at a constant speed by setting the vehicle speed with the
cruise control switch instead of operating the accelerator pedal.
The PCM controls the throttle valv ...
Other materials:
Airflow Mode Actuator [Full Auto Air Conditioner]
Purpose
The airflow mode actuator moves the mode door in the A/C unit to switch the
air vent.
Function
Door open/close function
The airflow mode actuator drives the motor based on the signal from the climate
control unit and moves the mode door to the VENT, BI-LEVEL, HEAT, ...
Front Door Latch Switch
Purpose, Function
Switches on/off in conjunction with the latch lever rotation, and detects
the front door open/closed condition by the voltage which is changed by the
rear body control module (RBCM).
Construction
The switch is turned on/off by the rotation of the latch lev ...
Transmission/Transaxle SST
1: Mazda SST number
2: Global SST number
Example
1:49 UN30 3009
2:303-009
Crankshaft damper remover
Clutch [C66M-R]
1:49 E011 1A0
2: –
Ring gear brake set
1:49 SE01 310A
2: –
Clutch disc center ...
