Mazda CX-5 Service & Repair Manual: Coupling Component Removal/Installation
WARNING:
-
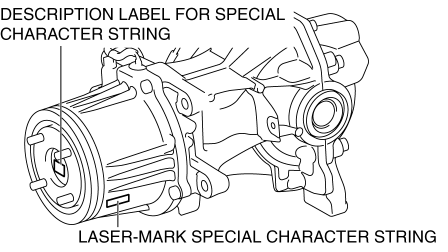
When replacing the coupling component, read the special character string before installing a new coupling component and write it to the AWD control module after replacement. The special character string is indicated in the two locations shown in the figure.
1. Drain the rear differential oil into a container.
2. Remove the propeller shaft..
3. Remove in the order indicated in the table.
4. Install in the reverse order of removal.
5. Add rear differential oil..
|
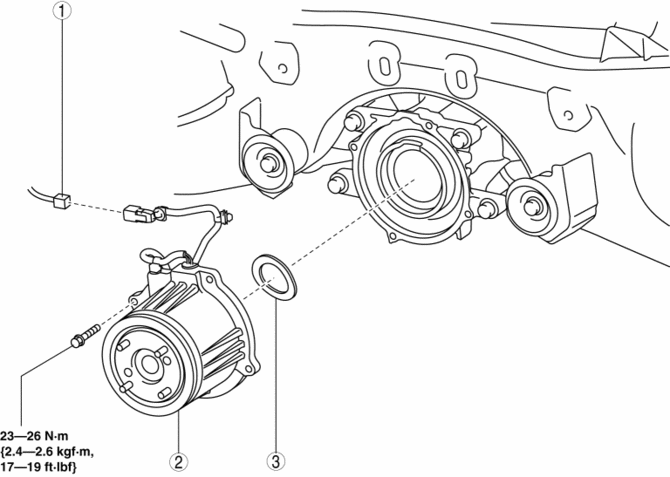
1 |
AWD solenoid connector |
|
2 |
Coupling component (See Coupling Component Removal Note.) (See Coupling Component Installation Note.) |
|
3 |
Washer |
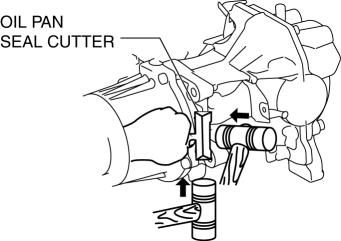
Coupling Component Removal Note
1. Support the coupling unit with a transmission jack.
2. Cut away the coupling unit using an oil pan seal cutter.
Coupling Component Installation Note
NOTE:
-
Clean away the old sealant before applying the new sealant.
-
Install the coupling component before the applied sealant starts to harden.
-
Allow the sealant to set at least 30 min
after installation before filling the differential with the specified oil.
1. Apply sealant to the coupling case surface that contacts the rear differential case.
2. Install the coupling unit to the rear differential.
-
Tightening torque
-
23—26 N·m {2.4—2.6 kgf·m, 17—19 ft·lbf}
 Coupling Component Calibration Data Writing
1. Connect the M-MDS to the DLC-2.
2. After the vehicle is identified, select the following items from the toolbox
of the M-MDS.
Select “Chassis”.
3. Then, select items from the ...
 Electronic Control Coupling
Purpose, Function
An electromagnetic clutch, which operates smoothly due to the lack influence
from the front and rear wheel traction force, has been adopted for the electronic
control co ...
Other materials:
Manual Transaxle Shift Mechanism Removal/Installation [C66 M R]
1. Disconnect the negative battery cable..
2. Remove the shift lever using the following procedure:
a. Remove the upper panel..
b. Remove the shift lever knob.
c. Remove the shift panel..
d. Remove the side wall..
e. Remove the rear console..
f. Press the tabs on the control cable ...
Active Command Modes Inspection [Instrument Cluster]
1. Connect the M-MDS to the DLC-2.
2. After the vehicle is identified, select the following items from the initialization
screen of the M-MDS.
a. Select “DataLogger”.
b. Select “Modules”.
c. Select “IC”.
3. Select the simulation items from the PID table.
4. Perform the acti ...
Front Sash Molding Removal
WARNING:
Using a utility knife with bare hands can cause injury. Always wear gloves
when using a utility knife.
1. Using a utility knife, carefully remove the double-sided adhesive tape in
the locations shown below.
CAUTION:
When removing the double-sided adhesive tape, ...
