Mazda CX-5 Service & Repair Manual: Control Valve Body [Fw6 A EL, Fw6 Ax EL]
Purpose/Function
-
A direct linear solenoid has been adopted for the solenoid valve which contributes to improved shift response, drive feel and reduced shift shock by the improved precision of the hydraulic pressure control.
Construction
-
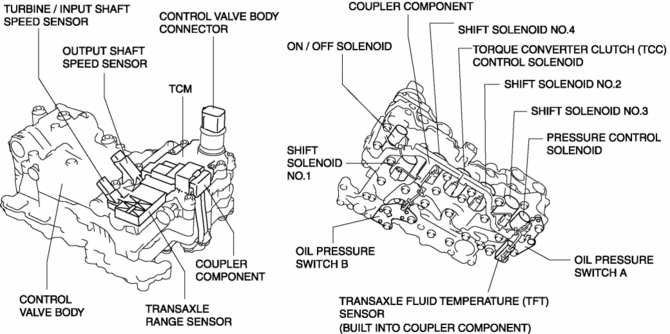
The control valve body consists of integrated hydraulic control related parts and electronic control related parts.
-
The transaxle range sensor, output shaft speed sensor, turbine/input shaft speed sensor, and the control valve body connector are built into the TCM and integrated with the automatic transaxle.
-
The transaxle fluid temperature (TFT) sensor, wiring harness, and the wiring harness cover bracket are built into the coupler component.
-
If any of the component parts of the control valve body has a malfunction, the control valve body must be replaced because the replacement of a single part is not possible except for the following parts:
-
On/off solenoid
-
Oil pressure switch A, oil pressure switch B
-
Coupler component (built into transaxle fluid temperature (TFT) sensor)
 Control Valve Body Removal/Installation [Fw6 A EL, Fw6 Ax EL]
On-Vehicle Removal
WARNING:
A hot transaxle and ATF can cause severe burns. Turn off the engine and wait
until they are cool.
Using compressed air can cause dirt and other particle ...
 Control Valve Body [Fw6 A EL, Fw6 Ax EL]
Purpose/Function
The control valve body controls the hydraulic pressure generated by the oil
pump by each solenoid valve. In addition, the oil passages which introduce hydraulic
pressure ...
Other materials:
Emission System
Purpose, Outline
A single-nano catalyst has been adopted for the under-floor, three-way catalyst
to improve emission gas purification efficiency.
Structural View
Engine compartment side
Exhaust system side
2WD
AWD
Fuel tank side
U.S.A. and CANADA (2WD)
U.S.A. a ...
Differential Oil Temperature Sensor Removal/Installation
WARNING:
Hot differential oil may cause severe burns. Do not perform maintenance while
differential oil is hot.
1. Disconnect the negative battery cable.
2. Disconnect the differential oil temperature sensor connector.
3. Remove the differential oil temperature sensor.
4. ...
Engine Oil Pressure Warning Light
Purpose
The engine oil pressure warning light warns the driver that the engine oil
level is insufficient.
Function
When the instrument cluster receives the engine oil pressure warning light
request signal sent from the PCM via the CAN signal, it illuminates the engine
oi ...
