Mazda CX-5 Service & Repair Manual: Connecting Rod, Connecting Rod Bearing
Purpose, Function
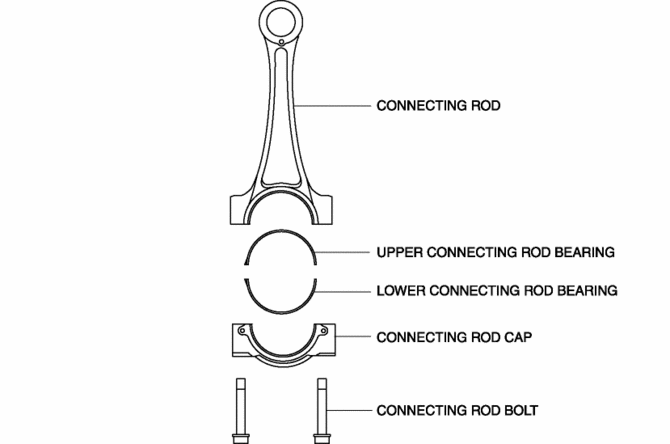
Connecting rod
-
The connecting rod transmits the reciprocating movement of the piston to the crankshaft by engaging the piston pin and crank pin.
Connecting rod bearing
-
The connecting rod bearing forms an oil film on the outer surface of the crank pin to prevent wear due to sliding.
Construction
Connecting rod
-
The connecting rod is installed between the piston pin and crank pin.
-
High-strength, forged carbon steel has been adopted for weight reduction.
-
A cracking method*1 for breaking off and separating the connecting rod from the connecting rod cap has been adopted for improved accuracy.
-
Weight has been reduced by optimizing the shape from the I shaft to the large end.
-
Reciprocating inertial weight, including the piston, has been reduced with the use of a full-float type for the connection with the piston and further tapering of the small end shape.
-
With the adoption of the plastic region tightening*2 method for the connecting rod bolt, the stability of the axial force has been improved.
*2 Plastic region tightening is a method of controlling the tightening using the rotation angle of a bolt. By tightening to the region (plastic tightening region) in which bolt deformation does not become irreversible, variation in axial force is suppressed.
Connecting rod bearing
-
The connecting rod bearing is installed on the outer surface of the crank pin.
-
The upper and lower connecting rod bearing are made of aluminum alloy.
 Piston Assembly
...
 Piston, Piston Ring, Piston Pin
Purpose, Function
Piston
The piston in the cylinder of the cylinder block moves reciprocally by the
pressure received when the air-fuel mixture combusts.
Piston ring
The piston ...
Other materials:
Power Steering
Power Steering
• Power steering is only operable when the
engine is running. If the engine is off or if the power steering system is inoperable,
you can still steer, but it requires more physical effort.
If the steering feels stiffer than usual during normal driving or the steering
vibrate ...
Front Pillar Removal [Panel Replacement]
Symbol Mark
Removal Procedure
CAUTION:
Remove the curtain air bag module to prevent damage before servicing.
Front-side
Rear-side
CAUTION:
Avoid cutting with a blowtorch or similar tools as the insulator (shaded
area) is flammable.
1. Rough cut the ...
Turn And Hazard Indicator Alarm
Purpose
The turn and hazard indicator alarm notifies the driver that a turn light
or the hazard warning lights are flashing.
Function
When the instrument cluster receives the turn signal/hazard warning indicator
light illumination request signal sent from the front body con ...
