Mazda CX-5 Service & Repair Manual: Condenser Removal/Installation
1. Disconnect the negative battery cable..
2. Remove the following parts:
a. Trunk board.
b. Trunk end trim (LH).
c. Rear scuff plate (LH).
d. Trunk side trim (LH).
e. D-pillar trim (LH).
3. Disconnect the connector.
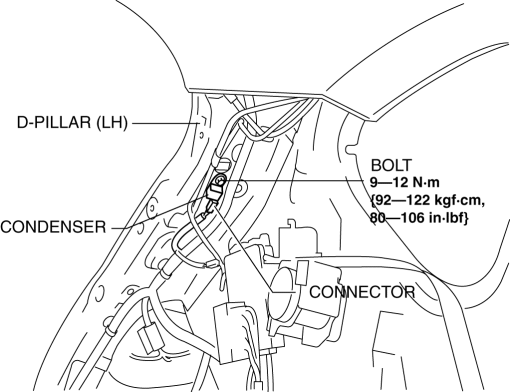
4. Remove the bolts.
5. Remove the condenser.
6. Install in the reverse order of removal..
Condenser Installation Note
-
Align with the D-pillar position and install the condenser.

 Condenser Removal/Installation
1. Disconnect the negative battery cable..
2. Discharge the refrigerant..
3. Remove the front under cover No.1..
4. Drain the engine coolant..
5. Remove the following parts:
a. Plug hole pla ...
 Control System [Full Auto Air Conditioner]
Outline
Refrigerant pressure sensor adopted in which refrigerant pressure is changed
into a linear electric signal and precise information is transmitted.
MS-CAN for communicatio ...
Other materials:
Headlight Leveling Actuator
Purpose, Function
The headlight leveling actuator drives the motor based on the target optical
axis voltage, which is input from the AFS control module, to change the optical
axis of the headlights.
Construction
Built into the front combination lights.
Consists of ...
Active Command Modes Inspection [Blind Spot Monitoring (Bsm)]
1. Connect the M-MDS to the DLC-2.
2. After the vehicle is identified, select the following items from the initialization
screen of the M-MDS.
a. Select “DataLogger”.
b. Select “Modules”.
c. Select “BSML” or “BSMR”.
3. Select the simulation items from the PID table.
4. ...
Front Sash Molding Removal
WARNING:
Using a utility knife with bare hands can cause injury. Always wear gloves
when using a utility knife.
1. Using a utility knife, carefully remove the double-sided adhesive tape in
the locations shown below.
CAUTION:
When removing the double-sided adhesive tape, ...
