Mazda CX-5 Service & Repair Manual: Column Cover Removal/Installation
1. Pull down the steering wheel.
2. Press the shaded area shown in the figure using your thumb, and lift the upper column cover in the direction of arrow (1).
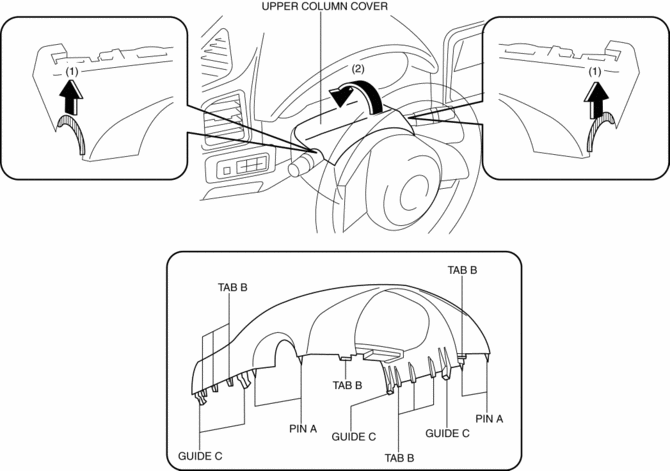
3. Pull the upper column cover in the direction of the arrow (2) and remove it while detaching pins A, tabs B and guides C.
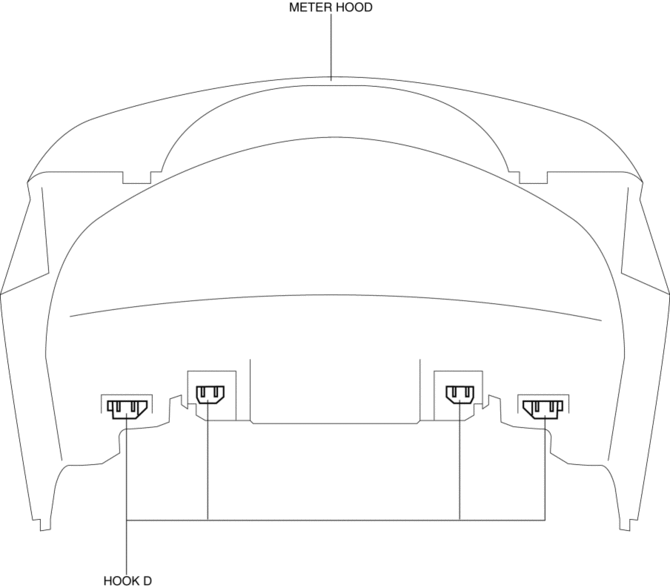
4. Remove hooks D from the meter hood.
CAUTION:
-
If the cover of the meter hood is deformed, it may not return to its original condition. When removing the cover of the meter hood, detach hooks D one by one from the upper column cover.
5. Pull up the steering wheel.
6. Remove screws E.
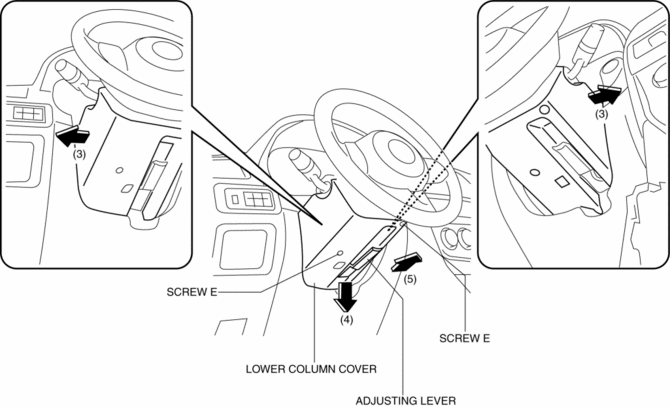
7. Remove the lower column cover in the direction of the arrow (4), (5) set the adjusting lever aside while keeping it open in the direction of the arrow (3) shown in the figure.
8. Install in the reverse order of removal.
 Center Panel Removal/Installation
1. Disconnect the negative battery cable..
2. Remove the decoration panel.
3. Take the shaded area shown in the figure, and pull the center panel in the
direction of the arrow in the order of (1 ...
 D Pillar Trim Removal/Installation
1. Disconnect the negative battery cable..
2. Remove the following parts:
a. Trunk board.
b. Trunk end trim.
c. Rear scuff plate.
d. Trunk side trim.
3. Take the shaded area shown in the f ...
Other materials:
Power Window Main Switch
Purpose
Remote control of door glass open/close and power outer mirror adjustment
are possible with occupant seated in the cabin.
Function
Power window main switch
Manual
When the power window main switch is operated for manual open/close operation,
it sends ...
Audio Control Switch Operation
When the audio unit is turned on, operation of the audio unit from the steering
wheel is possible.
NOTE
Because the audio unit will be turned off under the following conditions,
the switches will be inoperable.
• When the ignition is switched off.
• When the power button on the audio uni ...
Rear Fender Panel Removal [Panel Replacement]
Symbol Mark
Removal Procedure
CAUTION:
Avoid cutting with a blowtorch or similar tools as the insulator (shaded
area) is flammable.
1. Rough cut the 3 locations indicated by (A) shown in the figure.
2. Drill the 90 locations indicated by (B) shown in the figure.
...
