Mazda CX-5 Service & Repair Manual: Clutch Unit Removal/Installation [C66 M R]
1. Disconnect the negative battery cable..
2. Remove the MTX..
3. Remove in the order indicated in the table.
4. Install in the reverse order of removal.
5. Add the specified amount of specified transaxle oil..
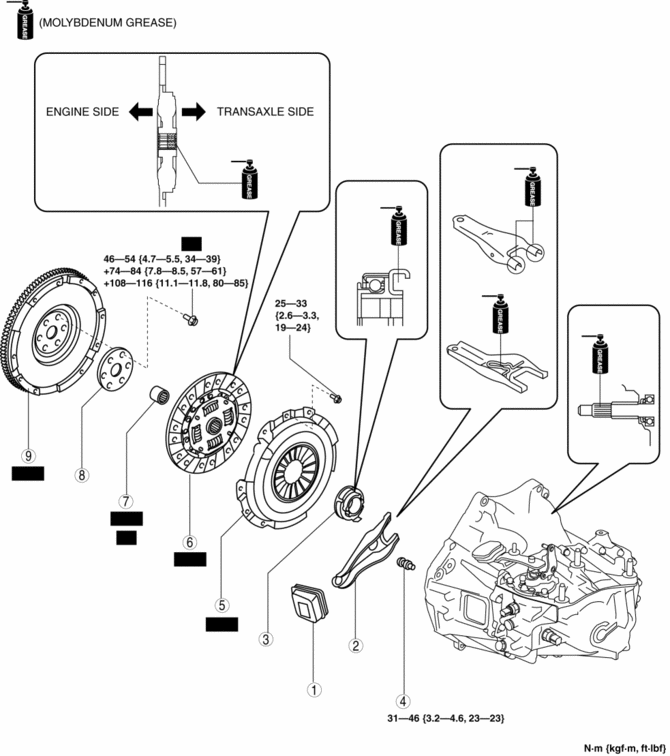
|
1 |
Boot |
|
2 |
Clutch release fork |
|
3 |
Clutch release collar |
|
4 |
Pivot pin |
|
5 |
Clutch cover (See Clutch Cover and Disc Removal Note.) (See Clutch Disc and Cover Installation Note.) |
|
6 |
Clutch disc (See Clutch Cover and Disc Removal Note.) (See Clutch Disc and Cover Installation Note.) |
|
7 |
Pilot bearing (See Pilot Bearing Removal Note.) (See Pilot Bearing Installation Note.) |
|
8 |
Plate |
|
9 |
Flywheel (See Flywheel Removal Note.) (See Flywheel Installation Note.) |
Clutch Cover and Disc Removal Note
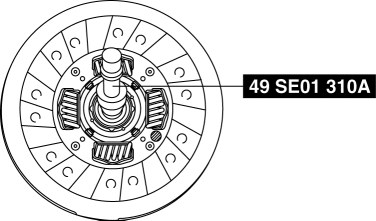
1. Hold the clutch unit using the SST
.

2. Loosen each bolt one turn at a time in a crisscross pattern until spring tension is released.
3. Remove the clutch cover and disc.
Pilot Bearing Removal Note
NOTE:
-
The pilot bearing does not need to be removed unless you are replacing it.
1. Use the SST
to remove the pilot bearing.
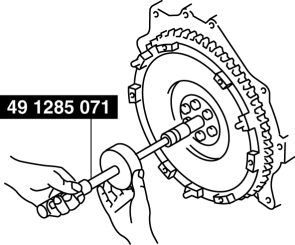
Flywheel Removal Note
1. Hold the flywheel using the SST
.
2. Remove the lock bolts, and remove the plate and the flywheel.
3. Inspect for oil leakage from the crankshaft rear oil seal.
-
If there is any malfunction, replace the crankshaft rear oil seal..
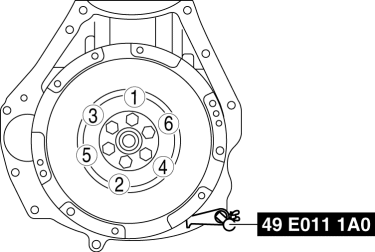
Flywheel Installation Note
1. Clean the crankshaft thread holes.
2. Install the flywheel and the plate to the crankshaft, and temporarily tighten a new lock bolts.
3. Hold the flywheel using the SST
.

4. Tighten the lock bolts completely in the order shown in the figure in the following 3 steps.
-
Tightening torque
-
Step 1: 46—54 N·m {4.7—5.5 kgf·m, 34—39 ft·lbf}
-
Step 2: 76—84 N·m {7.8—8.5 kgf·m, 57—61 ft·lbf}
-
Step 3: 108—116 N·m {11.1—11.8 kgf·m, 80—85 ft·lbf}
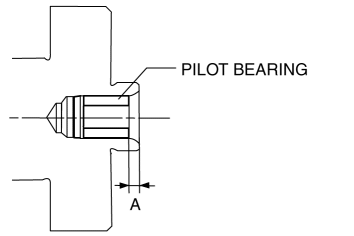
Pilot Bearing Installation Note
1. Install new pilot bearing to the specified position using the following tools.

-
Tool
-
Snap-on brand millimeter size bushing driver set (A160M) adapter A160M7 (20—22 mm)
-
Use the adapter with the 20 mm side of the A160M7 (20—22 mm) facing the pilot bearing side.
-
Substitution tool
-
Outer diameter: 21 mm {0.83 in}
-
Inner diameter: 19 mm {0.75 in}
-
Standard position
-
Distance A of pilot bearing from crankshaft end: 1.5—2.5 mm {0.060—0.098 in}
Clutch Disc and Cover Installation Note
1. Hold the clutch disc position using the SST
.
2. Hold the clutch unit using the SST
.

3. Tighten the bolts in Min. 2 stages.
a. Temporarily tighten the bolts in the order shown in the figure.
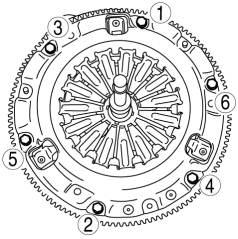
b. Tighten the bolts completely in the order shown in the figure and install the clutch disc and cover.
-
Tightening torque
-
25—33 N·m {2.6—3.3 kgf·m, 19—24 ft·lbf}
4. Remove the SST
s.
 Clutch Release Cylinder Removal/Installation [C66 M R]
CAUTION:
Do not allow clutch fluid to get on a painted surface. Clutch fluid contains
properties which can dissolve the paint. If clutch fluid gets on a painted surface,
wash it off with ...
 Clutch [C66 M R]
Purpose, Function
The clutch unit transmits or cuts the drive force between the engine and
MTX according to the clutch pedal operation.
Construction/Operation
The construction/o ...
Other materials:
Front Body Straight Line Dimensions (1) [Dimensions]
Point symbol
Designation
Hole diameter or bolt or nut size mm {in}
A
Cowl panel installation hole
?5 {0.2}
B
Wiper bracket datum hole
?7 {0.3}
C
...
Brake Fluid Pressure Sensor Inspection
1. Switch the ignition to off.
2. Remove the clips.
3. Set the splash shield out of the way.
4. Disconnect the brake pipe from the LF brake hose.
5. Remove the clip.
6. Remove the LF brake hose from the bracket.
7. Detach the brake pipe from the pipe holder.
8. Install the SST ...
Steering Wheel And Column Inspection
Play inspection
1. With the wheels in the straight-ahead position, start the engine.
2. Turn the steering wheel to the left and right gently, then verify that the
steering wheel play is within the specification.
Steering wheel play
0—30 mm {0—1.1 in}
Looseness, Exces ...
