Mazda CX-5 Service & Repair Manual: Climate Control Unit Removal/Installation [Full Auto Air Conditioner]
NOTE:
-
The climate control unit prior to replacement stores the vehicle specification information.
-
The new climate control unit does not store any vehicle specification information.
-
When the ignition is switched ON after the climate control unit is replaced, the climate control unit reads the vehicle specification information sent via CAN transmission from the instrument cluster, and stores the vehicle specification information.
1. Disconnect the negative battery cable..
2. Remove the following parts:
a. Decoration panel.
b. Shift lever knob (MTX).
c. Front console box.
d. Shift panel.
e. Upper panel.
f. Rear console.
g. Side wall.
h. Front console.
3. Remove in the order indicated in the table.
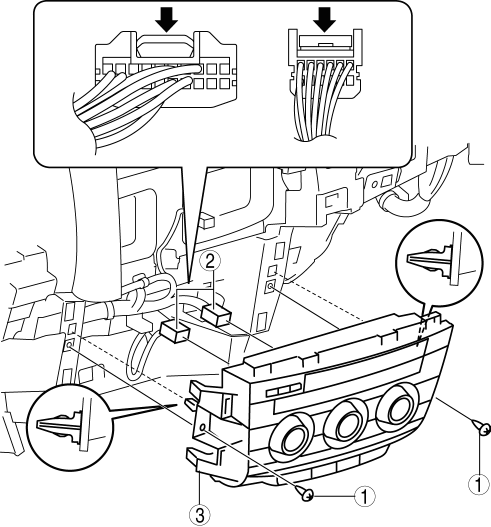
|
1 |
Screw |
|
2 |
Connector |
|
3 |
Climate control unit |
4. Install in the reverse order of removal.
5. Switch the ignition ON and perform the climate control unit automatic configuration.
6. Clear the DTCs..
 Climate Control Unit Inspection [Manual Air Conditioner]
1. Remove the climate control unit with the connector connected..
2. Switch the ignition ON (engine off or on).
3. Connect the negative (-) lead of the tester to the body ground.
4. By inserting ...
 Climate Control Unit Removal/Installation [Manual Air Conditioner]
Removal
1. Disconnect the negative battery cable..
2. Remove the following parts:
a. Shift lever knob (MTX).
b. Glove compartment.
c. Front console box.
d. Shift panel.
e. Upper panel.
...
Other materials:
Rollover Valve
Purpose, Function
Prevents fuel from flowing into the evaporative gas passage during sudden
cornering or vehicle rollover.
Construction
The rollover valve is built into the fuel tank.
U.S.A. and CANADA
Except U.S.A. and CANADA
The rollover valve con ...
Ignition Switch
Push Button Start Positions
The system operates only when the driver is in the vehicle or within operational
range while the key is being carried.
Each time the push button start is pressed, the ignition switches in the order
of off, ACC, and ON. Pressing the push button start again from ON sw ...
Engine Coolant Level Inspection
WARNING:
Never remove the cooling system cap or loosen the radiator drain plug while
the engine is running, or when the engine and radiator are hot. Scalding engine
coolant and steam may shoot out and cause serious injury. It may also damage
the engine and cooling system.
Tu ...
