Mazda CX-5 Service & Repair Manual: Climate Control Unit [Manual Air Conditioner]
Purpose
-
The climate control unit performs air conditioning according to the operation by the users and the driving conditions of the vehicle.
Function
-
The climate control unit determines optimum air-conditioning based on the input signals from each sensor and the control module and the operation signals from the control panel, and controls each actuator, A/C compressor, and the blower motor..
Construction
-
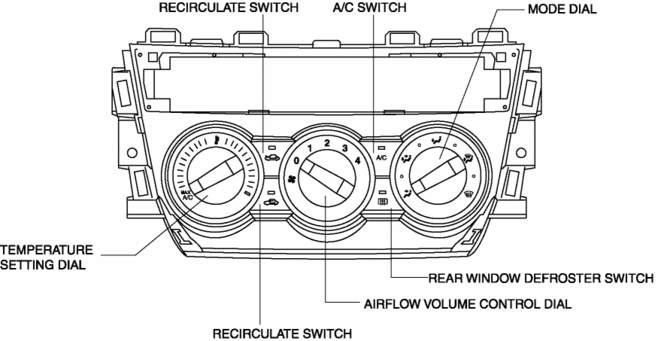
A wire-type climate control unit has been adopted.
-
The climate control unit consists of a control panel and a control unit.
-
The switches and dials shown in the figure are positioned on the control panel.
Operation
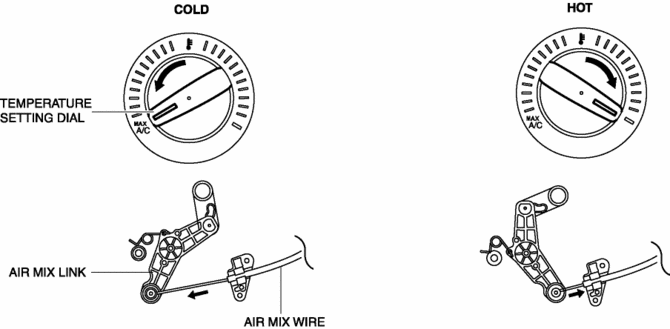
Airflow temperature setting
-
When the temperature control dial is turned, the length of the air mix wire is changed, and the air mix door position is switched via the air mix link. As a result, the blower air temperature is changed..
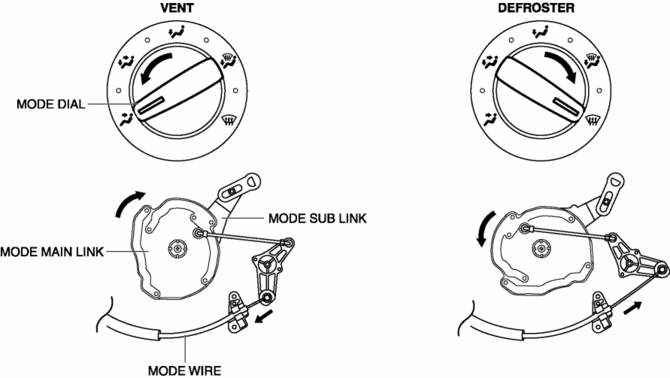
Airflow mode setting
-
When the mode dial is turned, the length of the airflow mode wire is changed, and the airflow mode door position is switched via the airflow mode main link and the airflow mode sub link. As a result, the airflow mode is changed..
Fail-safe
-
Function not equipped.
 Climate Control Unit Removal/Installation [Manual Air Conditioner]
Removal
1. Disconnect the negative battery cable..
2. Remove the following parts:
a. Shift lever knob (MTX).
b. Glove compartment.
c. Front console box.
d. Shift panel.
e. Upper panel.
...
 Condenser
Purpose
The condenser cools the high-temperature, highly pressurized refrigerant.
Function
The condenser cools the high-temperature, highly pressurized gaseous refrigerant
compr ...
Other materials:
Declaration of Conformity
Declaration of Conformity
Keyless Entry System/Immobilizer System
Blind Spot Monitoring (BSM) System
Radiation Hazard
This BSM (blind spot monitoring) device emits intentional electromagnetic radiation
in the 24 GHz to 25 GHz frequency range. The total radiated average power over the
entir ...
Floor Covering Removal/Installation
1. Disconnect the negative battery cable..
2. Remove the following parts:
a. Front scuff plate.
b. Front side trim.
c. Rear scuff plate.
d. B-pillar lower trim.
e. Rear seat cushion.
f. Front seat.
g. Lower anchor of the front seat belt (without lap pre-tensioner seat belt).
h. La ...
Cooling Fan Relay [Skyactiv G 2.0]
Purpose, Function
The cooling fan relay operates by receiving the signal from the PCM to supply
power to the cooling fan motor.
Construction
The cooling fan relay is installed on the relay and fuse block.
Operation
The contact point is on when the battery vo ...
