Mazda CX-5 Service & Repair Manual: Charcoal Canister Inspection
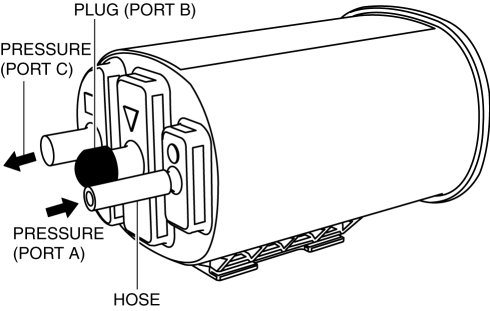
U.S.A. And CANADA
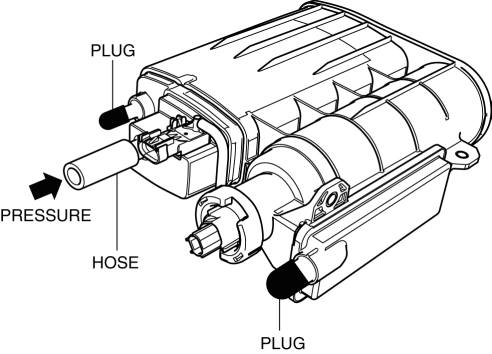
Leakage inspection
1. Perform the following procedures:
-
Do not operate CV solenoid valve.
-
Assemble the hose used for inspection to port A.
-
Cover ports B and C with the caps.

CAUTION:
-
Do not apply a pressure 20 kPa {150 mmHg, 5.91 inHg} or more to the charcoal canister for 1 min. or more. Doing so will damage the charcoal canister.
2. Apply pressure (19.6 kPa {147 mmHg, 5.79 inHg}
) through the hose, and verify that air does not leak from the charcoal canister.
-
If there is airflow, replace the charcoal canister..
-
If there is no airflow, perform the following “Airflow Inspection”..
Airflow inspection
1. Perform the following procedure to verify the charcoal canister airflow.
-
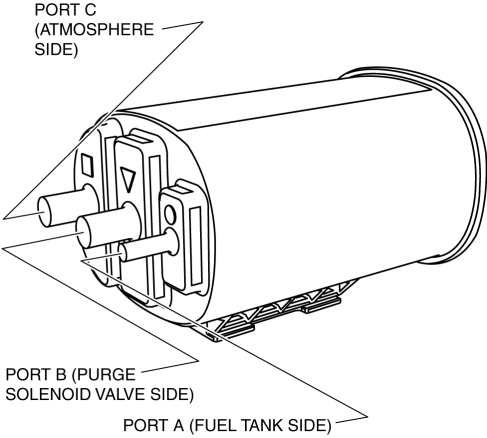
Between port A and port C
-
Plug the port B.

-
Apply a pressure of 1.8 kPa {14 mmHg, 0.53 inHg}
to port A.
-
Verify that there is airflow from port C.
-
If there is no airflow, replace the charcoal canister..
-
Between port B and port C
-
Plug the port A.
-
Apply a pressure of 2.0 kPa {15 mmHg, 0.59 inHg}
to port C.
-
Verify that there is airflow from port B.
-
If there is no airflow, replace the charcoal canister..
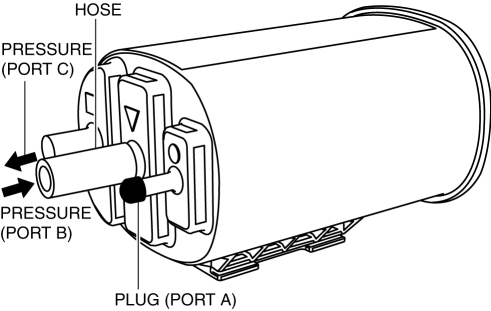
Except U.S.A. And CANADA
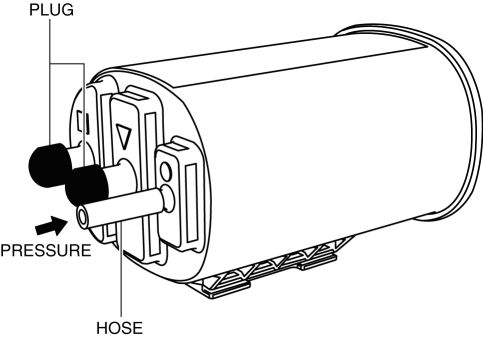
Leakage inspection
1. Perform the following procedures:
-
Assemble the hose used for inspection to port A.
-
Cover ports B and C with the caps.
CAUTION:
-
Do not apply a pressure 20 kPa {150 mmHg, 5.91 inHg} or more to the charcoal canister for 1 min. or more. Doing so will damage the charcoal canister.
2. Apply pressure (19.6 kPa {147 mmHg, 5.79 inHg}
) through the hose, and verify that air does not leak from the charcoal canister.
-
If there is airflow, replace the charcoal canister..
-
If there is no airflow, perform the following “Airflow Inspection”..
Airflow inspection
1. Perform the following procedure to verify the charcoal canister airflow.
-
Between port A and port C
-
Plug the port B.
-
Apply a pressure of 0.98 kPa {7.4 mmHg, 0.29 inHg}
to port A.
-
Verify that there is airflow from port C.
-
If there is no airflow, replace the charcoal canister..
-
Between port B and port C
-
Plug the port A.
-
Apply a pressure of 0.98 kPa {7.4 mmHg, 0.29 inHg}
to port C.
-
Verify that there is airflow from port B.
-
If there is no airflow, replace the charcoal canister..
 Catch Tank
Purpose, Function
Suppresses pulsation occurring before evaporative gas is inducted into the
intake manifold.
Construction
The catch tank is installed in the engine compartment. ...
 Charcoal Canister Removal/Installation
U.S.A. And CANADA
1. Disconnect the negative battery cable..
2. Remove the floor under cover..
3. Remove in the order indicated in the table.
1
Quick release connect ...
Other materials:
Quarter Window Glass Installation
WARNING:
Using a razor with bare hands can cause injury. Always wear gloves when using
a razor.
CAUTION:
If a door is opened or closed when all the window glass is closed, the resulting
change in air pressure could cause the sealant to crack preventing the proper
insta ...
Restraints SST
49 H066 002
Deployment tool
49 B066 004
Adapter harness
49 L066 002
Adapter harness
49 G066 003
Adapter harness
49 N088 0A0
Fuel and Thermometer checker
...
Cruise Control System
Outline
Enables driving at a constant speed by setting the vehicle speed with the
cruise control switch instead of operating the accelerator pedal.
The PCM controls the throttle valve actuator to maintain the vehicle at a
constant speed.
Component and function
...
