Mazda CX-5 Service & Repair Manual: C Pillar Trim Removal/Installation
1. Disconnect the negative battery cable..
2. Remove the following parts:
a. Trunk board.
b. Trunk end trim.
c. Rear scuff plate.
d. Trunk side trim.
e. D-pillar trim.
3. Partially peel back the seaming welt.
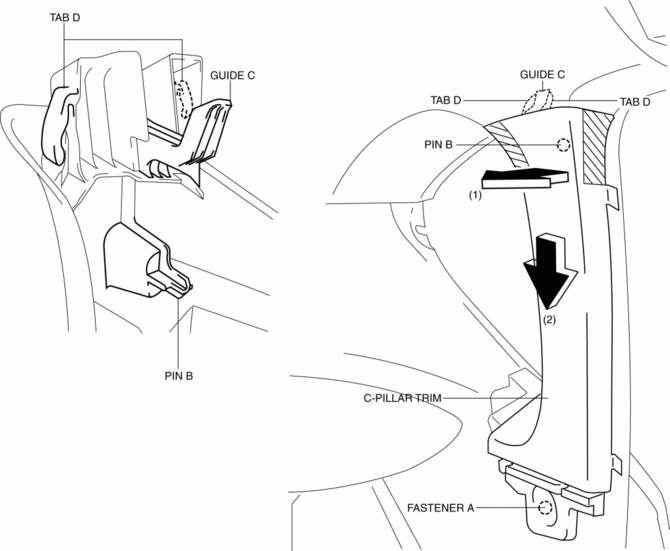
4. Remove the fastener A.

5. Take the shaded area shown in the figure, and pull the C-pillar trim in the direction of the arrow (1) while detaching the pin B.
6. Remove the C-pillar trim in the direction of the arrow (2) shown in the figure while detaching guide C, tabs D.
CAUTION:
-
If the C-pillar trim is pulled in the direction of the arrow (1) forcefully, guide C may be damaged. Carefully pull the C-pillar trim so as not to damage guide C.
7. Install in the reverse order of removal.
 B Pillar Upper Trim Removal/Installation
1. Remove the following parts:
a. Front scuff plate.
b. Rear scuff plate.
c. B-pillar lower trim.
d. Adjuster anchor cover.
e. Upper anchor installation bolts on the front seat belt.
2. Pa ...
 Center Panel Removal/Installation
1. Disconnect the negative battery cable..
2. Remove the decoration panel.
3. Take the shaded area shown in the figure, and pull the center panel in the
direction of the arrow in the order of (1 ...
Other materials:
Audio Amplifier
Purpose, Function
The audio signal (analog voltage waveform) output from the unit equipped
on the vehicle is converted into a digital pulse. The converted digital pulse
signal is amplified and sent to the speakers.
Construction
The audio amplifier is placed in the front sid ...
Cylinder Block
Purpose, Function
The cylinder block forms the cylinder and crankcase.
Construction
The cylinder block consists of the upper cylinder block and lower cylinder
block.
The cylinder block is an open deck type with excellent cooling performance.
The lightweight cyl ...
Upper Panel Removal/Installation
1. Disconnect the negative battery cable..
2. Remove the following parts:
a. Front console box.
b. Shift lever knob (MTX).
c. Shift panel.
3. Open the console lid.
4. Remove the button, then open the fastener.
5. Take the shaded area shown in the figure, and remove the upper panel ...
