Mazda CX-5 Service & Repair Manual: Bumper Bracket Removal [Panel Replacement]
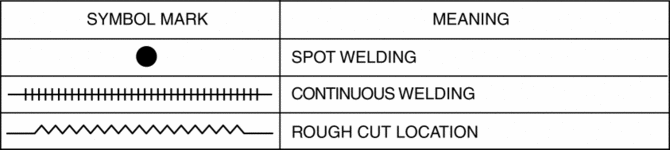
Symbol Mark
Removal Procedure
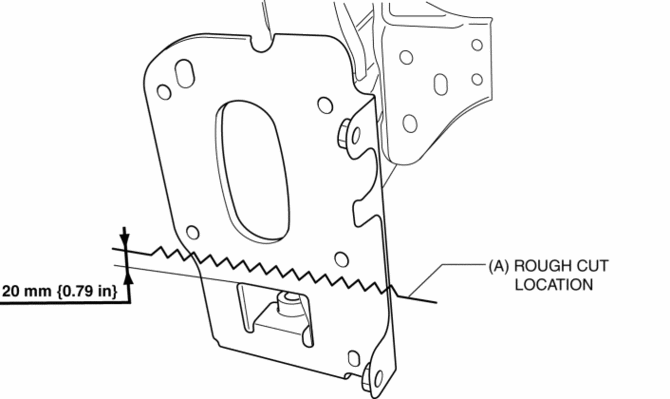
1. Rough cut area locations indicated by (A).
2. Grind the 6 locations indicated by (B) shown in the figure.
CAUTION:
-
When grinding 6 locations indicated by (B) shown in the figure and the front side frame is damaged, there is a possibility that attachment of a bracket may become difficulty. When grinding 6 locations indicated by (B) shown in the figure, the amount removed will affect the quality of the installation.
3. Grind the 2 locations indicated by (C) shown in the figure.
4. Drill the 2 locations indicated by (D) shown in the figure, then remove the half portion above the bumper bracket.
5. Drill the 3 locations indicated by (E) shown in the figure.
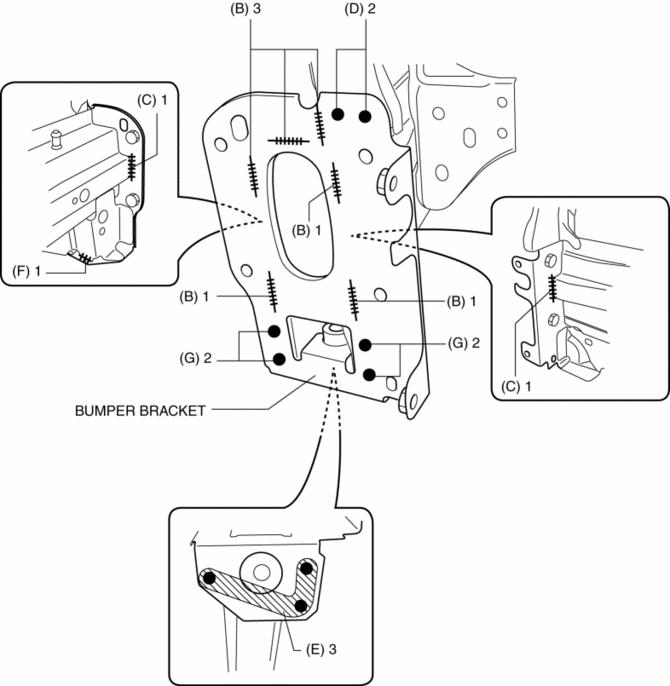
6. Grind the 1 location indicated by (F) shown in the figure.
7. Drill the 4 locations indicated by (G) shown in the figure.
8. Remove the half portion below the bumper bracket.
 Bumper Bracket Installation [Panel Replacement]
Symbol Mark
Installation Procedure
1. When installing new parts, measure and adjust the body as necessary to conform
with standard dimensions.
2. Drill holes for the plug welding 6 locations ...
 Bumper Slider Removal/Installation
Front Bumper Slider
1. Disconnect the negative battery cable..
2. Remove the seal board upper..
3. Remove the front bumper..
4. Remove bolts A.
5. Pull the front bumper slider in the dire ...
Other materials:
D Pillar Speaker Removal/Installation
1. Disconnect the negative battery cable..
2. Remove the following parts:
a. Trunk board.
b. Trunk end trim.
c. Rear scuff plate.
d. Trunk side trim.
e. D-pillar trim.
3. Disconnect the connector.
4. Remove the screws.
5. Remove the D-pillar speaker.
6. While pressing the tab ...
Power Outer Mirror
Outline
The power outer mirror adjusts the outer mirror glass position up/down and
left/right using the up/down adjustment motor and, left/right adjustment motor.
The up/down adjustment motor and, left/right adjustment motor turns clockwise
(down/right direction) or counterclock ...
Valve, Valve Spring, Valve Seal, Valve Guide
Purpose, Function
Valve
The intake valve is pressed down by the cam, the intake air passage is opened,
and air is introduced into the cylinder.
The exhaust valve is pressed down by the cam, the exhaust air passage is
opened, and combustion gas is exhausted from the cylinder.
...
