Mazda CX-5 Service & Repair Manual: Brake Fluid Pressure Sensor Inspection
1. Switch the ignition to off.
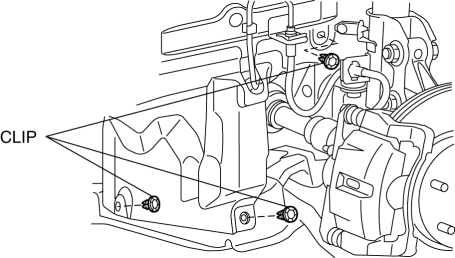
2. Remove the clips.
3. Set the splash shield out of the way.
4. Disconnect the brake pipe from the LF brake hose.

5. Remove the clip.
6. Remove the LF brake hose from the bracket.
7. Detach the brake pipe from the pipe holder.
8. Install the SST
to the brake pipe as shown in the figure.

9. Bleed the brake line and the SSTs
of air. Bleed the air form the SSTs
using bleeder screw A.
10. Connect the M-MDS to the DLC-2.
11. Select the “BRK_F_P_R” PID.
12. Start the engine.
13. Depress the brake pedal, and confirm that the fluid pressure value of the SST
(Gauge) and the value shown on the M-MDS are equal
-
If the fluid pressures are different, replace the DSC HU/CM..
14. After the inspection, remove the SSTs
, install the brake hose, clamp, and brake pipe to the original positions, and then bleed the air from the brake line..
 Brake Fluid Pressure Sensor
Purpose/Function
The brake fluid pressure sensor detects the fluid pressure from the master
cylinder and transmits it to the DSC HU/CM.
Construction
The brake fluid pressure sen ...
 Pressure Sensor Removal/Installation [Two Step Deployment Control System]
WARNING:
Handling the pressure sensor improperly can accidentally operate (deploy)
the air bag module, which may seriously injure you. Read the air bag system
service warnings and cautio ...
Other materials:
Basic System
Outline
Integrated A/C unit adopted.
Sub-cooling system to multi-flow condenser adopted.
Structural View
Ventilation system
Refrigerant system
Flow Diagram
Ventilation system
A/C unit
Inside the vehicle
Display
CENTER ...
Air Filter
Purpose
The air filter removes pollen and dust in the intake air and purifies air
flowing into the cabin.
Function
The air filter removes pollen and dust using a dust collecting filter.
Construction
The air filter is installed to the blower unit.
It ...
Clock Inspection
1. Disconnect the negative battery cable..
2. Remove the following parts:
a. Shift lever knob (MTX).
b. Front console box.
c. Shift panel.
d. Upper panel.
e. Rear console.
f. Side wall.
g. Decoration panel.
h. Front console.
i. Glove compartment.
j. Climate control unit.
3. C ...
