Mazda CX-5 Owners Manual: Battery Runs Out
Jump-Starting
Jump-starting is dangerous if done incorrectly. So follow the procedure carefully. If you feel unsure about jump-starting, we strongly recommend that you have a competent service technician do the work.
WARNING

Follow These Precautions Carefully:
To ensure safe and correct handling of the battery, read the following precautions carefully before using the battery or inspecting it.

Do not allow the positive ( ) terminal
to contact any other metal object that could cause sparks:
Flames and sparks near open battery cells are dangerous. Hydrogen gas, produced
during normal battery operation, could ignite and cause the battery to explode.
An exploding battery can cause serious burns and injuries. When working near a battery,
do not allow metal tools to contact the positive (
 ) or negative (
) terminal of the battery.

Keep all flames, including cigarettes, and sparks away from open battery cells:
Flames and sparks near open battery cells are dangerous. Hydrogen gas, produced during normal battery operation, could ignite and cause the battery to explode. An exploding battery can cause serious burns and injuries.
Do not jump-start a frozen battery or one with a low fluid level:
Jump-starting a frozen battery or one with a low fluid level is dangerous. It may rupture or explode, causing serious injury.
Connect the negative cable to a good ground point away from the battery:
Connecting the end of the second jumper cable to the negative (
) terminal of the discharged battery is dangerous.
A spark could cause the gas around the battery to explode and injure someone.
Route the jumper cables away from parts that will be moving:
Connecting a jumper cable near or to moving parts (cooling fans, belts) is dangerous.
The cable could get caught when the engine starts and cause serious injury.
CAUTION
Use only a 12 V booster system. You can damage a 12 V starter, ignition system, and other electrical parts beyond repair with a 24 V power supply (two 12 V batteries in series or a 24 V motor generator set).
1. Remove the battery cover.
2. Make sure the booster battery is 12 V and that its negative terminal is grounded.
3. If the booster battery is in another vehicle, do not allow both vehicles to touch. Turn off the engine of the vehicle with the booster battery and all unnecessary electrical loads in both vehicles.
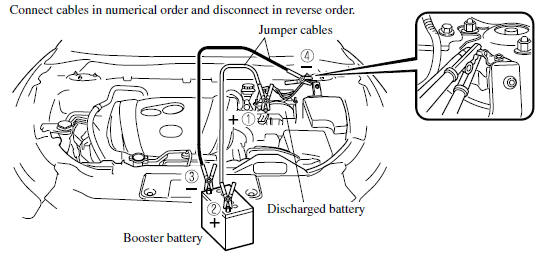
4. Connect the jumper cables in the exact sequence as in the illustration.
• Connect one end of a cable to the positive terminal on the discharged battery (1).
• Attach the other end to the positive terminal on the booster battery (2).
• Connect one end of the other cable to the negative terminal of the booster battery (3).
• Connect the other end to the ground point indicated in the illustration away from the discharged battery (4).
5. Start the engine of the booster vehicle and run it a few minutes. Then start the engine of the other vehicle.
6. When finished, carefully disconnect the cables in the reverse order described in the illustration.
7. If the battery cover has been removed, install it in the reverse order of removal.
NOTE
Verify that the covers are securely installed.
 Changing a Flat Tire
NOTE
If the following occurs while driving, it could indicate a flat tire.
• Steering becomes difficult.
• The vehicle begins to vibrate excessively.
• The vehicle pulls in one direction.
I ...

Other materials:
Cruise Control
Cruise Control
With cruise control, you can set and automatically maintain any speed of more
than about 25 km/h (16 mph).
WARNING
Do not use the cruise control under the following conditions: Using the cruise
control under the following conditions is dangerous and could result in loss of
ve ...
Front Body Control Module (Fbcm)
Outline
Located at the front of the vehicle, the front body control module (FBCM)
performs numerous system controls for functions at the front of the vehicle.
Function
The front body control module (FBCM) controls the system based on the input/output
signals.
The fu ...
Hood Latch Switch Inspection
1. Disconnect the negative battery cable..
2. Remove the front bumper..
3. Disconnect the hood latch switch connector..
4. Verify that the continuity is as indicated in the table.
NOTE:
Inspect the continuity when the hood is open and closed.
If the operation as i ...
